
I belong to an online minis group here in Brazil and they had been working on a group challenge when I joined. This project has an Italian inspiration and it's called 'Mamma Mia'. The members that are participating have been creating beautiful minis, like vegetable baskets, wall shelves, etc. Inspired by their creations I decided to work on a setting of my own. But I wanted to use stuff I've already had for a long time. I have this terrible habit: I get stuff but I never use them, always 'saving for later'. Then I end up making my own minis... This time I asked myself: "Later when, exactly???" Well, I decided that 'later' is now!!! :) so, to adapt the setting to what I already had, my theme is Provence, in Southern France, as this was the image I had and was going to use to decorate the outside of the 'container'...
 |
| a caixa original, como estava cortada e com dobradiças. the original box, as it came (cut in the middle and with metal hinges) |
A caixa eu comprei pronta, mas estava cortada ao meio. Retirei as dobradiças, colei o 'corpo' do livro, descolei a 'tampa/capa', e usei o próprio papel creponado pintado da lombada como dobradiça. Usei um guardanapo para decorar o exterior, com a técnica decoupagem.
I bought the box/book some time ago. It's a mixture of MDF ("binding") and pine wood. But it was cut in half to open. So I removed the hinges, glued the middle, un-glued one of the 'covers' and used the same paper I used to cover the 'spine' of the 'book' as a hinge. I used a decoupage napkin to decorate the exterior.


Eu ia fazer a parede de tijolos com EVA, uma brilhante idéia de Regina Passy. Mas em vez de cortar com tesoura, fui inventar de cortar com estilete... péssima idéia! Não importa o quão firme segure a régua, o EVA escorrega e afunda, e cada tira sai de um tamanho. O resultado final ficou horrível! Então usei um papel impresso mesmo, que obtive no site PaperBrick. Impermeabilizei com verniz spray e, usando verniz fosco à base de água da Corfix, criei uma textura no papel para maior realismo.
I wanted to make the brick walls inside out of EVA 'bricks', a brilliant idea suggested by Regina Passy. But instead of cutting the bricks with scissors, I had the unfortunate idea of using craft knife and ruler, as I wanted to make sure they'd be straight. It didn't work!!! No matter how firmly I held the ruler, EVA slides and moves beneath it and each strip came out a slightly different size, and the result was horrible! I didn't want to make it all over again, so I used a printed paper instead, which I got at PaperBrick. I sprayed some varnish to protect and, using a matte water-based varnish, created some texture for some realism.

O piso foi criado com EVA. Desta vez cortei com tesoura. Fica MUITO bom. Como queria que parecesse piso de cerâmica, passei duas camadas de verniz brilhante importado (Triple Thick), que comprei quando fui a Chicago em 2010 (dura muito!!!)
But I did use the EVA to create the floor. This time I cut the parts with scissors. The result is AWESOME! I wanted it to look like ceramic tile floor, which has some shine to it, so I applied two coats of glossy varnish (Triple Thick) I have ever since I went to Chicago in 2010 (yes, I use it a lot and it's still good!!!)


Fiz a estante com papel cartão. Mudei as pernas da mesa, que eram muito curtas e o acabamento. Fiz a pintura de acabamento igual nos três móveis: base de verde, esfreguei vela, pintei com um branco 'casca de ovo' (Delta Ceramcoat Seashell White) e lixei para dar o efeito "gasto pelo tempo". Na mesa original o tampo era pintado de branco e o resto em madeira envernizada. Fiz a cadeira com palitos (de churrasco e normal) e o assento com fio para crochê bem antigo que tinha. Fiz o livro e coloquei flores na girlanda seca e no vaso de ave(?). Também fiz o avental.
I made the shelf/cabinet with cardstock. I changed the table legs, the original ones were too short, and I also changed the finishing. I made the same finishing on all three pieces: a green coat, rubbed some candle, an 'off white' coat (Delta Ceramcoat Seashell White) and then sanded to give it a 'weatherworn' look). The original table had a white top and the rest of the structure was natural wood, just varnished. I made the chair with kebab sticks and thin dowels, and a very old crochet thread for the seat. I made the book and placed some flowers (dried and dyed ones) on the garland and in the 'poultry' (?) vase. I also made the apron.


Todos os outros acessórios eu já tinha, obtidos ao longo dos anos:
- pratos: MiniMárcia
- tábua de queijos e vinho: Reutter Porcelain
- pão (acrescentei a textura da parte cortada!), faca, cabide: Cia das Artes
- jarro porcelana azul florido: Dollhouse Junction
- queijo com ratinhos: Ivani Grande
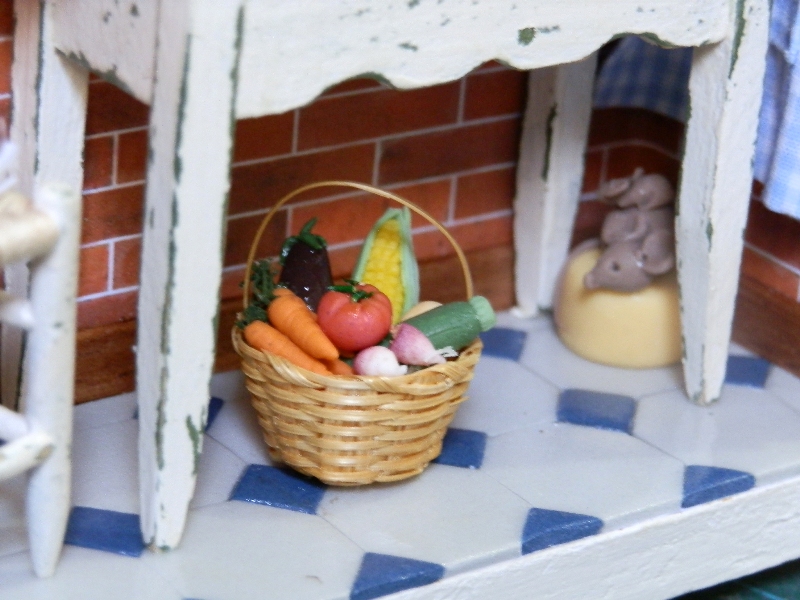
- cesta de verduras: não lembro!
- panela de cobre: Darlene Artesanatos
- todos os outros acessórios: John Constable, Canadá
I already had all the other items, collected over the years:
- dishes: MiniMárcia
- cheese and wine board: Reutter Porcelain
- bread (I added the texture to the cut surface!), knife, hanger: Cia das Artes
- blue porcelain jug: Dollhouse Junction
- cheese with mice: Ivani Grande
- basket with vegetables: I don't remember!
- copper pan: Darlene Artesanatos
- all the other items: purchased from John Constable, Canada
that looks wonderful! I like it very much! especially the colours you chose!! :)
ResponderExcluirThank you Anna!
ExcluirThe colors were based on the illustrations I started with (the ones on the cover). I liked it so much, I've been meaning to use it forever. Though it doesn't look like a 'traditional' book, I like the outcome. :)
Muito lindo, ameeeeeeeeei. Vc tem maos de fada. PArabens!!!
ResponderExcluirAh, obrigada Sheila! Assim vou ficar convencida, rsrs...
ExcluirA beautiful scene nicely put together. The use of the book is a brilliant idea. I love it!
ResponderExcluirHugs, Drora
Thank you Drora!
ExcluirI love the aged look on the furniture.
ResponderExcluirThank you Jocelyn! I thought that the kitchen in the main house of an old Southern French vineyard would not look brand new, so I gave it a try. It's really hard for me not to make 'brand new' mini furniture. When I see one, even though I can appreciate the realism, I have an urge to renovate them, lol!
ExcluirEstá lindo Evelyne, sem contar a aula detalhada, parabéns.
ResponderExcluirObrigada! :) Aprendi muito com meus amigos blogeiros e nos grupos lá fora, sempre muito generosos. Procuro compartilhar sempre, vai que de repente ajudo ou inspiro alguém também, né?
ExcluirWow! You packed a lot of beautiful miniatures into that book and it all works perfectly together. Congratulations, I say you won the challenge!
ResponderExcluirThank you John! Your compliment means a lot to me, I really admire your work and talent as a miniaturist!
ExcluirQue lindo, Evelyne! Quantos detalhes! Parabéns!
ResponderExcluirZilda
Obrigada Zilda! Quero ver as suas criações, heim?
ExcluirThis is fantastic - such wonderful detail!
ResponderExcluirThank you Janine :)
ExcluirBeautiful job!
ResponderExcluirMaureen
Thank you Maureen :)
ExcluirAmazing!! You are incredibly talented!
ResponderExcluirYou're making me blush... :)
ExcluirThank you!!
.....Oi Evelyne
ResponderExcluirUm primôr...super delicado ....adorei todos os detalhes.
um mimo. bjus amiga.
Obrigada Susy!
ExcluirVc sempre marcando presença aqui com seu carinho e amizade, obrigada!!!
Lindo! AMEI seu trabalho! Gosto muito, muito de tudo o que você faz. E dos detalhes que você dá sobre as técnicas...você é precisa e clara. Muito obrigada, minha linda!
ResponderExcluirObrigada Mirian!
ExcluirAprendi tanto com meus amigos miniaturistas brasileiros e do exterior, que curto muito passar adiante meu conhecimento, nem que seja o conhecimento dos meus erros, rsrs...
Adoreiiiiiii!! que otimo que ficou,tudo muito delicado ,otima criação!!
ResponderExcluirParabens EvelYne!!..bjs
Ah, obrigada querida Ivani!!! Seu ratinho está fazendo sucesso!
ExcluirVais fazer muita falta aqui no Brasil, os americanos nem sonha o presente que estão ganhando com sua chegada lá, viu?
wow, i love it!
ResponderExcluir