Mostrando postagens com marcador furniture. Mostrar todas as postagens

sexta-feira, 25 de julho de 2014

Personalizando um - Sofa - Customizing

Mais uma postagem da 'série' customizando minis... :)
This is another one in the 'bashing minis series'... :)

Eu ainda estou arrumando as coisas que trouxe, os pacotes que chegaram enquanto eu viajava, etc. E um sofá estava na pilha... É no estilo vitoriano. Nada contra, mas como gosto mais de reproduzir em miniatura estilos mais atuais, não curto muito esse período, mesmo sendo muito popular em miniaturas. Então resolvi dar uma mexida nele.
Believe it or not, I'm still organizing things I brought with me from the trip, the contents of the parcels that arrived while I was away, etc. And there was a sofa/settee on that pile... It's in the Victorian style. I have nothing against that, but as I'm much more into reproducing in miniature contemporary styles, I'm not really a fan of that style/era, even if it's very popular among dollhouse fans. So I decided to bash it. 


Primeiro tentei trabalhar o baixo-relevo que já veio nele, dando uma sensação maior de esculpido, de tridimensional. Mas não gostei muito do resultado. Para ser sincera, não sei esculpir madeira, rsrs...
First, I tried to work on the original 'bas relief', trying to deepen the 3D feeling, giving it a more sculpted impression. But I did not like the outcome. To be honest, I don't know how to sculpt wood... :)

Então descolei todo o estofamento, cobri os entalhes, cobri de novo com um relevo diferente, pintei, refiz o estofamento com outro tecido e... este foi o resultado! Inclusive aproveitei o veludo do estofamento original e fiz duas almofadas. 
So, I unglued the upholstery, I covered up the grooves, covered again with some relief, painted, reupholstered with another fabric and... this was the result! I even reclaimed some of the velvet used on the original upholstery and made a couple of pillows. 


Ok, embora pareça, não é que eu seja fã do estilo 'shabby chic', mas acho mais atual que o vitoriano, então... acho que ficou muito fofo! :) e você, gostou?
Ok, even though it seems like it right now, I'm not that much into 'shabby chic' style... :) but I do think it's more contemporary than Victorian, then... I think the new settee is very cute!  and you, how do you like it? 

.

quarta-feira, 23 de julho de 2014

Trabalhando... working...

Bem, já faz quase um mês que voltei da viagem... Depois de Castine fiquei alguns dias com amigos no Canadá e depois passei 5 dias em NY. Se vocês quiserem, posso postar algumas fotos aqui e comentar a respeito. Mas meu conselho é: se for a Castine, faça qualquer outra viagem turística antes, nunca depois... É que Castine é tão bom, que qualquer outro local perde em comparação. Sem contar que você vai estar tão cansado(a), que não vai ter o pique necessário para curtir direito os lugares que visitar! E olha que estive em lugares lindos e tive anfitriões maravilhosos!!!
Well, it's been almost a month since I came back from my trip... After Castine, I stayed a few days with friends in Canada, and then I spent 5 days on my own in NY. If you wish so, I can post here some pictures and tell you more about those places. But my advice is: if you go to Castine, make any other touristic trip before, never afterwords... It's just that Castine is so good and intense, that any other place will lose in comparison. Not to mention that you'll probably be so worn out that you won't have the energy needed to enjoy those places as you should! And keep in mind I went to beautiful places and had the best hosts ever!!! 


Ok, sonhar com viagens é bom, mas de volta à realidade! É claro que gostaria de produzir muitos móveis com as técnicas que aprendi em Castine, mas não tenho torno, furadeira de bancada, nem serra de mesa. Isso limita bastante a precisão necessária para fazer os móveis decentemente... 
Ok, dreaming about trips is great, but let's get back to reality! Of course I'd love to make many more pieces of furniture using the techniques I learned in Castine, but I still don't have a lathe, a drill press or a table saw. This kinda limits the accuracy needed to make that kind of furniture properly...


O que não quer dizer que não possa fazer boas miniaturas! :) Aproveitando que minha cama teve boa aceitação lá no leilão, vou investir meu tempo customizando outros móveis em miniatura que já tenho aqui. Quando estive no Canadá, meus anfitriões tinham uma loja de miniatura e estão liquidando seu estoque porque estão aposentados. Então trouxe bastante 'matéria-prima' para trabalhar.
Which doesn't mean I can't make good miniatures! :) As the bed I made for the auction was very well praised there, I'll invest my time bashing some other pieces of furniture in miniature I already have here. When I was in Canada, my hosts used to have a miniature store, but they are retiring and selling out their inventory. So I brought plenty of material to work on here.

A primeira obra foi uma outra cama. Uma das camas que eu trouxe se descolou na viagem, dentro da mala... Então aproveitei e trabalhei nela!
And my first piece of work was another bed. One of the beds I brought home with me suffered a little in the luggage and I would have to glue it back together... So I took the chance to work on it!

A primeira coisa foi descolar tudo, nossa parece que alguém detonou uma bomba de desmontar móveis aqui, rsrs...
The first step was to unglue everything. Wow, it looks like an 'unglue' bomb was detonated here, lol...


Depois, remover a tinta vermelha e verniz brilhante. Não gosto deste tipo de acabamento, e a maioria dos móveis em miniatura que vemos aqui é assim, não é?
After that, I had to remove the red stain and glossy varnish. I don't like this kind of finish, and most miniature furniture we can find here are like that.


toda essa poeira é só dessa peça aí!
all this dust is from sanding only this piece!
Os postes exigiram um pouco de jogo de cintura. Não dava para lixar sem destruir ou deformar as curvas já torneadas... Então primeiro limpei o verniz/tinta com acetona depois passei bom-bril para dar um brilho e terminar de remover resíduos.
The posters demanded some creativity. I couldn't just sand them without destroying or changing the previously turning job... So first I removed the stain/varnish using acetone (nail polish remover), then I used steel wool to buff and remove any remaining residue. 


Aí foi só colar tudo de novo... Já gostei mais dela assim! :)
Then all I had to do is glue everything back together... I already like the bed better! :)


Pintei com efeito pátina, para estilo shabby chic e fiz um novo colchão, mais alto...
Painted with a patina effect for shabby chic style and made a new mattress, thicker than the first...


Dei forma ao babado lateral... já fiz um tutorial sobre isso aqui, lembram?
Started making the draped skirt... I have already made a tutorial on this here, remember?


E eis a cama pronta! 
And here is the finished bed!


Ah, esqueci de dizer: fiz inspirada nessa foto de uma cama em tamanho normal que achei no Pinterest... ficou parecido? E o que você acha, devo fazer umas mesinhas de cabeceira para combinar com ela, como a da foto?
Oh, I forgot to mention: I made this one inspired by this picture of a life size bed I found on Pinterest... can you see the resemblance? What do you think, should I made some matching nightstands, like in the 'original' picture?


.

quarta-feira, 12 de março de 2014

Uma cama especial - A Special Bed

Sei que tenho andado bem quietinha, quase sem postar, mas questões de saúde na família andaram tomando meu tempo o que me manteve meio longe das minis... Mas agora as coisas começaram a voltar ao normal e pude me dedicar a uma criação especial...
I know it's been quite a while since I posted, and that I've been quiet and not done much miniature this year, but some health issues in the family have been demanding my attention... Well, things are finally getting back to normal and I could spend some time creating a special piece...


Esta cama irá em breve para os Estados Unidos, onde será leiloada para levantar fundos para um programa muito importante para quem ama miniaturas. Daqui a alguns meses darei maiores informações a respeito... :)
This bed will soon go to the US, where it will be auctioned in a fundraising event, for a really wonderful program for those of us who love miniatures. I'll give you more details about it in a few months... :)

Era uma cama vendida assim em lojas de miniatura. Bonitinha, mas achei que faltava algo nela...
Originally it was a regular 1/12 bed, sold in miniature stores. Cute already, but I thought something was missing...


Então "despi" a cama, repintei, usando a técnica 'Provençal', onde algumas partes são lixadas dando um ar de "antigo" e "gasto", mas com muito charme. Refiz toda a parte de roupa de cama, e ficou assim:
So I 'stripped' the bed, repainted giving it a 'Shabby Chick' look, where some parts are worn out - which gives it an 'old' and 'weathered' look, but very charming. I gave it new linen and this is the result:


Gostou? :)
How do you like it? :)
.

quarta-feira, 11 de julho de 2012

Escala 1:24 - Half Scale

Uma amiga brasileira lá do Pará, a Sheila (faz noivinhos lindos!), comprou no ML uma dollhouse. Só que ela está na escala 1:24! Se já é difícil achar itens em 1:12 com certa qualidade e preços acessíveis aqui no Brasil, imagine na metade do tamanho!!! E os móveis que vieram com a casa são em MDF e parecem mais quebra-cabeças 3D. Dá para customizar, claro, mas o trabalho que dá...


A friend of mine, Sheila (she makes beautiful custom made top cake brides-grooms), who lives in the North of Brazil (Belem, Para), had bought a dollhouse at a national version of eBay. But it turned out that it was in 1:24th or Half Scale. If it's already really hard to find 1:12th scale miniature items with reasonable quality and affordable prices in Brazil, imagine how hard it is to find them in 1:24!!! Some furniture pieces did come with the dollhouse, but they look more like MDF laser cut 3D puzzles than actual furniture. It IS possible to bash them, but there would be a lot of work involved...


Prometi para ela um jogo de sofá. Vi instruções de Beckie Sanderson para uma poltrona nesta escala na Miniature Collector na edição de Fevereiro 2011. Além de duas poltronas, alterei o projeto e fiz um sofá também. Ela queria fazer os móveis brancos, então usei um tecido branco cuja estampa cai bem nesta escala. Vai dar um trabalhinho maior para manter sempre limpo, mas até que ficou legal, o q vc acha?


I promised to make her the living room sofa set. I saw instructions by Beckie Sanderson to make an upholstered armchair in this scale in February 2011 issue of Miniature Collector. I made 2 of those armchairs, then changed the design and made a sofa too. She wants to make all furniture white, so I chose some nice white fabric. She'll have to dust more often to keep them white, but they actually turned out quite nice, what do you think?


foto sem flash - mais parecido com o que se vê "ao vivo"
no flash picture - more like you'd see them "live"


foto com flash - dá para ver melhor a delicada estampa do tecido
flash picture - you can see better the delicate pattern of the fabric I used

quinta-feira, 14 de junho de 2012

Tutorial de cama - Bed Tutorial

Quando eu fiz o Quarto de Menina, em setembro do ano passado, um seguidor e conhecido de outros grupos perguntou se eu faria um tutorial da cama. Quando fiz a cama de menina, não tirei foto nenhuma do processo. Resolvi fazer outra agora, só para criar o tutorial. Desta vez não usei o Pretty Pleater, para mostrar uma alternativa com materiais que se encontram no Brasil. Mas recomendo MUITO comprar e usar esta ferramenta, é MUITO útil! A inventora (Danne Ruff) vende no site dela, aceita Paypal e despacha para o Brasil.
When I made a Little Girl's Room, in September 2011, a follower and friend from Yahoo groups asked if I was going to publish a tutorial on the bed in it. I hadn't taken any pictures while making the bed, so it was not possible. So, I decided to make another one, just to make the tutorial. I tried to use only materials that can be found in Brazil, so this time I did not use the Pretty Pleater. But I strongly recommend it! The inventor of this wonderful tool, (Danne Ruff) sells them on her website.

Lista de Materiais:
  • Placa de espuma (usada para embalar encomendas) ou de EVA
  • Caixa do tamanho da cama. No caso, usei uma com 15 x 5 x 9 cm
  • Tecido de algodão com padrões à escolha
  • Moldes recortados em cartolina (baixe arquivo pdf aqui)
  • Cartão paraná ou papelão para a cabeceira
  • Fita fina para acabamento
  • Estilete, régua, tesoura afiada, lapiseira
  • Cola (cola pano, cola de silicone ou cola branca secagem rápida são as melhores opções)
  • Spray de cabelo ou spray de gel para cabelo diluído em água (1 parte gel, 3 partes água) - teste antes em um pedaço do tecido para ver se não mancha!
  • Muitos palitos de dente e fita dupla face (não estão na foto)
Material List
  • Foam or EVA sheet - aprox 1/8" thick
  • Box the size of the bed. I used one that measured aprox 6 x 2 x 3 1/2in
  • Cotton fabric of your choice
  • Patterns for headboard cut from bristolboard (download pdf file here)
  • A piece of hard cardboard for the headboard
  • Tiny rickrack or 1/8" ribbon for trimming
  • Craft knife, ruler, sharp scissors, pencil
  • Glue (tacky or fabric glue are best. I used Aileen's)
  • Hair spray or hair gel diluted in water (1 part gel for 3 parts water) - test on piece of fabric first to see if it won't stain it!
  • Lots of toothpicks and double-sided adhesive tape (not in picture)
Material necessário
Materials needed
Instruções:
1) Forre um dos lados da caixa com a espuma/EVA. Deixe sobrar uns 6mm em três lados (menos o da cabeceira). Corte a quina para evitar sobras e cole a sobra nas laterais. Segure com fita crepe até a cola secar.
Instructions:
1) Glue the foam/EVA sheet to one side of the box (the top one). Leave about 1/4" extra on 3 of the sides, but cut flush to the "headboard" side. Glue those to the sides, holding with masking tape until dry.


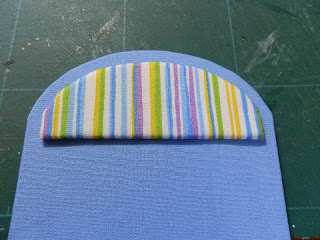
2) Recorte os moldes da cabeceira em cartolina e no cartão paraná, e recorte os tecidos, como indicado na foto, deixando cerca de 1 cm de folga.
2) Cut the headboard patterns on Bristol board paper and cardboard, and cut the fabric as show in pictures, leaving about 1/4" rim.

3) Recorte uma tira que seja cerca de 1 cm mais larga que a lateral da caixa. Esta tira tem que ter um comprimento igual ao dobro da medida de três lados da caixa (o lado onde vai a cabeceira não conta).
3) Cut a strip of fabric that is about 1/4" wider than the side of the box, and 2 times as long as the 3 sides together (except the "headboard" one).

4) Dobre e cole as laterais da tira como ensinado no tutorial da cortina. SEMPRE espalhe a cola delicadamente para não vazar para o outro lado do tecido! Passe bem todos os recortes de tecido antes de continuar.
4) Fold and glue the rim sides of the strip, as I showed for the curtains tutorial. ALWAYS spread the glue before gluing, so as it won't "bleed" to the other side of the fabric! Iron all fabric pieces well before you proceed.

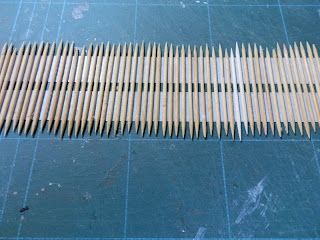
5) Cole duas tiras da fita dupla-face na superfície de trabalho. Cole os palitos como na foto, deixando um pequeno espaço entre eles para o tecido passar (cerca de 1 mm).
5) Glue two strips of double sided tape on the working surface. Glue the toothpicks as shown on picture, leaving some space between them to fit the fabric (about 1/16").

6) Vá encaixando a tira nos palitos, com ajuda de cartões de crédito, como mostrado na foto. Mantenha um cartão segurando o tecido e encaixe com o outro. Segure este, use o outro cartão para encaixar no próximo espaço e assim por diante. A fita dupla-face irá segurar o tecido no lugar.
6) Insert the fabric strip into the spaces, using two credit cards (or similar) to help you. Use one to hold fabric in place while pushing a new part of the fabric into the next "slot". Hold this one down and use the first one to push the next part and so on. The double-sided tape underneath will hold the fabric in place.


7) Aplique o spray de cabelo ou gel. Espere secar completamente. Pode usar secador de cabelo para acelerar. Use no fraco para não deformar a placa de corte nem tirar o tecido do lugar.... Depois de seca, retire com cuidado. Repita o processo até ter marcado a tira inteira.
7) Apply hairspray or the hair-gel/water mixture all over it. Wait until it dries completely. You may use hair drier to speed up, but use the lower speed/heat so as not to warp the cutting mat neither push fabric out of place... After completely dry, remove carefully. Repeat the process until the whole strip is pleated.

8) Enquanto espera secar, cole a espuma no detalhe da cabeceira, e os tecidos nos moldes como na foto. Recorte nas curvas e cole a sobra para dentro.
8) While you wait for it to dry, go ahead and glue foam on the template (Bristol board) for the headboard detail. Glue the fabric pieces onto the templates, as shown on picture.  Cut some "V"s to help folding and glue trim on the other side of the templates.


9) Cole o molde de cartolina forrado sobre o molde de papelão forrado, avesso sobre avesso. Cole a parte de espuma, já forrada, sobre a parte de papelão. Reserve.
9) Glue Bristol board template (already with fabric) on the cardboard one, back to back, as shown on picture. Glue the foam ornament on top of the thicker side of the headboard. Set aside.


10) Recorte o tecido para a colcha, de modo que sobre 2 cm de cada lado da caixa. Cole as laterais primeiro. Depois cole o lado da cabeceira e dos pés da cama. Veja nas fotos.
10) Cut fabric to cover the "bed", with an extra inch on each side as rim. Glue sides first and then "head" and "foot" of the bed, as shown on pictures. 
Cabeceira da cama
"Head" side of the bed
Pé da cama
"Feet" side of the bed
 11) Depois da tira lateral ter secado, comece a colar na lateral da cama. Cole só cerca de 1 cm na cabeceira, para não fazer volume. Cole mais juntinho na curva (veja foto) para ficar mais natural.
11) After the pleated fabric strip is completely dry, start gluing to the sides of the bed. Glue just about 1/4" to the back of the "head" part (so as not to "bulk up"). Gather the pleats together when gluing the corners of the "skirt" to the "bed" for a more natural look (check picture).


12) Cole o acabamento que tiver escolhido, ocultando a emenda dos tecidos.
12) Glue whichever trimming you chose, so as to hide the top of the pleats and make a more natural transition.

13) Cole a cabeceira na cama. Segure bem até a cola secar.
13) Glue the headboard to the bed. Hold in place until dry.
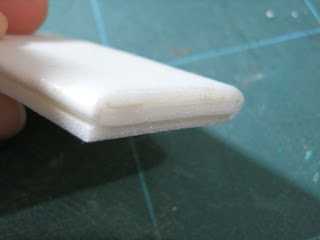
14) Para os travesseiros, recorte uma tira da espuma ou EVA com 3 vezes a altura do travesseiro que quer e 1 vez a largura.
14) To make pillows, cut another strip of the foam or EVA sheet, which should be 3 times as desired pillow  "height" in length and the same "width" of the pillow.

15) Dobre em três como na foto e cole. Coloque um peso por cima até secar.
15) Fold in three and glue, as shown on picture. Put some weight on top to hold in place until dry.

16) Recorte uma tira de cada tecido, cerca de 1 cm mais larga que a altura do travesseiro e 1,5 vez o comprimento. Cole as laterais, e depois cole como na foto, deixando uma abertura para inserir a espuma (o "travesseiro".
16) Cut another strip of each fabric, about 1/4" wider than the desired width of the pillowcase and 1 1/2 longer than it. Glue rim in and then fold and glue as shown in picture, leaving an opening to insert the "pillow".


17) Pronto!!! É só colocar os travesseiros no lugar e sua cama está pronta!
17) It's ready!!! All you have to do now is place the pillows on the bed and enjoy!
A cama pronta!
The finished bed!
A cama "original" :)
The "original" bed :)
Para uma cama de menino, eu teria usado o mesmo sistema da cortina, que ficaria mais natural. Mas quis mostrar como fazer dobras com um sistema alternativo, então aproveitei o tutorial para isso.
To be honest, for a boy bed I'd have pleated the skirt the same way as I worked on the curtains, for a more natural look. But as I wanted to show an alternative way to make pleats, the bed tutorial was a good 'excuse'... :)

Espero que tenha gostado!!! Mande fotos das suas criações, ok?
I hope you enjoyed this tutorial!!! Send me pictures of your creation, ok?

Related

Related Posts Plugin Blogger...