Material necessário:
- tecido com estampa BEM miúda, algodão é melhor
- papel grosso, tipo cartolina
- alfinetes, os mais finos que conseguir! (usei de patchwork)
- folha de caderno
- ferro de passar com vapor
- spray para cabelo (do tipo 'forte') ou gel para cabelo, diluído em água, em um spray manual
- suporte para 'espetar'. O melhor é cortiça, pois resiste ao calor do vapor.
- tesoura para cortar tecido
- tesoura pequena bem afiada
- régua
- lápis
- cola branca
- frasco de cola com aplicador fino na ponta. (Atelier Prince vende, chama "aplicador de guta")
- adesivo dupla-face
- acabamento à escolha (fitas, rendas, etc)
As promised, here goes the first tut related to the little girl's roombox: the curtains!
Material used:
- very small print fabric - cotton is best
- thick paper, like bristol board
- pins, the thinner the better! (I used patchwork ones)
- thick paper, like bristol board
- pins, the thinner the better! (I used patchwork ones)
- a notebook sheet (slated, or with 'lines')
- steam iron
- hair spray, the strong kind - or hair gel diluted in water, use a pump spray
- steam iron
- hair spray, the strong kind - or hair gel diluted in water, use a pump spray
- surface where you can fin and fold. I used a cork board.
- scissors to cut fabric- small sharp scissors
- ruller
- pencil or mechanical pencil
- white glue
- fine tip glue applicator, for tacky glue (Templewood has those).
- double sided adhesive tape
- trim of your choice
Meça a largura e a altura do chão até uns 2 cm acima da janela. Esta será a medida de cada LADO da cortina. Corte 2 vezes, deixando 0,5 cm em cada lado para arremate.
Para cortar:- passe o tecido com o ferro (normal).- marque as medidas com régua e lápis do avesso
Measure the height from floor to about 3/4" above the top of the window, and the window width. That will be the measures for each SIDE of the curtains. Cut twice. Allow 1/8" for rims.To cut:
- iron the fabric (normal iron).
- draw the lines measured using a ruler and the pencil, on the wrong side of the fabric.
- passe um fio de cola sobre as linhas traçadas. Quando secar, corte. Só assim impedirá que desfie! :)
- apply a thin line of glue on top of the lines you draw. When they are dry, then cut. That's how you prevent fabric from fraying. :) - passe mais um fio de cola em cada lateral e dobre para o avesso.
- apply another thin line of tacky glue and fold to the wrong side for rims.
- prenda a folha de caderno na superfície de cortiça. Faça uma linha perpendicular (90 graus) às linhas da folha. Serão seus guias!
- tape the notebook sheet on the cork work surface. Draw a perpendicular (90 degrees) line to the sheet printed lines. Those will be your guides!
- prenda com alfinetes (quanto menos, melhor!) uma lateral da cortina seguindo uma das linhas do caderno. Faça uma prega e prenda de novo. Vá fazendo pregas e prendendo com alfinetes, tomando cuidado de seguir as linhas guias para que fique tudo bem reto! Faça o mesmo com o outro lado da cortina.
- pin down one of the sides of the curtain following a printed line. Fold a little and pin again. The less pins you use, the better (less marks later!). Keep folding and pining but make sure you follow the guide lines to keep the curtain straight! Do the same with the other side.
- use o ferro a vapor para jogar vapor nas pregas.
- apply steam.
- solte metade dos alfinetes, mantendo uma das laterais presas. Empurre gentilmente as pregas como na foto e prenda novamente em alguns pontos.
- carefully remove pins from the lower half of the curtain, but keep them on the outer side. Gently push the drapes towards the outer side like in the picture. Pin down again.
- Agora aplique o spray de cabelo generosamente. Se tiver alguma dúvida, teste antes num pedaço de tecido para ver se mancha. Espere secar.
- Now apply hairspray, don't be shy. If in doubt, try first on a spare piece of fabric to make sure it won't change its color. Let it dry.
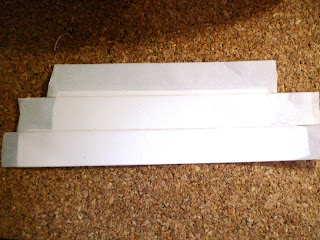
- Corte a sanca no papel grosso (cartolina, por exemplo). Adapte o modelo abaixo às medidas da sua janela.
- Aplique o dupla-face no lado DIREITO da sanca (onde não tem marcas de lápis).
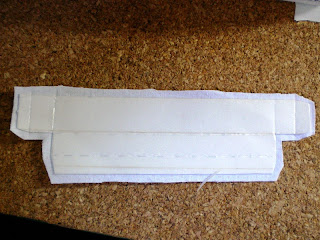
- Remova a proteção de UMA das fitas, ajuste no tecido (pelo lado avesso) para que fique reto. Quando estiver bem posicionado, pressione. Verifique se está correto pelo lado direito. Só então remova as outras tiras e cole o restante do tecido. Corte o tecido deixando uma margem de 0,5 cm.
- também corte a braçadeira 2 vezes. Use cola ou fita adesiva dupla face para colar no tecido.
- Cut the pelmet pattern above on bristol board or similar paper. Adapt the pattern to your window measures.- Apply the double sided tape to the RIGHT side of the template (without the pencil marks). -- Remove the protection of ONE of the tapes and position the pelmet onto the wrong side of the fabric, make sure it's straight. When well positioned remove the other protections and stick the fabric to the template. Cut fabric around, allow 1/8" for rim.
- also cut the tieback twice and glue to fabric, use double sided tape or glue.
- dobre a sanefa e cole as abas. Segure com prendedores até a cola secar.
- fold the pelmet, glue the tabs and hold in place with small clamps till dry.
- cole um arremate na sanefa e na braçadeira.
- cole a braçadeira nas cortinas e as cortinas no lado interno da sanefa.
- use uma fita dupla-face na parte inferior da cortina se achar que ela está abrindo muito.
- glue a trim of your choice on the bottom part of the pelmet and around the tiebacks.
- glue the tiebacks around the curtains and the curtains to the inner side of the pelmet.- use a piece of tape to hold the lower side of the curtains together if you think they're opening too much.
Pronto, sua cortina está pronta!!! Agora é só colar na parede acima da janela e curtir o ambiente!
That's it! Your curtain is finished!!! Now all you have to do is glue it above the window and enjoy the room!


