Mostrando postagens com marcador 1:12. Mostrar todas as postagens

terça-feira, 17 de dezembro de 2013

Varanda com vista - A Balcony with a View

Lembra todas aquelas plantas que eu vinha fazendo? E aquela mesinha em MDF recortada a laser que modifiquei para outro uso? Pois então, o cenário finalmente ficou pronto, êêêêê!! :)
Do you remember those plants I shared? And that cute little lasercut table in MDF, which I was going to use for a different purpose? Well, the display is finally ready, yay!!! :)

Nesta postagem as fotos:
On this post I'll just show the pictures;


Este cenário está disponível na loja: 
This miniature setting is available for purchase on my online store:

quarta-feira, 11 de dezembro de 2013

Novo Cenário está surgindo - New Scene being made

Bem, a "bonança" (ateliê arrumado) passou! O caos criativo voltou, rsrs... papel, ferramentas, colas, caixas abertas... Que gostoso! Como não consigo ficar direto no ateliê por ter que prestar assistência constante à família, meu trabalho é interrompido constantemente. É muito bom poder deixar tudo como está para retomar quando puder! :) O único lado negativo é que demoro mais que deveria para completar qualquer cenário. Principalmente os "detalhes" deste... 
Well, the short "lull" (when my workspace was tidy) shown in the video (last post) is over! The creative chaos is back, lol... paper, tools, glues, open boxes... So much fun! As I cannot work straight hours on miniatures, due to constant attention I have to give to my family, my work there is often interrupted. It's great to be able to leave everything as is and resume later exactly where I stopped! :) The only negative side is that it usually takes me way longer than it should to finish any scene. Especially when I'm working on the "details" like the ones that will go in this one... 

Se você já curtiu minha fanpage no Facebook, tem acompanhado as pequenas "revelações" que tenho feito lá. O cenário ainda não está pronto, mas vou atualizar a situação aqui no blog também. Lembre-se de "curtir" a página para acompanhar os detalhes em primeira mão! 
If you have already liked my fanpage on Facebook, you probably have been following the "spoilers" I've been sharing there. The scene is not completed, but I'll update the situation here on the blog as well. Remember to "like" the page so that you can follow the news as I release them!

Primeiro, achei essa linda mesa em MDF com recortes feitos à laser. Por sorte até é na escala, veja ao lado de uma mesa comercial que importei lá de fora. Mas ela não será usada como mesa... :) Consegue imaginar o que será? Dica: vou usar duas delas!!!
Let me start by showing this cute MDF table I found at a crafts store here, with some laser cut details. By chance, it's in 1/12th scale - just check it next to the HouseWorks table I imported a while ago. But it will not be used as a table... :) Can you imagine what it will become? Tip: I'm using two of them!!!


E agora, já pintada e pronta para instalar? :)
What about now, already painted and ready to be installed? :)


Outros itens que irão no cenário já foram terminados, mas só vou mostrar com o conjunto, ok? 
Other items that will also go in the new scene have already been finished, but those will be shown when it's completed, ok?

Depois foi a vez de começar os "acessórios", os famosos detalhes que dão realismo e riqueza ao conjunto todo. E os "acessórios" deste cenário específico são do tipo que exigem muito tempo, paciência e dedicação!...
Then it was time to start working on the "accessories", the famous details that give a touch of realism and enhance the whole thing. And the "accessories" for this particular scene are that kind that demand a lot of time, effort and patience!...


Desta vez tive a paciência de cronometrar meu tempo no ateliê. Mesmo interrompido, é impressionante o tempo que um único "acessório" em miniatura leva para ser feito!!!
This time I went ahead and tried to time my own work in the studio. Even with the interruptions, it's amazing the amount of time one single item in miniature will take to be made!!!

Parece absurdo, mas levei pouco mais de 1 hora só para cortar cada uma dessas folhinhas. 
I know it sounds crazy, but it took me a little over 1 hour just to cut all these little leaves, one by one.


E 3 turnos de 45 minutos para dar relevo, o que adiciona realismo...
And 3 turns of 45 minutes each to emboss them, which will add to the realism...


Mais de 1 hora para pintar, secar e cortar as pequenas florzinhas, e mais outros 45 para moldá-las no formato certo. São tantas!!! Enquanto isso, secam as bolinhas de biscuit que serão a base (umas 2 horas para secagem completa - o biscuit encolhe ao secar, então é importante dar este tempo!)
Then more than 1 hour to paint, dry and cut the small flowers, and another 45 minutes to shape them. There are so many of them!!! Meanwhile, I let dry the little balls of cold porcelain which will be used as base (about 2 hours for them to be completely dry - cold porcelain shrinks when it dries, so it is important to wait!)


Finalmente, levei cerca de 8 a 10 minutos para montar cada flor, depois mais uns 2 a 4 colocando folhas em cada uma, mais alguns minutos para cada arranjo...
Finally, it took me 8 to 10 minutes to assemble each flower, then another 2 to 4 min placing the leaves in each stem, then some more minutes to make each arrangement...

E todo este trabalho e tempo resultou nisso... que tal? :)
And all that work and hours became this... how do you like it? :)


Esta foi a foto que me inspirou... ficou parecido?
This is a picture of a real one (life size) I got on the internet and which inspired me... do they look alike?


Bem, sobraram algumas, então fiz este vaso...
Well, I had some extra flowers & leaves, so I made this extra pot...


... e este:
... and this vase:


O que você acha? Devo ficar com elas ou vender? :)
What do you think? Should I keep them or sell them? :)

Depois posto mais atualizações aqui, ok? Mas lembre-se de curtir minha fanpage no Facebook para acompanhá-las de imediato!
I'll blog future updates here later. But please remember to "like" my fanpage on Facebook so that you can have more frequent updates!
.

terça-feira, 2 de julho de 2013

Banheiro da loja - A lavatory for the store

Ok, eu sei que disse que não ia postar mais sobre a loja! :) Este é, digamos, um adendo somente.
Ok, I know I said I wouldn't post about the store anymore! :) This is just, let's say, an addendum. 

Quando planejava o interior da loja, há vários meses, pensei em incluir um banheiro. Achei um livro muito interessante que ensina a fazer banheiros antigos usando peças e achados. 
When I was planning the interior of the store, several months ago, I thought about including a small water closet (lavatory). I found a very interesting book that teaches how to make period lavatories using found items. 


Não segui nenhum dos tutoriais do livro, mas usei o princípio aplicado nos banheiros dele. Usei as peças abaixo, uma pia de louça que eu já tinha, madeira balsa e fiz as peças do banheiro.
I didn't copy any of the lavatories in the book, but I did apply the same principles to make my own. I used the parts below, a porcelain sink I already had, balsa wood and made the parts.


Cortei o plástico da embalagem de uma cola para fazer o reservatório de água.
I cut the plastic of a glue blister to make the water tank.
Porém, nos meus testes vi que ia tampar a visibilidade para o interior da loja e ocupar muito espaço... Então desisti de colocar banheiro na loja. 
But, as I tested the layout, I realized an extra room inside for the lavatory would block the view to the interior of the store and take up a lot of space... So I gave up including one in the structure.

Mas não desisti das peças, já prontas. Sabe aquela porta falsa que coloquei na parede do fundo para as fotos? Então, adivinha o que há "atrás" dela? 
But I didn't give up on the pieces I had already made. Remember that fake door I placed on the back wall of the store for the pictures? Guess where it "opens" to?


Isso mesmo! Usei as peças, imprimi um papel para a parede de azulejos e um para o piso, montei a caixa, usei uma moldura de retratos e pronto! Aqui está o banheiro do final do século 19... 
That's right! I used the pieces I had made, printed the tiles for the walls & for the floor, assembled the box on foamboard, used a picture frame on the front and voilá! Here is the turn of the 19th century lavatory...


A vela é miniatura comprada, e o suporte são peças de bijuteria.
The candle is a commercial miniature, the holder/sconce is made of findings.
Bem, duvido muito que alguma loja tivesse um banheiro chique, mas foi divertido fazer. :) Gostou?
Well, I really doubt any 'regular' store back then would have such a fancy lavatory, but it was fun to make. :) How do you like it? 

.

segunda-feira, 22 de abril de 2013

Enquanto isso... Macramê! - Meanwhile... Macrame!

Tenho estado ocupada com a criação e divulgação do novíssimo DHB Club. É um clube de acesso restrito a membros, bilíngue, no estilo Facebook, sem aqueles anúcios chatos. E é grátis! Confira aqui. Então, como estava sem tempo para dedicar a atenção necessária à próxima etapa da minha loja do século 19, fui tentando dar uma organizada no meu 'bagunceliê'. E, nisso, encontrei um kit antigo que consegui já há algum tempo, para fazer um porta-vaso de planta em macramê.
I've been busy setting and divulging DHB Club. It's a member-only-access international bilingual social network website, kind of like Facebook, but without the annoying ads. It's also free! Check it out here. So, while I didn't have time to finish the next step on my 19th century store, I did try to organize my workspace a bit. And while doing it, I came across a DIY kit I got from a store in Canada - it's closing down as their owners are retiring - for a plant hanger in macrame. 
acho que esse kit era da década de 70 ou 80!
I think this kit was from the 70's or 80's!
Não, eu nunca tinha feito nada em macramê antes! :) Mas tinha lembranças gostosas de infância desses suportes de vasos, quando eles eram um pouco mais comuns de ver e também um tanto "chiques". Então, decidi tentar. Bem... leva um tempão para fazer um! :) Nozinho por nozinho, um suporte para plantas pode muito bem levar 2 dias ou mais para ser finalizado... Mas algo estava errado com o meu. Não parecia muito com os que eu lembrava, dê uma olhada:
Nope, I have never tried macrame before! :) But I have some nice memories of those from my childhood, when they were more common and also very fancy. So, I decided to give it a try. Well... it takes time! :) Knot by knot, one plant hanger might take as much as 2 days to be finished... But something was very wrong with mine. It didn't look quite as the ones I remembered, check it out:

Eu até achava que tinha acertado na maioria das 'alças' do suporte, mas ainda assim parecia estranho. Então pesquisei no Youtube por vídeos que ensinassem a fazer macramê na escala normal. Até então eu só tinha a folhinha com o tutorial escrito e algumas imagens para seguir, então podia bem estar fazendo tudo errado.
I even think I got each most of the 'legs' of the hanger right, but it seemed so off. So I went ahead and searched on Youtube for some video tutorials on life size macrame. I only had a written tutorial with some drawings to follow, so I might be doing something wrong. 

De fato, achei dois vídeos excelentes, que recomendo totalmente. Esta senhora, thecraftingcorner, tem vários vídeos curtos onde ensina muito bem como fazer os nós básicos. E este outro vídeo, da macrame school, é um vídeo maravilhoso sobre um suporte para plantas muito lindo.
I did find two excellent videos, which I totally recommend. This lady, thecraftingcorner, has several short videos where she explains really well how to make the basic knots. And this other video, by macrame school, is a wonderful video of a beautiful plant hanger. 

Alerta: se você quiser assistir este último vídeo para aprender a fazer macramê, desligue o som. Ela realmente escolheu uma música linda, mas é tão suave, e assistir ela trabalhar, nó por nó, também é tão relaxante, que se você deixar o som ligado, pode sem querer descobrir a cura para sua insônia, hahaha!
Word of caution: if you watch this last video to learn how to make macrame, turn the sound off. She chose a beautiful soundtrack, but it's so relaxing, and watch her go, knot by knot, is also so soothing, that if you leave the sound on, you might find the cure for your insomnia, lol! 

De qualquer forma, notei que uma característica em comum é que o fio, ou melhor, o cordão usado era sempre um tanto grosso, variando entre 5 mm e 10 mm. E o fio de costura fornecido no kit era fino demais!!! Ele equivaleria a um fio de uns 2 mm no máximo, na escala normal. Por isso ficou tão estranho!...
Anyhow, I noticed that a common feature was that the thread or cord used was kind of thick, varying from 3/16" to 5/16". And the sewing thread provided in the kit was way too thin!!! It would translate into something smaller than a 1/16" in life size. That's why it was so off!...

Bem, com isso resolvi tentar de novo. Usei um fio um pouco grosso demais desta vez, que equivaleria a uma corda na escala normal. Mas eu já vi suportes de plantas em fotos na internet com uns 2 metros de altura e com mais de 50 cm de largura, feitos de corda, então não está tão fora de escala assim. E, o melhor, desta vez o trabalho aparece, eba! :)
Well, I gave it another try. This time I used a much thicker thread, kind of like a rope in miniature. It is a little bit too large, but I've seen plant hangers as tall as 8 feet and 15" wide, made of actual rope. So, it's ok. And the knot work does show this time, yay! :) 
Até que não ficou nada mal, não é? :)
Not too bad, right? :)
Na próxima vez que fizer um, vou usar fio de crochê, aposto que ficaria lindo! :)
Next time I'll use some crochet threads, I bet they'll look great! :)

.
Obrigada! Thank you!
.

domingo, 14 de abril de 2013

Escada em espiral - Spiral iron stairs

Bem, depois de um longo "silêncio" no blog, mas bastante atividade fora dele (repaginando o site DollhouseBrazil, criando o MinisVitrine - já colocou seu blog ou site lá? - criando websites para outros miniaturistas, trabalhando offline...), finalmente consigo um tempinho para colocar o andamento da loja do século XIX em dia!!!
Well, after a long period of "silence" here on the blog, but very active outside it (I revamped the Dollhousebrazil website, I created MinisVitrine: the free-to-post white pages/yellow pages for the miniature community- have you placed your website/blog/club/store, etc there yet? - created websites for other miniaturists and also real life work...), I finally managed some time to update my work on the 19th century store!

Eu queria muito colocar uma escada em espiral, daquelas de ferro batido. Morro de aflição em usar uma na vida real - não sou muito chegada em escadas, trauma de infância, rsrs.... mas acho lindésimas. E são um elemento arquitetônico muito típico da época. 
I really wanted to place a spiral staircase, that Victorian kind made of wrought iron. In real life I'm kinda terrified of those - I'm not a huge fan of stairs, any kind of stairs, since I was a child and fell off one, :) but I do think they are drop-dead gorgeous (pun intended, lol!). And also they are a very typical architectonic feature of that time.


Como eu não sabia se minha tentativa ia dar certo, nem me dei ao trabalho de registrar as etapas cuidadosamente. Aqui vocês terão uma idéia do que fiz em linhas gerais. Mas depois que terminei descobri outros tutoriais na internet, com resultados bem semelhantes ao que consegui, uma inclusive usa praticamente os mesmos materiais que eu usei! Os dois tutoriais são em espanhol e repletos de fotos: El mundo de las manualidades e Pequeñeces.
As I wasn't sure if my attempt to create the spiral staircase would be successful, I didn't register each step of the way very carefully. Here you'll have an idea of what I did. But after I was finished, I discovered other tutorials to make stairs very similar to the one I made, one of them even uses the same materials I used! Both are in Spanish (use google translator if you need assistance), but they are very clear and have plenty of pictures:
El mundo de las manualidades and Pequeñeces.


O material que usei:

  • um tubo de borracha de aprox 3mm de diâmetro (comprei em uma loja especializada em borrachas, mas lojas de material elétrico ou de construção têm produtos semelhantes)
  • um tubo de borracha mais grosso, com cerca de 1 cm de diâmetro para o poste central
  • uma vareta redonda com o mesmo diâmetro do orifício central do tubo de borracha acima. Cerca de uns 4mm. Pode usar palito de churrasco
  • várias varetas mais finas para usar no corrimão. Pode usar hastes de cotonete, palitos de pirulito, etc.
  • um leque xing-ling de "madeira", comprado em loja de 1,99 [sugiro usar um de plástico, em vez deste de "madeira" que usei]
  • biscuit (opcional)
  • super-bonder
  • tinta spray preta
List of materials:
  • a plastic/rubber tube about 3/16" in diameter (I got it from a specialized store, but you can find similar ones at any hardware store, I believe)
  • a thicker plastic/rubber tube, about 3/8" in diameter, used as central axis
  • a wood dowel with the same diameter as the hole inside the thicker tube (about 3/16" in my case)
  • several wood dowels for the rails (about 1/8" or less)
  • a cheap "made in China" "wooden" (?) hand fan. [I suggest using the plastic one instead]
  • cold porcelain or polymer clay (optional)
  • super glue
  • black spray paint
Cortei pedaços do tubo mais grosso, em intervalos de ~1,5 cm: dê o espaçamento que desejar para a altura dos degraus.
I cut the thicker tube at regular intervals. Cut them the same the distance you want to have between each step and the next. In my case, ~9/16".


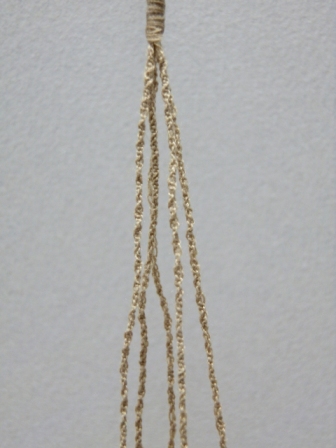
Corte cada haste do leque no comprimento dos degraus. Algo entre 6 e 7 cm. Fiz um furo em um dos cantos do lado mais largo para passar o palito mais fino. Esta parte é mais difícil. Por isso é que aconselho usar um leque de plástico. É o mesmo preço e deve ser mais fácil de trabalhar... Este é difícil de cortar e furar onde a gente quer, e quebra MUITO fácil onde a gente não quer... Dá para ver as manchas de super-bonder onde tive que consertar. Joguei vários fora!!!
Cut each "blade" of the fan in the length you want for the step. Something between 2 1/4" and 2 5/8". I drilled one corner of the larger part of each blade to let the thinner dowel go through. Working with the blades is a very tricky thing... It's hard to cut or drill them where you want to, but it breaks REALLY easily where you don't want it to... You can see the stains caused by super glue where I had to fix some of those "accidents". I had to throw many of them away because of that!!


Corte os palitos somando o espaço entre os degraus mais a altura que deseja que o corrimão tenha. Meça a altura de um corrimão real e divida por 12 para ter uma idéia aproximada. Os meus palitos têm cerca de 10 cm de comprimento. Usei uma haste que fiz de biscuit, somente no primeiro, para dar um efeito diferente. Pode usar todos de madeira se preferir.
To cut the dowels for the rails, consider the height you want them to have and add the distance between each step. You can measure a real-life-size stair rails (and then divide by 12) to have a better idea of what is a good size. In my case, they are about 4 inches. The first one was made of cold porcelain, just to add a different charm to it.


Segure a vareta mais grossa em algum lugar que fique firme. Coloque o primeiro "espaçador" que cortou do tubo de borracha mais grosso. Cole um "degrau" que fez com o leque. Insira outro espaçador, e, em seguida, cole o próximo degrau, um pouco mais para trás. Insira um palito no furo para colocar no lugar certo. Se quiser, já pode colar o palito no degrau de baixo para que já fique no lugar. Use super-bonder. Prossiga até chegar no último degrau. Faça furos a intervalos regulares na parte de baixo da tira do corrimão e cole por cima dos palitos, encaixando-os. Pinte com spray preto e pronto!
Place the thicker dowel somewhere it'll be held firmly. Place the first "spacer" you cut from the rubber/plastic tube. Glue one "step" you made from the fan blades. Insert another spacer and another step. Turn it a little on the central axis. If you insert the thinner dowel on that hole on the corner you had already drilled, and glue it to the corner of the first step, you can have a better control of that positioning. Use super-glue. Go on until you reach the last step. Make some holes on one side of the other rubber/plastic tube and glue on top of the rails/dowels. Paint with black spray paint and you're ready to go!


Eu já tinha feito um furo no piso no lugar em que vou encaixar a escada, então será só encaixar/colar lá. Outros tutoriais ensinam a fazer uma base, o que acho uma opção bem inteligente. 
As I had previously drilled a hole on the floor to place the stairs, all I'll have to do is glue it there when the time comes. The other tutorials I mentioned teach to make a base, which I think is a very clever option.

.
Obrigada! Thank you!
.

segunda-feira, 12 de novembro de 2012

Casa Toscana - Tuscany House

Há poucos grupos de miniatura no Brasil. Tenho a sorte de pertencer aos dois mais ativos.... :) Um deles, o MiniClube, se reúne uma vez por ano em São Paulo, para um fim-de-semana de aulas e montam um cenário. Não pude ir este ano (19 e 20 de outubro), mas comprei o kit, que vem com as instruções. Recebi o kit em 30/10. O pessoal que foi ao encontro teve só um fim-de semana para montar, e completar depois. Eu tive o benefício de ter todo o tempo do mundo e me inspirar pelos cenários já prontos, rsrs... Você verá no final da postagem o protótipo, criado por Regina Passy e com colaboração de Rose Favero, Lelis Filho e Célia Nepomuceno
There are very few miniature groups in Brazil. I'm lucky to be in two of the most active ones... :) One of them, MiniClube, gathers once a year in Sao Paulo for a weekend full of classes where they usually make a mini setting. I couldn't join them this year (Oct 19th & 20th), but I surely bought the kit, which also comes with instructions. It's not the same as being there, but I feel I participated somehow... Besides, the participants are supposed to finish the setting during the weekend or shortly afterwords. I received my kit on Oct/30th and I had the benefit of taking my time and getting inspired by the finished ones... :) In the end you'll see pictures of the prototype, designed by Regina Passy with colaboration of Rose Favero, Lelis Filho and Célia Nepomuceno.

Deixei a loja um pouco de lado para montar o kit. Já tinha feito uma extensa pesquisa de imagens da Toscana na internet e sabia bem como queria fazer alguns detalhes. Bem, foi assim que ficou:
I stopped working on my store for a while to give myself fully to the kit. I had previously made a throughout Tuscany images research on the internet and had a very clear idea on how I wanted it to look like. Well, this is what it turned out: 


Fiz também um pequeno vídeo caseiro do cenário. Desculpe o fundo feio, mas era o único lugar no quintal com boa iluminação hoje...
I also made a short homemade video of the setting. I apologize for the ugly background, but it was the only spot in the backyard today with good light...


Não posso mostrar como foi que fiz, porque a maioria das técnicas que usei fazem parte do kit/aulas, e não são de minha autoria.  Mas fique à vontade para perguntar. Se não for algo que veio com o projeto, ficarei feliz em explicar como fiz.
I'm not at liberty to show you guys how I made things, as most of the techniques I used are part of the kit/classes and I don't want to infringe copyright, I'm sure you'll understand. If you got curious, just ask me. If it was not something I learned from the group, I'll be glad to share.

O que NÃO fui eu quem fez nem estava incluido no kit está listado aqui:
regador com margaridas - Minifiore
regador e panelas de cobre - Darlene
pratos na parede - MiniMarcia
alho e tábua de queijos - Ivani Grande
garrafa de vinho e pode de azeitonas (mudei os rótulos) - Florbrás
torneiras e fechadura da porta - Cia das Artes
What I DIDN'T make myself neither was included in the kit is listed here:
water can with daisies - Minifiore
cupper water can and pans - Darlene
dishes on the wall - MiniMarcia
garlic and cheese plate - Ivani Grande
'glass' wine bottle & olives jar (I changed the labels) - Florbrás
tap/faucets on sink; door knob - Cia das Artes


Aqui seguem fotos do protótipo e links para blogs de quem já terminou seu cenário e postou na rede. (Se você fez um cenário e quer que eu inclua seu blog - será um prazer! :) - por favor, forneça o link nos comentários).
And now you can see pictures of the prototype and links to the blogs of those who have also made this kit and have published the pictures:


Links para outros kits completados:
Links to other finished kits:


Link para o blog do grupo, com fotos do encontro e dos cenários (mesmo de quem não tem blog):
Link to the online miniature group official blog, with pictures of the event and several finished settings from other members (even those who don't have a blog):


Obrigada! Thank you!
.

Related

Related Posts Plugin Blogger...