quarta-feira, 8 de maio de 2013

Um pouco de luz - A little light

Minha loja do final do século 19 terá luz elétrica! Se havia luz elétrica nas lojas de verdade naquela época, é outra história... :) Eu fiz minha pesquisa, e a eletricidade chegou bem aos poucos nas construções residenciais e comerciais no Brasil. Nosso amado imperador D. Pedro II, abraçou logo a novíssima tecnologia, mas pouco depois ele foi deposto pela elite de fazendeiros e militares, então esta parte do progresso ficou 'emperrada'. Somente na década de 1920 é que a eletricidade foi gradualmente implantada nas residências. Então, de 1847 a 1862, a iluminação das ruas era à base de óleo. Daí foi trocada aos poucos por gás. E somente em 1905 é que aos poucos foi trocada de novo por lâmpadas elétricas.
My end of the 19th Century store will have lights! Whether there was electricity in RL stores back then, that's a whole other story... :) I did my research, and electricity arrived very slowly to homes & commercial buildings in Brazil. Our former emperor, the very beloved D. Pedro II, was quick to embrace the new technology, but soon after that he was deposed by the farmers elite + military, so that part of the progress was halted. Only in the 1920's electricity became gradually more common in homes. So, from 1847 to 1862 street lamps used oil. Then it was switched to gas. Only in 1905 the street lights began to be changed to electricity. 

Acho sensato presumir, portanto, que dentro das lojas na década de 1890 usavam velas, iluminação a base de óleo ou então, em estabelecimentos chiques, gás. Pesquisei os candelabros mais usados na época e tive sorte em achar dois modelos funcionais em miniatura que se pareciam com os modelos que mais vi nas minhas pesquisas: um para o lado  de fora e outro para o interior da loja. Comprei-os por valores bem razoáveis no ebay. Eba!!!
My assumption, then, was that inside stores they either used candles, oil or gas by the 1890's. I researched for the chandelier models back then and I was lucky enough to find two miniature models which looked like the ones I saw more often in my research: one to use outside the store, and the other one, inside. I bought them for a very reasonable price on ebay, so... happy, happy, happy! :)


O único problema era a cor do metal usado!
The only problem was with the metal color!

Para os lampiões que iam do lado de fora, queria que tivessem um aspecto de ferro batido (mais baratos e mais comuns na época)... Então desmontei as lâmpadas, passei um spray de verniz preto fosco e remontei depois de secos.
Outside, I wanted them to look more like wrought iron (less expensive & more commonly used)... So I dismantled the fixtures, removed the little lamps and sprayed them with matte black varnish. 

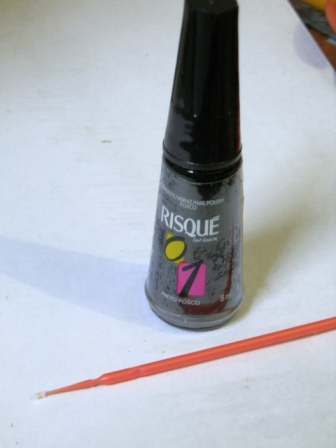
Para os candelabros do interior da loja, eu queria um aspecto de latão ou cobre (novamente, menos caros que o metal dourado e mais comuns - apesar de mais 'chiques' que o ferro batido)... Então, novamente, desmontei as luminárias, removendo cuidadosamente as lâmpadas e as partes de plástico, e pintei com verniz vitral fumê. Como não é à base de água, usei um micro-pincel descartável (desses que os dentistas usam), pois detesto usar solvente para limpar meus pincéis - acho que acabam estragando os pincéis! (sem contar com o cheiro horrível e tóxico...)
Inside, I wanted them to look more like brass or copper (again, less expensive than any golden metal & more commonly used - though fancier than iron)... So I once more dismantled the fixtures, removed the little lamps and the plastic tulips and painted them carefully with sepia varnish meant to be used on glass. It's not water based, so I used a disposable micro brush (those used by dentists), as I hate using spirits to clean my brushes - I think it ends up ruining them!! (not to mention the toxic fumes...)


Bem, gostei do resultado! :)
I like the result!!! :)

O problema agora é que eu deveria ter preparado os canais para acomodar os fios antes de ter colado o roda-teto - que tonta!!! Bem, tarde demais para me lamentar. Então eu fiz um furo no roda-teto, bem rente à parede.
The problem now was that I should have prepared the grooves for the wires before I glued the ceiling moulding - silly me!!! Well, too late to be sorry. I then drilled a hole through it, very close to the wall. 

No processo, fiz um pequeno estrago em uma parte da parede acima do roda-teto. Mas consegui consertar com um preenchimento e pintura.
In the process, I did some damage above the moulding, which I managed to fix later with plaster filling & paint.

Hora então de instalar as lâmpadas externas. Passando os fios pelo buraco...
So, time to install the outside fixture. Wires in...

E subindo pelos canais! Para passar pelo buraquinho do roda-teto, usei um artifício usado por eletricistas da escala normal: um arame fino com um ganchinho na ponta, amarrei os fios e puxei. 
And up! To help the wires go through the tiny hole in the mouldings, I used a trick I saw a real-life electrician do: I used a thin wire with a little hook on the tip. I attached the wires from the lamps there and pulled the wire. Voilá!

Colei no lugar e cobri com preenchimento. Depois de seco, um pouco de lixa e tinta. O 'remendo' quase nem aparece...
I then glued them to place and covered the grooves with plaster. After dry, sanded and painted. One almost doesn't see the work done there... 

E é assim que as lâmpadas externas ficaram. Fique ligado para ver as luzes inernas e para vê-las em funcionamento! :)
This is how the outside lamps look like.  Stay tuned for the lights inside & to see them lit! :)

Obrigada! Thank you!
.

sábado, 4 de maio de 2013

Um nome... - And a name...

Lojas chiques no Brasil, no séc 19 e nas primeiras décadas do século 20 tinham que ter um nome francês. Paris era então o centro cultural do mundo e, para a maioria da elite aqui, centro do bom-gosto... :) Tudo relacionado à moda vinha de lá. Mesmo que um ano depois... :) E as mulheres adoravam comprar as revistas e encartes de moda franceses e levavam para sua modista preferida para fazer os modelos desenhados nas revistas. O que era um tanto irônico, pois estes modelos eram complicados e impraticáveis de usar, e, por isso, só eram vistos na Europa nas revistas, jamais com pessoas reais usando, rsrs...
Fancy stores in Brazil, by the end of the 19th century and the first decades of the 20th usually had French names. Paris was the center of culture, and, to most people here, good taste... :) Fashion came from there. Even if one year late... :) And women loved to buy the fashion magazines from France and would take them to their favorite seamstress to copy and wear those dresses. Which was funny in a way, as most designs were never worn by women in Europe, where they would only be seen in the pages of the magazines, lol!

De qualquer forma, minha loja, sendo de tecidos, cuja clientela seria na maioria feminina, tinha que ter um nome francês. :) Quando comecei em 2008 era parte de um projeto de um grupo, lembra? O tema eram os imigrantes e sua influência no Brasil. Eu escolhi os franceses porque meu pai é francês. E escolhi tecidos porque achei que seria mais fácil... (tolinha, né? rsrs)
Anyhow, my store, a fabrics store, whose clients were mostly women, had to have a French name. :) When I started it, it was part of a group project, remember? It was about immigrants in Brazil and their influence in our culture. I chose French because my father is French. And fabrics because I thought it would be easier... (silly me, lol!)

Analisando fotos de lojas reais da virada do século, notei quatro tipos básicos de letreiro de loja, quando havia algum (muitas lojas sequer colocavam placa!):
Studying pictures of actual stores by the turn of the last century, I noticed four basic kinds of store signs, if any (most stores wouldn't even place a sign!):

Nome pintado na parede: nem pensar! Minhas habilidades artísticas não chegam a tanto...
Painted on: nope! I'm not that artistic...

Placas, colocadas retas, com moldura: poderia ser, mas não sei se gosto da idéia de fazer moldura na placa tanto assim...
Hard boards, placed flat, framed: that could work, but I'm not so sure about the frame part, I don't like it too much....

Placa, colocadas em ângulo, com ou sem moldura: mesmo suspeitando que colocassem inclinadas para baixo para que as pessoas na rua conseguissem ler a placa, para mim dá a impressão de mal-colocada... Além disso, as pessoas no tamanho normal não vão ler a placa de baixo para cima, pelo contrário! E então o efeito seria oposto e até feio em miniatura...
Hard boards, placed at an angle, framed or not: even though I suspect they placed them like that so that people on the streets could read them better, I can't help but feel they don't look too neat, as if carelessly placed... Also, we, real life size people won't be looking at it from such a low angle, quite the opposite! Then, it won't be as charming or effective in miniature...

Uma placa ligeiramente convexa (curva). As placas provavelmente em metal pintado, e a curvatura adiciona uma certa elegância e, novamente, tornam mais fácil para as pessoas no nível do chão ler o letreiro, imagino eu. E, nesse caso, também funciona assim para as pessoas 12x maiores olhando de um ângulo bem acima (nós!)... :)
A slightly curved board. The sign was probably painted on metal, and the curve adds a little elegance and, again, makes it more easily read by people on the streets, I figure. And by people 12 times bigger looking from a much higher level (us!)... :)


Feito, este é meu estilo favorito, e também o mais fácil de reproduzir em miniatura, é claro! :) Tudo que tive que fazer foi desenhar a placa no meu computador, imprimir em papel couché e aplicar verniz protetor em spray semi-brilho. Imprimi 2 mm mais largo que o espaço disponível na fachada, para criar a curvatura, e ao cortar deixei 6 mm a mais nas laterais (acima e abaixo), dobrando para trás. Colei primeiro embaixo (como na foto) e depois em cima. Pronto! :)
So, this is my favorite, and the easiest to reproduce in miniature, of course! :) All I had to do was design the sign on my computer, print on couché paper, and spray varnish to protect. I printed them 1/16" larger than the space I had reserved for it, and left a margin of 1/4" of paper on each side (top & bottom) when I cut. Folded those backwards. Glued the bottom and then the top. That was all I had to do! :)

Escolhi este nome que era o nome de uma loja verdadeira daquela época na Rua do Ouvidor, no Rio de Janeiro. Muito chique e famosa então. Tomei o nome emprestado e fiz assim uma homenagem a um ícone da época, já quase esquecido...  
This was actually the name of a very "chic" and famous department store in Rio in the beginning of the 20th century. I just borrowed it... :) 

Obrigada! Thank you!
.

segunda-feira, 29 de abril de 2013

Portas!... - Doors!...

Por acaso já mencionei que quando eu comecei esta loja, em 2008, eu tinha muito pouca experiência em fazer miniaturas? Do zero, quero dizer, não de kits... Eu até tinha feito pesquisa visual da época, mas ainda não tinha incorporado a escala em mim. Então, tudo com que me preocupei na época foi em não ter uma estrutura grande demais que eu não teria onde colocar.
Have I mentioned before that when I started this store, in 2008, I had very little experience in miniature making? From scratch, I mean... I did do some research, but I still had not incorporated the scale in me. So, all I cared about back then was that I didn't want to end up with a structure too big

Puxa vida, como eu estava errada, e sob tantos aspectos!!! :) Agora eu teria optado por uma estrutura de dois andares, como já disse antes. Mas também notei algo errado com as portas...
Oh, how wrong I was, in so many levels!!! :) Now I would have opted for a two story structure, I've already said that, I know. But now I also knoticed something wrong with the doors... 

É assim que as portas de lojas da época eram. Duas vezes mais altas que uma pessoa normal, como pode ver pelas fotos...
This is what doors from back then should look like. Twice as tall as the average person, as you can see from the pictures...

Na verdade o Angelo (professor de maquetes e miniaturas), que estava me orientando e ajudando na época, bem que queria fazer as portas consideravelmente mais altas, mas eu não quis. Eu achei que ficariam grandes demais. Mesmo assim, pensava em fazer como as da foto, com uma pequena 'janela' semicircular no alto. Nanina! Agora que já estou bem mais familiarizada com a escala, só de olhar já sabia que havia algo estranho para estes planos... Então, peguei "emprestado" uma porta pronta que tinha comprado e... encaixou na altura da abertura das portas! Daí que, se eu insistisse em fazer a tal "janelinha semicircular" no alto, conforme planejado, uma "pessoa" normal, em miniatura, não passaria pela porta de jeito nenhum! Ou eu teria que mudar o projeto todo para 1:24 ou mudar as portas. Escolhi a segunda opção...
Well, Angelo, who was helping me back then, did want to make the doors much higher (taller?), but I didn't agree. I thought they'd be too big. But yet, I wanted to make them like the ones I saw in the pictures, with a little semi-circular window on the top, like a Palladian door. Nope! Now that I have a better feel on scale, I sensed something was off... So, I "borrowed" a ready-made door from HBS I have and... it fit! So, if I insisted on making it as planned, it would end up being too small for a 'regular' person to go trough. I'd either have to switch the whole project to half scale or change the door plans. I chose the second option... 


Bem, então vamos lá!
So, off we go!

O primeiro passo foi medir as aberturas para as portas na estrutura. A partir disso, desenhei os moldes em papel. Usei um cortador/compasso para manter o topo circular. Depois usei os moldes para cortar as portas 3 vezes em papelão paraná, 6 vezes em papel duplex (o mesmo das caixas de cereal matinal) e 6 vezes em papel canson (alta gramatura, vendido em blocos nas melhores papelarias - é branco e tem uma textura interessante).
First step was to measure the openings in the structure. From that, I drew patterns on paper. I used a special  cutter/dividers to keep the top circular. Then I used the patterns to cut the doors 3 times on hard cardboard (same as the one used to make shoe boxes), 6 times on a thinner cardboard (the same as the one used to make cereal boxes) and 6 times on canson paper (used by art students - it's thicker than regular paper and it has an interesting texture too).


Daí cortei os panéis internos da porta, na camada intermediária - que corresponde ao papel duplex. Mantenha um bom controle de qual painel pertence a qual 'porta', ou terá problemas depois para encaixar! E ficará feio, pois diferenças pequenas na hora de cortar vão fazer uma grande diferença no final.
Then I cut out the inner panels of the intermediate layer (the one that would correspond to the "cereal box" cardboard). Make sure you don't mix up the panels, as very slight differences might make a huge difference in the end. 


Lixei as bordas de cada painelzinho para arredondar as arestas. Então usei a mesma 'porta' de onde os paineizinhos foram recortados como guia para colá-los no papelão paraná. Isto ajuda a posicionar cada um corretamente!
I sanded the removed panels, to make the edges more 'round'. Then I used the very same cardboard parts from where the panels were removed as a guide to glue the panels on the hard-cardboard doors. This helped  me keep them in the right position, all the time. 


Removi o trecho que faltava e colei cada painel de cada lado de uma das portas em papelão paraná.
I removed the remaining central parts, sanded the edges again and glued the outside part on each side of the forming doors. 

Repeti o processo usando os moldes de novo, desta vez no papel canson.
I repeated the process using the patterns on the 'canson' paper too. 

E aqui estão as portas, com todos os painéis cortados e colados no lugar!
And here you have the doors, all cut and glued in place!

E aqui, já pintadas - parecem mais com portas, não é? :) E só então é que eu cortei ao meio, fazendo as duas metades de cada porta.
Now painted too - it does start to look more like doors, right? :) And only then I cut them in the middle, making two half doors.

Hora de instalar as dobradiças. Importadas, aqui no Brasil não achei pequeninas assim. Recortei uma reentrância para encaixar a dobradiça para que ficasse nivelada com a lateral da porta. Colei com super-bonder. E depois usei alicates para inserir cada minúsculo preguinho (são 3 para cada lado da dobradiça!), passando um pouquinho de super-bonder na ponta para segurar melhor. Se não fizer isso, sai fácil!!
Time to apply the hinges. I cut a little bit to fit them into the sides of the doors. Then used super-glue to hold the hinge in place. And used pliers to insert the tiny little nails in the right places. I put a drop of super-glue on a piece of paper and smear the nail in them, before I insert them, just to help them hold better and longer. Those things are fragile!!!


Agora é a vez do batente. Medi o comprimento total da abertura e cortei longas tiras em papel duplex. 6 mm para o batente e 2 mm para a parte mais 'alta' que segura a porta. O importante é que a 'fatia' onde será instalada a dobradiça deve ter a mesma 'largura' (profundidade?) da porta, ou ela não fechará bem!
Time to make the door jamb and stop. I measured the length of each opening and cut long strips from the "cereal box" cardboard. About 1/4" for the door jamb and 3/32" for the stop. What is important is that the space where you'll place the hinge is the same width (depth?) of the door, or they won't close well!!

Colei e pintei as tiras...
Glued and painted the strips...

E puxei entre os dedos para dar um formato curvo no meio, que ficaria na parte superior da porta.
And pulled them between my fingers to 'coax' them into a curve on where they'd be on the top of the opening (middle of the strips).

Formam-se alguns 'calombinhos' no processo de curvar papel, sempre. A melhor forma de se livrar deles é pressionar para dentro. Usei a parte de trás da base de uma lixa de unha de metal. É feita para empurrar cutícula, mas a parte de trás é curva e firme o bastante para isso, perfeita!
Little 'bumps' always form when you curve paper. The best way to get rid of them was to press them back into place. I used the back of a metal nail file. Usually it's meant to push back cuticles on our nails, but the back is round, and it's perfect for that!

Entalhe as reentrâncias para as dobradiças nos batentes também e instale-as do mesmo modo como nas portas. Esta parte é a que menos gosto de fazer! Parece fácil olhando as fotos, mas é um processo lento e 'doloroso'. Virava a estrutura toda de um lado para o outro, usei objetos para manter a porta no lugar ao instalar as dobradiças, etc. E esses malditos preguinhos minúsculos insistiam em voar para longe, alguns nunca mais foram vistos... Palavrões foram ditos... Se alguém souber um jeito mais fácil de instalar essas mini dobradiças, pode compartilhar! :)
Cut a little bit where you'll place the hinges and place them as you did on the sides of the doors. This was my least favorite part so far! I know it seems easy-peasy from the pictures, but it's a slow and painful process. I turned the structure on the sides, used objects to hold each side of the doors in place while positioning and 'nailing' the hinges, etc. Those damn tiny nails flew away, some got lost and were never seen again... Names were called... If anyone knows of a better, faster and easier way to install hinges in miniature, please, do share! :)

Bem, depois de uma longa batalha com minúsculos preguinhos e dobradiças teimosas, partes da pintura que havia aplicado com spray nas dobradiças douradas (preto parece mais com ferro que dourado brilhante) saíram, é claro! Não podia aplicar spray de novo pois ia fazer muita bagunça. Para minha sorte, achei um esmalte de unha não só preto, mas também fosco! Eba! Usei um micro-pincel - do tipo usado pelos dentistas - para não ter que sacrificar um pincel ultra-fino nessa operação - e retoquei aqui e ali. Parece bom... :)
Well, after the long battle, some of the paint I had sprayed on the golden hinges to turn them black (like wrought iron) was, of course, gone!. I could not spray them again without risking making a big mess. Lucky me, I found a nail polish that is not only black, but matte! Yay! I used a micro brush - the kind dentists use all the time - so I wouldn't have to sacrifice a good 00 paintbrush on this - and re-touched here and there. Looks good enough... :)


Eu já tinha algumas fechaduras que havia comprado da Cia das Artes anos atrás (modelo MEF-10678), especialmente para este projeto, e colei no lugar somente depois que as portas já estavam instaladas, para mantê-las alinhadas - por algum motivo as portas parecem sempre se 'mover' um pouco durante o processo de instalação, não importa o cuidado que eu tenha... :(
I had some locks I had bought from Cia das Artes years ago (model MEF-10678), especially for this project, and glued them in position only after the doors were installed, to keep them well aligned - somehow the doors always seem to 'move' a little during the install process... :(

E assim ficaram as portas, finalmente instaladas: fechadas e abertas.
And these are the doors, finally installed: closed, and open.


Obrigada! Thank you!
.

Related

Related Posts Plugin Blogger...