When I made a Little Girl's Room, in September 2011, a follower and friend from Yahoo groups asked if I was going to publish a tutorial on the bed in it. I hadn't taken any pictures while making the bed, so it was not possible. So, I decided to make another one, just to make the tutorial. I tried to use only materials that can be found in Brazil, so this time I did not use the Pretty Pleater. But I strongly recommend it! The inventor of this wonderful tool, (Danne Ruff) sells them on her website.
Lista de Materiais:
- Placa de espuma (usada para embalar encomendas) ou de EVA
- Caixa do tamanho da cama. No caso, usei uma com 15 x 5 x 9 cm
- Tecido de algodão com padrões à escolha
- Moldes recortados em cartolina (baixe arquivo pdf aqui)
- Cartão paraná ou papelão para a cabeceira
- Fita fina para acabamento
- Estilete, régua, tesoura afiada, lapiseira
- Cola (cola pano, cola de silicone ou cola branca secagem rápida são as melhores opções)
- Spray de cabelo ou spray de gel para cabelo diluído em água (1 parte gel, 3 partes água) - teste antes em um pedaço do tecido para ver se não mancha!
- Muitos palitos de dente e fita dupla face (não estão na foto)
- Foam or EVA sheet - aprox 1/8" thick
- Box the size of the bed. I used one that measured aprox 6 x 2 x 3 1/2in
- Cotton fabric of your choice
- Patterns for headboard cut from bristolboard (download pdf file here)
- A piece of hard cardboard for the headboard
- Tiny rickrack or 1/8" ribbon for trimming
- Craft knife, ruler, sharp scissors, pencil
- Glue (tacky or fabric glue are best. I used Aileen's)
- Hair spray or hair gel diluted in water (1 part gel for 3 parts water) - test on piece of fabric first to see if it won't stain it!
- Lots of toothpicks and double-sided adhesive tape (not in picture)
 |
| Material necessário Materials needed |
1) Forre um dos lados da caixa com a espuma/EVA. Deixe sobrar uns 6mm em três lados (menos o da cabeceira). Corte a quina para evitar sobras e cole a sobra nas laterais. Segure com fita crepe até a cola secar.
Instructions:
1) Glue the foam/EVA sheet to one side of the box (the top one). Leave about 1/4" extra on 3 of the sides, but cut flush to the "headboard" side. Glue those to the sides, holding with masking tape until dry.
2) Recorte os moldes da cabeceira em cartolina e no cartão paraná, e recorte os tecidos, como indicado na foto, deixando cerca de 1 cm de folga.
2) Cut the headboard patterns on Bristol board paper and cardboard, and cut the fabric as show in pictures, leaving about 1/4" rim.
3) Recorte uma tira que seja cerca de 1 cm mais larga que a lateral da caixa. Esta tira tem que ter um comprimento igual ao dobro da medida de três lados da caixa (o lado onde vai a cabeceira não conta).
3) Cut a strip of fabric that is about 1/4" wider than the side of the box, and 2 times as long as the 3 sides together (except the "headboard" one).
4) Dobre e cole as laterais da tira como ensinado no tutorial da cortina. SEMPRE espalhe a cola delicadamente para não vazar para o outro lado do tecido! Passe bem todos os recortes de tecido antes de continuar.
4) Fold and glue the rim sides of the strip, as I showed for the curtains tutorial. ALWAYS spread the glue before gluing, so as it won't "bleed" to the other side of the fabric! Iron all fabric pieces well before you proceed.
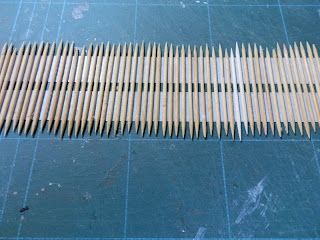
5) Cole duas tiras da fita dupla-face na superfície de trabalho. Cole os palitos como na foto, deixando um pequeno espaço entre eles para o tecido passar (cerca de 1 mm).
5) Glue two strips of double sided tape on the working surface. Glue the toothpicks as shown on picture, leaving some space between them to fit the fabric (about 1/16").
6) Vá encaixando a tira nos palitos, com ajuda de cartões de crédito, como mostrado na foto. Mantenha um cartão segurando o tecido e encaixe com o outro. Segure este, use o outro cartão para encaixar no próximo espaço e assim por diante. A fita dupla-face irá segurar o tecido no lugar.
6) Insert the fabric strip into the spaces, using two credit cards (or similar) to help you. Use one to hold fabric in place while pushing a new part of the fabric into the next "slot". Hold this one down and use the first one to push the next part and so on. The double-sided tape underneath will hold the fabric in place.
7) Aplique o spray de cabelo ou gel. Espere secar completamente. Pode usar secador de cabelo para acelerar. Use no fraco para não deformar a placa de corte nem tirar o tecido do lugar.... Depois de seca, retire com cuidado. Repita o processo até ter marcado a tira inteira.
7) Apply hairspray or the hair-gel/water mixture all over it. Wait until it dries completely. You may use hair drier to speed up, but use the lower speed/heat so as not to warp the cutting mat neither push fabric out of place... After completely dry, remove carefully. Repeat the process until the whole strip is pleated.
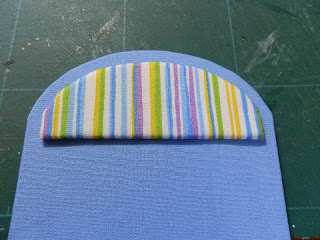
8) Enquanto espera secar, cole a espuma no detalhe da cabeceira, e os tecidos nos moldes como na foto. Recorte nas curvas e cole a sobra para dentro.
8) While you wait for it to dry, go ahead and glue foam on the template (Bristol board) for the headboard detail. Glue the fabric pieces onto the templates, as shown on picture. Cut some "V"s to help folding and glue trim on the other side of the templates.
9) Cole o molde de cartolina forrado sobre o molde de papelão forrado, avesso sobre avesso. Cole a parte de espuma, já forrada, sobre a parte de papelão. Reserve.
9) Glue Bristol board template (already with fabric) on the cardboard one, back to back, as shown on picture. Glue the foam ornament on top of the thicker side of the headboard. Set aside.
10) Recorte o tecido para a colcha, de modo que sobre 2 cm de cada lado da caixa. Cole as laterais primeiro. Depois cole o lado da cabeceira e dos pés da cama. Veja nas fotos.
10) Cut fabric to cover the "bed", with an extra inch on each side as rim. Glue sides first and then "head" and "foot" of the bed, as shown on pictures.
 |
| Cabeceira da cama "Head" side of the bed |
 |
| Pé da cama "Feet" side of the bed |
11) After the pleated fabric strip is completely dry, start gluing to the sides of the bed. Glue just about 1/4" to the back of the "head" part (so as not to "bulk up"). Gather the pleats together when gluing the corners of the "skirt" to the "bed" for a more natural look (check picture).
12) Cole o acabamento que tiver escolhido, ocultando a emenda dos tecidos.
12) Glue whichever trimming you chose, so as to hide the top of the pleats and make a more natural transition.
13) Cole a cabeceira na cama. Segure bem até a cola secar.
13) Glue the headboard to the bed. Hold in place until dry.
14) Para os travesseiros, recorte uma tira da espuma ou EVA com 3 vezes a altura do travesseiro que quer e 1 vez a largura.
14) To make pillows, cut another strip of the foam or EVA sheet, which should be 3 times as desired pillow "height" in length and the same "width" of the pillow.
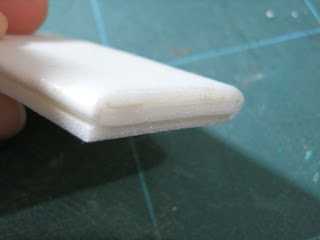
15) Dobre em três como na foto e cole. Coloque um peso por cima até secar.
15) Fold in three and glue, as shown on picture. Put some weight on top to hold in place until dry.
16) Recorte uma tira de cada tecido, cerca de 1 cm mais larga que a altura do travesseiro e 1,5 vez o comprimento. Cole as laterais, e depois cole como na foto, deixando uma abertura para inserir a espuma (o "travesseiro".
16) Cut another strip of each fabric, about 1/4" wider than the desired width of the pillowcase and 1 1/2 longer than it. Glue rim in and then fold and glue as shown in picture, leaving an opening to insert the "pillow".
17) Pronto!!! É só colocar os travesseiros no lugar e sua cama está pronta!
17) It's ready!!! All you have to do now is place the pillows on the bed and enjoy!
 |
| A cama pronta! The finished bed! |
 |
| A cama "original" :) The "original" bed :) |
Para uma cama de menino, eu teria usado o mesmo sistema da cortina, que ficaria mais natural. Mas quis mostrar como fazer dobras com um sistema alternativo, então aproveitei o tutorial para isso.
To be honest, for a boy bed I'd have pleated the skirt the same way as I worked on the curtains, for a more natural look. But as I wanted to show an alternative way to make pleats, the bed tutorial was a good 'excuse'... :)Espero que tenha gostado!!! Mande fotos das suas criações, ok?
I hope you enjoyed this tutorial!!! Send me pictures of your creation, ok?


