domingo, 12 de agosto de 2012

Troquinha internacional - Quarter Scale Swap


Desta vez resolvi aceitar um desafio que me desafiou em VÁRIOS aspectos: 
1) Participar de um desafio/troquinha lançado por um grupo de discussão online que participo
2) Fazer um item na escala 1:48 em quantidade (cada um faria 16 peças, que seriam redistribuídas para cada participante ganhar uma)
3) Montar uma cena na escala 1:48 em um TUBO!... 
4) Montar um cenário no tema patriótico de outro país. Bem... por que não? :)

This time I decided to take on a challenge that really challenged me at SEVERAL levels:
1) Taking part in an international swap in an online group I belong to.
2) Make an 1:48th scale item in kind of mass production (each participant should make 16 of their item, which would later be redistributed to all participants)
3) Make a scene in 1:48th scale in a TUBE!...
4) Make a scene in a patriotic theme from another country. Well, why not? :)

Eram desafios pelos seguintes motivos:
1) Com a demora no envio e recebimento pelos correios e alfândegas, temia que meus itens não chegassem à tempo. Corri para fazer logo que tudo ficou acertado para não perder tempo. Fui a última a receber a minha caixa, acho, e só consegui montar a cena bem depois do prazo final. Mas isso eu já esperava, por causa da nossa alfândega. O importante é que não deixei ninguém na mão!! Desafio vencido!!! :)

Those posed real challenges for the following reasons:
1) International shipping takes a long time, and anything from or to Brazil (especially TO) takes even longer, due to our customs. I rushed to finish my items way ahead of time and shipped them asap. I was among the last one to get my swap box - which I quite expected - and was late to finish the challenge. But I did my part for the swap on time and no one had to wait for me! Challenge conquered! :)
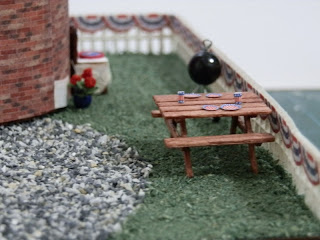
Todos os itens recebidos... Olha a minha mesinha na frente (embaixo)
All items from swap... Check my picnic table at the bottom


2) Nunca consegui produzir nada em série. Sempre faço itens únicos. Achava que nem ia conseguir, mas deu certo! Desafio vencido!!! :)
2) I had never made any multiple items. All my minis are 'one of a kind', sort of speaking. I though I wouldn't be able to make it but... I did it!! Challenge conquered!! :)
Todas as mesinhas que fiz para enviar!...
All picnic tables I made for the swap!...
Embalando para enviar...
Preparing for shipping...
3) O grupo usou um tubo comum lá, vendido com sal. Poderia ser de aveia, mas até a aveia aqui é vendida em caixas ou latas, nada de papelão. Então usei um tubo de batata frita (sim, fiz o sacrifício de comer, rsrs...) que é um pouco mais estreito e bem mais comprido que o deles. Deu certo! Desafio vencido!!! :)
3) Everybody was using a salt box. Salt is sold in plastic bags here... Oatmeal boxes would be ok too, but that is sold in cardboard boxes or metal cans... I could make my own, but I decided to use a chips container. It's narrower and longer, but it worked fine. Challenge conquered!!! :)
A embalagem que usei...
The container I used instead of the salt box...

Cortada...
Already cut...

Andar de cima, já pronto, esperando pelos itens da troquinha!
Top floor, finished, waiting for swap items!

Estrutura completa montada e aberta.
Structure finished and opened.
4) Na verdade o desafio maior foi bolar um jeito da estrutura ter algo a ver com fogos de artifício (quatro de julho, data da independência americana - os britânicos do grupo fizeram sobre o Jublieu da Rainha) e ao mesmo tempo ter 'cara' de casa. Descobri um 'treco' iluminado por led multicolor no ebay e usei na estrutura. Quando aceso parece mesmo fogos de artifício! Desafio vencido!!! :)
4) A foreign theme was not the real challenge. The real challenge was to come up with a way to make the structure look like a Firecracker (to celebrate the 4th of July - British members worked on it as a Jubilee theme) while still making it 'liveable'. I discovered a multicolored LED 'thingy' on ebay and it arrived just before the swap box. I used it and it really worked, it does look like fireworks when turned on! Challenge conquered!!! :)


Ok, chega de falar... Aqui estão as fotos das cenas. Espero que gostem!
Ok, nuff said... Here are the pictures of my challenge. I hope you enjoy them!
Vista frontal, estrutura fechada.
Front view, structure closed

Visto de trás.Back view

Lado direito, área de piquenique! :)
Right side, picnic area!... :)

Lado direito: jardim.
Right side: garden.

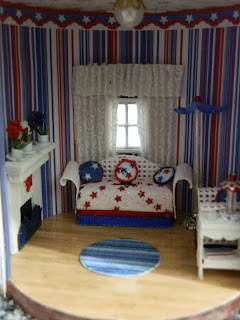
Piso superior: quarto de dormir. A cômoda fica na parede para aproveitar o espaço.
Top floor: bedroom. Notice the vanity on the wall to save space.

Detalhe do quarto
More detail view of the bedroom.

Piso inferior, sala.
Bottom floor: living room.

Lado direito da sala.
Right side of the living room.

Lado esquerdo da sala.
Left side of the room.

Os dois andares, estrutura aberta.
Both floors, opened.

Luz dos 'fogos de artifício' ligada. O quarto fica bem sexy, não é? ;)
Firework lights on. The bedroom becomes quite a sexy place, right? ;)
Se você ficou curioso(a) sobre os projetos de outros participantes da troquinha, aqui vão alguns links dos que postaram seus projetos em blogs:
If you got curious to see how other participants in the swap finished their projects, here are a few links (for the ones who posted on a blog or fotolog):

Sheila (USA) 
Heather (UK)
JoAnn (USA)

sábado, 28 de julho de 2012

contas, contas e mais contas! - beads!!!

Não tenho trabalhado em minis este mês, outras prioridades têm tomado meu tempo... Mas chegou recentemente uma compra que fiz há uns dois meses no ebay. Arrematei por menos de R$5 (o frete é que dói, nem vou comentar!!!) um lote de contas lindas. A maioria é murano (vidro). Lindas, maravilhosas!!! E tem umas de metal também... A maioria eu 'enxergo' como lindos vasos de flores, nas diversas escala em que trabalho, ou bases para abajures. Mas aceito sugestões!... :) Especialmente para as bolinhas de vidro transparente com saliências azuis (última foto), que para mim mais parecem representações de vírus, muuuuito ampliados, kkkkkkk 


I haven't worked on minis recently, as other RL projects have taken priority on my to-do list... But I have recently received a purchase I made about 2 months ago on ebay (our customs really sucks this year!) I won an auction for a beads lot for about £ 2 (shipping was more than that - not the seller's fault, of course. Why must intl shipping be so steep??? I'd rather not think about that, argh!!!) Most are murano beads (glass). They are beautiful, gorgeous!!! And there are also some metal ones... Most of them I 'see' as exquisite flower vases in the various scales I work with, or bases for table lamps. But I'm open to suggestions!... :) Specially for the transparent glass ones with some blue protrusions (last picture). I can't get past the image of a gigantic virus, lol!!!


Todas as contas do lote. Atrás está a base do meu monitor.
All beads in the lot. Behind you can see the base of my PC monitor.

Só as de vidro...
Just the glass ones...

Só as de metal...
Just the metal ones...

Close nas de vidro, filas da frente.
Close-up on the glass ones, front rows.

Close nas de vidro, filas da frente.
Close-up on the glass ones, front rows.

Close nas de vidro, filas de trás.
Close-up on the glass ones, back rows.

Close nas de vidro, filas de trás.
Close-up on the glass ones, backrows.

Exército de vírus gigante ou minas submarinas? kkkkkk!
An army of huge viruses or sea mines?... lol!  :)

quarta-feira, 11 de julho de 2012

Escala 1:24 - Half Scale

Uma amiga brasileira lá do Pará, a Sheila (faz noivinhos lindos!), comprou no ML uma dollhouse. Só que ela está na escala 1:24! Se já é difícil achar itens em 1:12 com certa qualidade e preços acessíveis aqui no Brasil, imagine na metade do tamanho!!! E os móveis que vieram com a casa são em MDF e parecem mais quebra-cabeças 3D. Dá para customizar, claro, mas o trabalho que dá...


A friend of mine, Sheila (she makes beautiful custom made top cake brides-grooms), who lives in the North of Brazil (Belem, Para), had bought a dollhouse at a national version of eBay. But it turned out that it was in 1:24th or Half Scale. If it's already really hard to find 1:12th scale miniature items with reasonable quality and affordable prices in Brazil, imagine how hard it is to find them in 1:24!!! Some furniture pieces did come with the dollhouse, but they look more like MDF laser cut 3D puzzles than actual furniture. It IS possible to bash them, but there would be a lot of work involved...


Prometi para ela um jogo de sofá. Vi instruções de Beckie Sanderson para uma poltrona nesta escala na Miniature Collector na edição de Fevereiro 2011. Além de duas poltronas, alterei o projeto e fiz um sofá também. Ela queria fazer os móveis brancos, então usei um tecido branco cuja estampa cai bem nesta escala. Vai dar um trabalhinho maior para manter sempre limpo, mas até que ficou legal, o q vc acha?


I promised to make her the living room sofa set. I saw instructions by Beckie Sanderson to make an upholstered armchair in this scale in February 2011 issue of Miniature Collector. I made 2 of those armchairs, then changed the design and made a sofa too. She wants to make all furniture white, so I chose some nice white fabric. She'll have to dust more often to keep them white, but they actually turned out quite nice, what do you think?


foto sem flash - mais parecido com o que se vê "ao vivo"
no flash picture - more like you'd see them "live"


foto com flash - dá para ver melhor a delicada estampa do tecido
flash picture - you can see better the delicate pattern of the fabric I used

quinta-feira, 14 de junho de 2012

Tutorial de cama - Bed Tutorial

Quando eu fiz o Quarto de Menina, em setembro do ano passado, um seguidor e conhecido de outros grupos perguntou se eu faria um tutorial da cama. Quando fiz a cama de menina, não tirei foto nenhuma do processo. Resolvi fazer outra agora, só para criar o tutorial. Desta vez não usei o Pretty Pleater, para mostrar uma alternativa com materiais que se encontram no Brasil. Mas recomendo MUITO comprar e usar esta ferramenta, é MUITO útil! A inventora (Danne Ruff) vende no site dela, aceita Paypal e despacha para o Brasil.
When I made a Little Girl's Room, in September 2011, a follower and friend from Yahoo groups asked if I was going to publish a tutorial on the bed in it. I hadn't taken any pictures while making the bed, so it was not possible. So, I decided to make another one, just to make the tutorial. I tried to use only materials that can be found in Brazil, so this time I did not use the Pretty Pleater. But I strongly recommend it! The inventor of this wonderful tool, (Danne Ruff) sells them on her website.

Lista de Materiais:
  • Placa de espuma (usada para embalar encomendas) ou de EVA
  • Caixa do tamanho da cama. No caso, usei uma com 15 x 5 x 9 cm
  • Tecido de algodão com padrões à escolha
  • Moldes recortados em cartolina (baixe arquivo pdf aqui)
  • Cartão paraná ou papelão para a cabeceira
  • Fita fina para acabamento
  • Estilete, régua, tesoura afiada, lapiseira
  • Cola (cola pano, cola de silicone ou cola branca secagem rápida são as melhores opções)
  • Spray de cabelo ou spray de gel para cabelo diluído em água (1 parte gel, 3 partes água) - teste antes em um pedaço do tecido para ver se não mancha!
  • Muitos palitos de dente e fita dupla face (não estão na foto)
Material List
  • Foam or EVA sheet - aprox 1/8" thick
  • Box the size of the bed. I used one that measured aprox 6 x 2 x 3 1/2in
  • Cotton fabric of your choice
  • Patterns for headboard cut from bristolboard (download pdf file here)
  • A piece of hard cardboard for the headboard
  • Tiny rickrack or 1/8" ribbon for trimming
  • Craft knife, ruler, sharp scissors, pencil
  • Glue (tacky or fabric glue are best. I used Aileen's)
  • Hair spray or hair gel diluted in water (1 part gel for 3 parts water) - test on piece of fabric first to see if it won't stain it!
  • Lots of toothpicks and double-sided adhesive tape (not in picture)
Material necessário
Materials needed
Instruções:
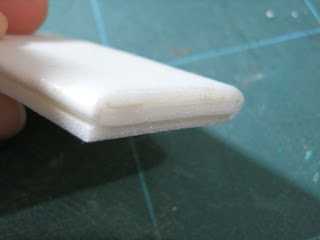
1) Forre um dos lados da caixa com a espuma/EVA. Deixe sobrar uns 6mm em três lados (menos o da cabeceira). Corte a quina para evitar sobras e cole a sobra nas laterais. Segure com fita crepe até a cola secar.
Instructions:
1) Glue the foam/EVA sheet to one side of the box (the top one). Leave about 1/4" extra on 3 of the sides, but cut flush to the "headboard" side. Glue those to the sides, holding with masking tape until dry.


2) Recorte os moldes da cabeceira em cartolina e no cartão paraná, e recorte os tecidos, como indicado na foto, deixando cerca de 1 cm de folga.
2) Cut the headboard patterns on Bristol board paper and cardboard, and cut the fabric as show in pictures, leaving about 1/4" rim.

3) Recorte uma tira que seja cerca de 1 cm mais larga que a lateral da caixa. Esta tira tem que ter um comprimento igual ao dobro da medida de três lados da caixa (o lado onde vai a cabeceira não conta).
3) Cut a strip of fabric that is about 1/4" wider than the side of the box, and 2 times as long as the 3 sides together (except the "headboard" one).

4) Dobre e cole as laterais da tira como ensinado no tutorial da cortina. SEMPRE espalhe a cola delicadamente para não vazar para o outro lado do tecido! Passe bem todos os recortes de tecido antes de continuar.
4) Fold and glue the rim sides of the strip, as I showed for the curtains tutorial. ALWAYS spread the glue before gluing, so as it won't "bleed" to the other side of the fabric! Iron all fabric pieces well before you proceed.

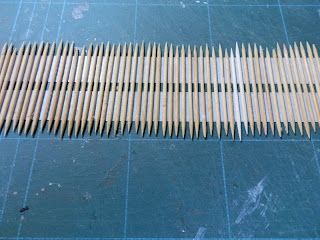
5) Cole duas tiras da fita dupla-face na superfície de trabalho. Cole os palitos como na foto, deixando um pequeno espaço entre eles para o tecido passar (cerca de 1 mm).
5) Glue two strips of double sided tape on the working surface. Glue the toothpicks as shown on picture, leaving some space between them to fit the fabric (about 1/16").

6) Vá encaixando a tira nos palitos, com ajuda de cartões de crédito, como mostrado na foto. Mantenha um cartão segurando o tecido e encaixe com o outro. Segure este, use o outro cartão para encaixar no próximo espaço e assim por diante. A fita dupla-face irá segurar o tecido no lugar.
6) Insert the fabric strip into the spaces, using two credit cards (or similar) to help you. Use one to hold fabric in place while pushing a new part of the fabric into the next "slot". Hold this one down and use the first one to push the next part and so on. The double-sided tape underneath will hold the fabric in place.


7) Aplique o spray de cabelo ou gel. Espere secar completamente. Pode usar secador de cabelo para acelerar. Use no fraco para não deformar a placa de corte nem tirar o tecido do lugar.... Depois de seca, retire com cuidado. Repita o processo até ter marcado a tira inteira.
7) Apply hairspray or the hair-gel/water mixture all over it. Wait until it dries completely. You may use hair drier to speed up, but use the lower speed/heat so as not to warp the cutting mat neither push fabric out of place... After completely dry, remove carefully. Repeat the process until the whole strip is pleated.

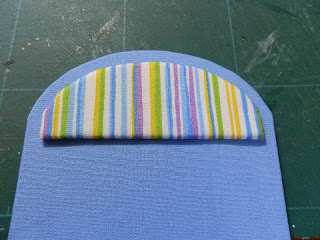
8) Enquanto espera secar, cole a espuma no detalhe da cabeceira, e os tecidos nos moldes como na foto. Recorte nas curvas e cole a sobra para dentro.
8) While you wait for it to dry, go ahead and glue foam on the template (Bristol board) for the headboard detail. Glue the fabric pieces onto the templates, as shown on picture.  Cut some "V"s to help folding and glue trim on the other side of the templates.


9) Cole o molde de cartolina forrado sobre o molde de papelão forrado, avesso sobre avesso. Cole a parte de espuma, já forrada, sobre a parte de papelão. Reserve.
9) Glue Bristol board template (already with fabric) on the cardboard one, back to back, as shown on picture. Glue the foam ornament on top of the thicker side of the headboard. Set aside.


10) Recorte o tecido para a colcha, de modo que sobre 2 cm de cada lado da caixa. Cole as laterais primeiro. Depois cole o lado da cabeceira e dos pés da cama. Veja nas fotos.
10) Cut fabric to cover the "bed", with an extra inch on each side as rim. Glue sides first and then "head" and "foot" of the bed, as shown on pictures. 
Cabeceira da cama
"Head" side of the bed
Pé da cama
"Feet" side of the bed
 11) Depois da tira lateral ter secado, comece a colar na lateral da cama. Cole só cerca de 1 cm na cabeceira, para não fazer volume. Cole mais juntinho na curva (veja foto) para ficar mais natural.
11) After the pleated fabric strip is completely dry, start gluing to the sides of the bed. Glue just about 1/4" to the back of the "head" part (so as not to "bulk up"). Gather the pleats together when gluing the corners of the "skirt" to the "bed" for a more natural look (check picture).


12) Cole o acabamento que tiver escolhido, ocultando a emenda dos tecidos.
12) Glue whichever trimming you chose, so as to hide the top of the pleats and make a more natural transition.

13) Cole a cabeceira na cama. Segure bem até a cola secar.
13) Glue the headboard to the bed. Hold in place until dry.
14) Para os travesseiros, recorte uma tira da espuma ou EVA com 3 vezes a altura do travesseiro que quer e 1 vez a largura.
14) To make pillows, cut another strip of the foam or EVA sheet, which should be 3 times as desired pillow  "height" in length and the same "width" of the pillow.

15) Dobre em três como na foto e cole. Coloque um peso por cima até secar.
15) Fold in three and glue, as shown on picture. Put some weight on top to hold in place until dry.

16) Recorte uma tira de cada tecido, cerca de 1 cm mais larga que a altura do travesseiro e 1,5 vez o comprimento. Cole as laterais, e depois cole como na foto, deixando uma abertura para inserir a espuma (o "travesseiro".
16) Cut another strip of each fabric, about 1/4" wider than the desired width of the pillowcase and 1 1/2 longer than it. Glue rim in and then fold and glue as shown in picture, leaving an opening to insert the "pillow".


17) Pronto!!! É só colocar os travesseiros no lugar e sua cama está pronta!
17) It's ready!!! All you have to do now is place the pillows on the bed and enjoy!
A cama pronta!
The finished bed!
A cama "original" :)
The "original" bed :)
Para uma cama de menino, eu teria usado o mesmo sistema da cortina, que ficaria mais natural. Mas quis mostrar como fazer dobras com um sistema alternativo, então aproveitei o tutorial para isso.
To be honest, for a boy bed I'd have pleated the skirt the same way as I worked on the curtains, for a more natural look. But as I wanted to show an alternative way to make pleats, the bed tutorial was a good 'excuse'... :)

Espero que tenha gostado!!! Mande fotos das suas criações, ok?
I hope you enjoyed this tutorial!!! Send me pictures of your creation, ok?

Related

Related Posts Plugin Blogger...