segunda-feira, 16 de abril de 2012

1:144 Sala de chá Oriental - Tea house

Agora foi a vez de montar outro kit completo (exceto o paisagismo do lado externo), a "sala de chá oriental". No paisagismo usei uma árvore pronta que ganhamos em uma convenção online anterior e material usado em ferromodelismo. 


Now it was time to make another complete kit (except for the landscaping outside), the "Tea House". For the garden I used a tree we all got in a past online convention and modeling stuff. Tatami was my creation, and I used egg carton to make the stone path. 

O tamanho real, comparado com uma lapiseira.
The real size, compared to a mechanical pencil.


sábado, 14 de abril de 2012

1:144 Floricultura - Flower Shop

Faço parte de um grupo que adora micro-minis, ou minis na escala 1:144, o que corresponde a uma dollhouse para uma dollhouse. Loucura! :) Todo ano a gente tem uma convenção virtual, é muito legal! Mas andei adiando montar alguns kits que comprei ao longo dos anos. Com o ateliê finalmente arrumado, pude me dedicar a eles. Mãos firmes são essenciais, e perder uma pecinha do tamanho de uma pinta é muito fácil. Então ordem é fundamental!


I belong to an online micro-minis group. We love really small scales, in 1:144. This would be the size of a dollhouse FOR a dollhouse. VERY tiny!!! :) Every year we have an online convention, it is so cool! But I have been postponing putting together the kits I got over the years. Now, as my work studio is finally organized, I could allow myself to work on them. Steady hands are really important, and as losing a piece as small as a mole might happen quite often, a clean and organized environment is paramount!

O primeiro já concluído é um kit de uma Loja de Flores. O tema da convenção este ano é "jardins", então achei apropriado. O kit vem com tudo que é preciso para montar a loja. Só usei um produto diferente para fazer as janelas e dei um acabamento diferente no piso, para ficar com mais 'cara' de cerâmica.

The first kit I finished is the Flower Shop, by SDK. As this year's convention theme is "gardens", I thought it would fit nicely. The kit comes with everything one needs to put it together. All I did different was the window treatment (I used Micromark's micro-glaze) and the floors (covered print with adhesive tape and scored the lines).

O tamanho real, comparado com uma lapiseira.
The real size, compared to a mechanical pencil.


sábado, 7 de abril de 2012

Hora de renovar (um pouco!)... - Time to refurbish (a little!)

Passei as últimas duas semanas organizando meu "bagunceliê" (como diz minha mãe, rsrs...) Agora que sei onde cada coisa está, não perco mais um tempão procurando cada item para, quando finalmente acho, acabar desanimando, fica muito mais rápido e divertido trabalhar!...
I spent the past two weeks reorganizing my "messtudio" (as my mom calls it...) Now that I know where everything is, I don't waste a lot of time searching each item just to, when I finally find it, end up giving up, so now working is a lot faster and way more fun!

Com isso, acabei retomando pequenos projetos que ficaram encostados por anos! Desde que fiz minha primeira Dollhouse, por exemplo, tinha já feito a impressão de quadros que queria usar nas paredes da casa. Mas acabei encostando este projeto. Bem, a culpa não tinha sido só da "bagunça" ou da falta de espaço na época... Na primeira compra que fiz numa loja do exterior comprei tiras de madeira para fazer as molduras do quadro. São tiras de uns 40, 50 cm. Mandei entregar no hotel onde meu irmão ficou hospedado na época, assim economizaria frete. Não é que a criatura teve a "brilhante" idéia de quebrar as varetas em 3 pedaços para "caber na mala"???? Aaarrrghhh!!! Que raiva deu!!! Tanta raiva que deixei encostado por dois anos até ter coragem de olhar para os pedaços e fazer os quadros... 
As a result, I ended up working on some UFOs (UnFinished Objects) I've had since I built my original dollhouse in 2008. Back then, I wanted to "hang" some paintings on the walls. I had already printed the images of the paintings I wanted to use. And with my first purchase from a specialized online miniature store in the US I included moldings for frames. They are about 15" long (?). I had my order delivered to the hotel where my brother was staying back then, so that I would save on international shipping costs. Would you believe that he had the "brilliant" idea of breaking the strips in pieces to fit them in the suitcase???? Aaarrghhh!!!! I was so angry and frustrated I never touched them again, up to now... 

Bem, finalmente fiz as molduras, pintei, encaixei as imagens e coloquei nas paredes. Aí me dei conta que também estava enrolando para consertar a cama, que na mudança quebrou um dos "postes". Como eu não gostava deles, pois "entregavam" que era feito de compensado, acabei tirando os outros e colocando umas contas de madeira na mesma cor. 
Well, I finally made the frames, painted, glued the images on and "hung" them on the walls. Then I realized that I had also been postponing fixing the bed. One of the 'posters' (?) had broken when I moved. Well, I didn't like them anyway, as they were an obvious "tell" that the bed was made from plywood, so I removed the remaining ones and replaced with some wooden beads. 

Aí também quis mudar a colcha... Na época, não entendia nada de minis, fui aprendendo à medida em que montava os kits, e seguia as instruções à risca e só usava o material fornecido. O tecido não é algodão, é um poliéster. Agora, eu também achei um material que, apesar de ser de plástico, parece muito com crochê, e achei que ficaria melhor. 
Then I also wanted to change the bed cover. Back then, I knew nothing about mini making, I learned as I put the kits together, and followed the instructions to the letter, never changing any material or finishing. The fabric provided was not cotton, I believe it's a polyester blend. But I have recently found a plastic material that really looks like crocheted, and I decided to try it on.

Agora foi a hora da cortina me incomodar... Por ser sintético, o tecido não tinha caimento algum, e ficava muito feio, amarrado com um laçarote amarelo. Usei o "pretty pleater", uma ferramenta de borracha que ajuda a fazer o caimento, e verniz em spray para fixar as novas curvas, pois o tecido sintético não aceita bem ser "trabalhado". 
Now it was the curtains that bothered me... As the fabric was synthetic, the draping wasn't natural at all, and it looked really ugly, tied up with some yellow thick ribbon. I used "Pretty pleater" on the fabric, using varnish spray to hold the curves. It's not the best looking curtains ever, but I honestly think it looks much better than before!

Finalmente, foi hora de mexer no lustre. O original ficava pendurado por correntes, mas isto me incomodava muito, pois acabava ficando baixo demais. Então eliminei as correntes e colei direto no teto.
Finally, it was time to change the light fixture. The original one was supposed to be hanging from chains, but that really bothered me, as it was too low and we could see the wires. So I took the chains off and glued the "bowl" directly on the ceiling, as they would "be" in a Brazilian home (well, not glued on , but you get it... lol!)

Bem, assim ficou o novo quarto principal, que tal? Detalhes fazem mesmo a diferença?
Well, the pictures below show the "before" and "after" of the changes. How do you like it? Do small changes actually make any difference?

A "antiga" versão do quarto, lado direito.
The "old" version of the room, right side.
A "antiga" versão do quarto, lado esquerdo.
The "old" version of the room, left side.
A "nova" versão do quarto.
The "new" version of the bedroom.
A "nova" versão do quarto, lado esquerdo, mostrando quadros.
The "new" version of the room, right side, showing pictures.
A "nova" versão cama, luz natural.
The "new" version of the bed, under natural light.


A "nova" versão cama, com flash.
The "new" version of the bed, under flash light. 
A "nova" versão do quarto, lado esquerdo.
The "new" version of the bedroom, left side. 
A "nova" versão da cortina, note a antiga no detalhe no alto, à direita.
The "new" version of the curtain, notice the old one on the small picture, top right.  


sábado, 10 de março de 2012

Uma doll especial - A special doll

Faço parte de um grupo online americano, o MSATMiniDoll, cuja proprietária é a Dana Burton, uma artista cheia de talento, simpatia e generosidade! Nesse grupo, além de muita troca de informação e dicas, ainda tem um programa que doa material para fazer dolls (tecidos, kit de doll em porcelana, fitas, rendas, viscose para cabelo, etc) a alguns membros da lista que não podem comprar mas que querem muito aprender a fazer. O material dessas doações vem dos próprios membros da lista que têm bastante e também têm um coração generoso e querem compartilhar. 
Este programa muito especial é chamado RAK (Random Acts of Kindness, ou Atos de Generosidade Aleatórios).
I'm a member of an online group called MSATMiniDoll, owned by Dana Burton, who is a very talented artist and an extremely nice and generous person! In this group, besides a great share of information and tips, there is also a RAK program (Random Acts of Kindness) that donates boxes with materials (doll kits, fabric, lace, trims, viscose hair, etc) to some members who really wish to create dolls but just can't afford it at the moment. All the material for the RAK boxes (and shipping money) comes from the generous members of the list. 


Uma das participantes do grupo, Sandy Babcock, faleceu recentemente. Era ainda relativamente jovem, alegre, amava seus cães, sua família e amigos e, com muita paixão, as miniaturas e as dolls. E acreditava imensamente no programa RAK e a chance única que ele representa para quem quer criar dolls mas não tem como. E deixou no seu testamento, para que fosse doado ao grupo, vários kits de doll de porcelana. A Dana fez um evento especial no final do ano passado e eu, que participei do evento, fui uma das felizes ganhadora de um dos kits. Outros kits foram vendidos entre os participantes para arrecadar fundos também para este programa maravilhoso, ou inseridos nas caixas do RAK
One of the members, Sandy Babcock, has recently passed away. She was still young, full of life and happiness, loved her dogs, her friends and family and, even more passionately, dolls and miniatures. And she truly believed in the list's RAK program. One of her last wishes was for her family to donate several of her doll kits to the program. As soon as Dana got them, she told us and during a special event. On this day, some members who participated were randomly picked to get some of the kits, the remaining ones were either kept to be given as prizes in future events, sold in the group to raise funds for the RAK program or included in the RAK boxes. I was one of the lucky winners of the day! :)


Logo o meu kit chegou. Vi-me diante de um lindo par de pernas femininas meio dobradas, dois antebraços, um torso que ia do pescoço ao quadril e uma bela cabeça, com as feições 'em branco', sem pintar. 
My kit arrived soon. And there I was, looking at a beautiful pair of slightly bent legs, two delicate forearms, a neck-to-hip torso and a really pretty smiling blank head.


Sou amadora em dolls, até então só tinha feito duas. Até tenho uns 2 outros kits, também doados, mas fico com receio de usá-los e estragar tudo... 
So far, I had only assembled and wigged two dolls. I still have some kits I got as prizes from the list, but I'm usually terrified to even touch them. We can't find those kits in Brazil, so if I mess up, it's not easy or cheap to replace them...


Mas este era especial. Eu TINHA que fazer uma doll que, pelo menos, tentasse fazer justiça à vida e ao legado de fé e generosidade da Sandy.  
But... this one was special. I just HAD to make a doll that, at least, would try to honor Sandy's legacy and generosity.


Logo pus mãos à obra. Escolhi com carinho os tecidos que queria usar, o tom do cabelo, etc. 
So I immediately started working. I carefully picked the fabric I wanted to use on her, and the hair, etc.


Mas queria fazer uma doll bem contemporânea, e mostrar seus braços. Então antes mesmo de começar a vesti-la, tratei de 'completar' o pedaço do braço que faltava, do cotovelo ao ombro. Primeiro tentei com Fimo, mas depois de levar ao forno ficava meio 'translúcido' e destoava da porcelana. Então resolvi 'atacar' com biscuit, que também é conhecido com Porcelana Fria, não por acaso. O mais difícil foi fazer chegar ao tom ideal, já que o biscuit escurece um pouco depois de secar. E aplicando camada por camada até obter um efeito natural, consegui fazer a doll ficar na posição que eu queria.
But... I wanted to make a very contemporary doll. And make an outfit that would show her full arms. So, before I did anything else, I had to 'complete' the missing part of the arms (from elbow to shoulders). First I tried to use Fimo, but after baking, it became a little translucent and didn't quite match the porcelain. So I decided to try cold porcelain, very common and easy to find here. Well, it's called (cold) porcelain for a reason, as it matched beautifully. It was hard to make the hue match too, as it darkens a little after it dries, but I managed to get it and the doll was in the position I wanted it to be.


Agora era a vez de dar vida ao rosto. Usei meu pincel mais fino e tinta acrílica mesmo. Tomei o cuidado de sombrear os vincos com blush, para dar um aspecto natural
Aí parti para a roupa, o colar, o cabelo. 
Now it was time to bring that face to life by paining it. I used my thinnest brush and acrylic paint. Used make-up blush to give a natural shadow to the recess parts of the face and body. Then I finally worked on the clothes, the necklace and the wig. 


E assim nasceu Laura. Eu sempre tive muito receio de errar ao fazer as outras duas dolls anteriores, mas Laura 'fluiu' MUITO fácil! Tão fácil e rápido que nem me ocorreu tirar fotos das etapas do processo!... E eu curti de montão cada etapa, mesmo as mais complexas! Era como se a própria 'doll' me dissesse a cada momento como queria ser: qual vestido usar, mais cor aqui, mais biscuit ali, menos acolá... E o melhor, fiquei MUITO satisfeita com o resultado!...
And this is how Laura was 'born'. Making the other previous dolls had been a 'painful' process, as I was always afraid to mess things up. But Laura as SO easy! So easy and fast that I just didn't think of taking pictures of the steps as I progressed!... I enjoyed it all so much, even the most complex steps of the way! It was as if the doll itself was 'telling' me at each step what she wanted to be: which clothes to wear, more color here, more porcelain there, less over there... And even better, I was SO happy with the result!...


Mais tarde a Lynn, irmã da Sandy, me contou que Laura é o nome da melhor amiga da Sandy, que coincidência maravilhosa!!! Hmm... teria sido a doll me 'contando' o que queria ser, me guiando, ou teria sido a própria Sandy, que lá de cima me guiava e inspirava a descobrir com ela a sensação maravilhosa que dá criar uma doll 1:12?
Later Sandy's sister Lynn told me that Laura is the name of Sandy's best friend, what a wonderful coincidence!!! Hmmm... was it the doll 'telling' me what she wanted to be, guiding me through each step, or could it have been Sandy herself, from up above, guiding and inspiring me to discover with her the wonderful feeling we get when we create a 1:12 doll?


Bem, só sei que curti! :)
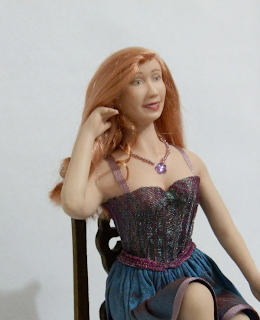
E aqui está a Laura: 
Well, the only thing I know for sure is that I really enjoyed it! :)  
And here is Laura: 


Um close da Laura, 'flagrada' enquanto arrumava os cabelos!
A close-up on Laura, 'caught' in the middle of adjusting her hair, so girly!...

Ainda não sei se vou colocar sapatos ou deixar descalça...
I still don't know if I'll give her some high heels of if I'll leave her  feet free...

De outro ângulo.
From another angle.

Ainda vou criar um ambiente digno dela. Esta cadeira é só para  a foto.
I'm still going to make a room just for her. This chair is just to pose for  pictures.


Esqueci de tirar foto do kit que ganhei, mas vem assim, sem pintar e tudo separado.
This is not the kit I got, but as I forgot to take a picture of it, this one illustrates how they come (to my Brazilian friends).


E finalmente, aqui está Sandy Babcock, cuja generosidade fez Laura nascer!
And last but far from least, here is Sandy Babcock, whose generosity turned Laura into reality!

Obrigada Sandy, Lynn e Mitzy (irmã e mãe da Sandy) e Dana!!!!
Thank you so much Sandy, Lynn (Sandy's sister), Mitzy (Sandy's mother) and Dana!!!!

domingo, 19 de fevereiro de 2012

Flores - Flowers

É carnaval... Mas eu não curto muito, fazer o quê? :)
Mas nem por isto deixei de 'brincar' e criar muito! Passei os últimos 3 dias fazendo flores. Isto mesmo!!!
O arranjo de lírios é um kit que comprei ainda em 2010 em Chicago também da Kimberly Hammer, com quem fiz o workshop do laguinho

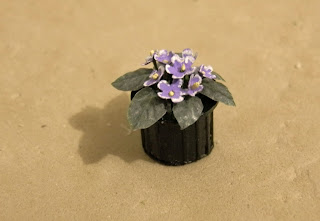
As violetas são 100% minhas. Criação, design e execução. Gostou? :)


It's Carnival. The most anticipated holiday in Brazil. But I'm not really into it, what can I say?... :)
But that doesn't mean I didn't 'play' or create a lot! I spent the last few days making flowers. That's right!!!
The lilies arrangement is a kit I had bought still in Chicago in 2010 from 
Kimberly Hammer, the same I took that little lake workshop.

The violets though are 100% mine. Creation, design and execution.  What do you think? :)


quarta-feira, 15 de fevereiro de 2012

Finalmente concluído - UFO finally finished! :)

Quando fui a Chicago, em abril de 2010, fiz um workshop com Kimberly Hammer, onde aprendíamos a fazer algumas plantas e montar um mini-cenário de um lago. Ela chamou esta cena de "Um toque de Monet".
A minha saiu de lá 80 % montada, faltando colar a árvore - que ela já trouxe pronta - e uns detalhes que eu queria fazer diferente...
Bem, na verdade eu acabei decidindo mudar algumas coisas BEM importantes, como a ponte (que achei muito pequena, apesar de bonita) e a árvore, pois queria uma mais 'natural. Comprei um kit da Marilyn Heath Lauffer (EarthScapes by Heath), e levei todo este tempo para fazer a árvore (que não ficou igual à dela, claro, rsrs, mas até que gostei do resultado!), a ponte e concluir o cenário. Ficou assim...


When I went to Chicago, in April 2010, I took a workshop at Bishop's show by Kimberly Hammer. We had to make flowers and assemble this lovely scene "A touch of Monet". I loved it! But my scene, as it usually happens in these workshops, was not fully finished. Only the tree - which she supplied fully finished - had to be glued on. But...
Well, the thing is... I actually wanted a different bridge for my scene. Even though I think the one supplied is beautiful, I also thought it was a little too small and decided to make another one, of wood. I also wanted a more 'natural looking' tree, so I purchased this kit by Marilyn Heath Lauffer (EarthScapes by Heath), and it took me all this time to finally make both the bridge and the tree (which does NOT look like Marilyn's, naturally, this was my first tree! :) ...) and finish the scene. This is how it turned out...


Meu cenário - My scene

O modelo - the model


domingo, 5 de fevereiro de 2012

Eu na mídia - Getting international!

É transbordando de alegria e com um imenso orgulho - não vou negar... :) - que compartilho com vocês que neste ano meus trabalhos apareceram em duas revistas estrangeiras especializadas em miniaturas: 

Nos dois casos, participei como leitora, pois sou assinante das duas revistas. Eles abriram a oportunidade para que os leitores enviassem seus trabalhos, e nos dois casos tive a sorte de ser escolhida. Eeeeba!!! :)


It is with an overwhelming feeling of joy and really proud - I won't deny it...  :) - that I share with you: two of my miniature settings have been shown in two separate international magazines specialized in miniature! 

In both cases I submitted my work to the magazines after they opened this possibility to their readers, on Facebook. As I subscribe them both, I did so. And I was lucky enough to have my work picked. Needless to say, I'm totally thrilled!!! Yay!!!  :)


Related

Related Posts Plugin Blogger...