
After the turmoil that was here due to my father's illness (yes, he's better now, thanks!) :), house guests popping up, etc, I must admit that my steam for creating miniatures has been very low. But I still - always - want to make something. So I decided to work on a project that has been waiting for me for a long time.
Bem, o fato é que 4ª feira passada (dia 9) foi meu aniversário. Acho que é verdade o que dizem: que as semanas que antecedem seu aniversário é chamado de "inferno astral" por alguns astrólogos, e para mim foi bem assim, hehe... Por isso, todo ano quando chega meu aniversário, eu me dou um bom presentepara compensar... :) No ano passado eu assinei uma publicação bem especial, da Del Prado. Foi o Relógio Cuco. :)
Well, last Wednesday (the 9th) was my birthday. I guess it's true what they say: the weeks preceding a birthday is called the "Astral Hell" by astrologers, and mine was quite like that, lol. So every year when my birthday comes, I indulge myself a little extravagant gift to make up for those weeks... :) Last year I subscribed to a very special publication, one that comes with parts in each issue and then you'll end up building something. It was a musical Cuckoo clock . :)

Sim, é uma coleção que no final sai bem cara. Mas relógios cucos semelhantes já prontos são mais caros ainda! Este, por outro lado, poderia ser pago em 'suaves prestações mensais', que cabiam no meu bolso e o relógio montado é bem grande: do tamanho de uma dollhouse na escala 1/24. E inclui vários recursos legais como figuras animadas, 12 músicas diferentes e sensor luminoso para que não toque à noite.
Yes, it's very expensive. But so are ready-made ones! This one, on the other hand, though also expensive, would be paid by monthly installments I could afford and the assembled clock will be pretty huge in the end: the size of a 1:24th scale dollhouse. And with many cool features, like animated figures, 12 different tunes and light sensor so that it won't play any tunes at night.
De qualquer forma, a essa altura já tenho quase todos os fascículos. Só terei todos mesmo em agosto, mas eles estavam acumulando e ocupando espaço. E já estava me incomodando vê-los ali sem fazer nada com eles. Da última vez que fiz uma coleção parecida, esperei 10 anos para finalmente montar: foi minha primeira dollhouse, e foi onde minha paixão por miniaturas nasceu. Não quis esperar tanto tempo assim de novo, haha!
Anyhow, I have almost all issues by now. I will only have them all by August, but they are piling up and I couldn't stand seeing all those unopened issues just waiting there anymore. The last time I did this they waited 10 years to be worked on: it was my first dollhouse and where my love for miniatures began. I didn't want to wait that long again, lol!

Eu bem que tentei ir montando à medida em que as entregas chegavam, mas logo percebi que não era o ideal. As partes não vinham na sequência da montagem. Várias partes não correspondiam às instruções recebidas no mesmo fascículo. Frequentemente eles pulavam vários fascículos até que a próxima parte/etapa da mesma peça viesse para continuar a montagem. Não sei por que é que fazem isso. Com certeza devem ter alguma estratégia mercadológica por trás, mas que é chato para caramba, isso é! Sem contar que às vezes as instruções estão erradas e você só se dá conta na etapa seguinte, que pode estar 3 ou 4 fascículos depois. Então, decidi aguardar, e agora acho que dá para trabalhar nele.
I did try to make them as they'd come, but pretty soon I realized it was not a wise approach. The parts do not come in the same sequence as the assembly. Often some parts do not match the instruction file that comes with the issue. Often they skip several issues until the next part comes. I don't know why they do that. They probably have a sound marketing reason, but that just sucks! Also, sometimes the instructions are messed up and you will only realize it in the next steps/instructions, that may be 3 or 4 issues ahead. So I decided to wait, and now I think it's doable.
Aqui está um bom exemplo desses problemas: ao retomar a montagem, decidi seguir as instruções fascículo por fascículo, na sequência em que foram publicados. Ao fazer isso, comecei montando a base: nas instruções elas são posicionadas e coladas em uma certa posição. Mas quando fui colar/montar o outro lado que veio no fascículo seguinte - que teoricamente teria sido publicado uma semana depois ou teria vindo para mim um mês depois, a parte do meio era mostrada na posição contrária! (veja fotos abaixo) E a segunda forma é que era a correta, a primeira estava errada! Então tive que descolar as partes, lixar para consertar tudo, e começar tudo de novo. Se eu tivesse esperado uma semana ou até um mês para perceber o erro, a cola já teria secado e teria sido impossível separar as partes já coladas sem causar um bom estrago!... :(
Here is a good example: I decided to follow the instructions going issue by issue, as they were published. And by doing so I started by assembling the base: in the instructions they are placed/glued together in a certain way. But when I was going to do the other side that came in the following issue, which supposedly would have been published a week later - or shipped to me one month later - the part in the picture was reversed! (see pictures below) And the second one was the right one! So I had to "unglue" parts, sand them and start all over again. If I had waited one week or one month to realize the error, the glue would be set and it would have been impossible to separate the glued parts without causing some damage!... :(


Por causa desses problemas, resolvi mudar minha abordagem: primeiro abri todos os fascículos, separando as partes em três montes: a estrutura em si, os ornamentos (escadas, balcões, janelas, acabamentos), telhado e o último será o mecanismo em si. Assim dá mais certo...
Therefore, a change in approach: first I opened all the issues, separating the parts by 'sections': the structure itself, ornaments (stairs, balconies, windows, finishing), roof and the last one will be the mechanism+ figures. Now this works better for me...
Apesar de parecer fácil, é MUITO trabalho montar isso! Tenho que lixar cada parte, tirar das pranchas em que vêm semi-cortadas, lixar de novo, fazer ajustes, pintar, lixar de novo, colar... Tem tanto o que lixar, e eu detesto lixar!!! :) Eu não gosto de forçar os pedaços ao separá-los das pranchas em que vêm. O compensado fino de que são feitas lasca muito facilmente, e podem até quebrar se não tiver cuidado! Prefiro lixar as pranchas sem separar nada. Uso uma lixa mais grossa depois outra mais fina. É mais fácil lixar peças pequenas e com recortes e curvas assim e isso também facilita tirar as partes das pranchas depois. Então é só usar um estilete para completar o corte e liberar as partes facilmente: elas praticamente saem sozinhas.
Anyhow, it's A LOT of work! I have to sand each board, push the parts from the boards, sand again, paint or dye, sand again, make adjustments, glue together... There is so much sanding to do, and I hate sanding!!! :) I don't like to force the parts out of the boards they come in. The thin plywood is fragile, and splinters come from everywhere if you're not careful! I prefer to sand the boards first, without removing anything. I use first a coarser grit sandpaper then a finer one. It's easier to send delicate parts like this and it also makes it easier to remove the parts from the boards. Then I use a craft knife to finish the cuts and free the parts: they just pop out easily.
 |
| meus blocos de lixar no alto. À esquerda, antes de lixar, à direita, depois (sem remover a serragem) my sanding blocks on top. On the left, before sanding, on the righ: sanded (before removing sawdust). |
 |
| aqui fica mais clara a diferença entre antes e depois de lixar... here you can see more clearly the difference between before & after sanding... |
And omg, there are so many parts! 'Normal' people would throw the excess parts away, but I'm a miniaturist :) AND I work with different scales, so.... the small rectangles that were removed from the windows, and that would be considered 'garbage' for many, would make perfect half-scale (1:24) books. Just paint the sides, print the covers and glue around them! The tiny round pieces that come from the punched holes are perfect cork stoppers for bottle/flasks in 1:12. And I can see the little square ones as tiles... :) They all go to a container where I'm keeping them for future projects!


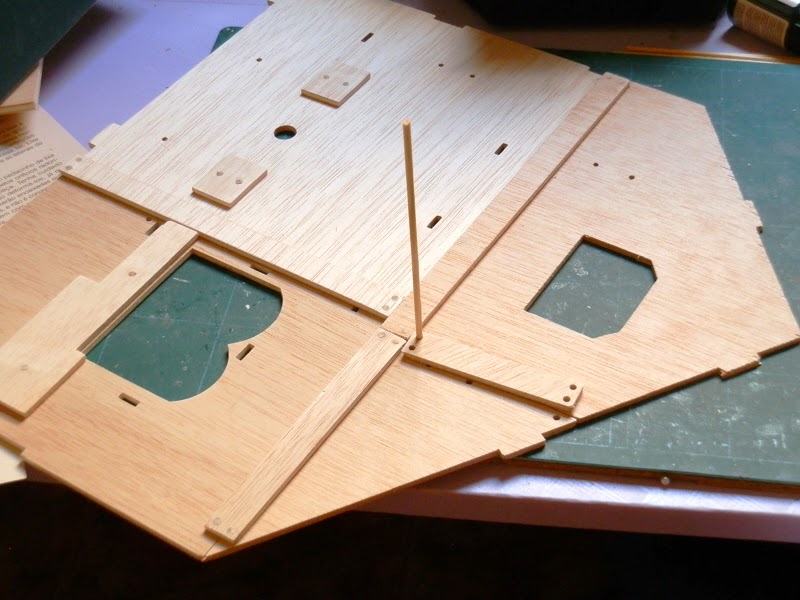
O aspecto mais peculiar desta coleção é que as partes não são montadas por simples colagem. Eles usam uma espécie de tábua de reforço com pequenos furos, que devem bater com a posição dos furos nas peças. Aí você deverá cortar pequenos pedaços das varetas que vêm no kit e colar nos furos. Formidável! Realmente dão mais firmeza à estrutura toda. Não acho que funcionaria em uma dollhouse normal, porque o lado que fica com o 'reforço' não é muito atraente, hehe..
The most interesting feature about this specific 'kit' (sort of speaking) is that parts are put together not just by gluing them, but by using a reinforcement board behind, and the little holes are matched and you have to cut small dowel and glue it there. Remarkable! It does make them sturdier than just gluing the parts, I'll give them that. Not sure this process would work in a dollhouse, because the side where the board is does not look that pretty, lol!.
 |
| um close do processo de junção. Os furos não estão sobrepostos de propósito, para expor os de baixo. a close-up of the joint process. The holes don't match in the picture on purpose, to expose the ones beneath. |
Bem, já escrevi demais para uma postagem. Vou continuar postando sobre o progresso da construção do cuco. Fique ligado! :)
Well, this is a lot for a one post. I'll keep posting about my progress with the cuckoo clock. Stay tuned! :)
.
Happy Belated Birthday! I love your Cuckoo clock project! My mother is from Germany & I love anything to do with my heritage. I can't wait to see your progress on it. It does look like a lot of work, but I am sure it will be a labor of love.
ResponderExcluirHugs,
Lisa
Thank you Lisa! Yes, this spells Black Forest all over, doesn't it? I love cuckoo clocks too. I hope I can honor the original makers with my kit... :) And yes you are right: it IS labor of love!
ExcluirFico contente por saber que seu pai já está melhor e um grande parabéns por seu aniversário!
ResponderExcluirQue aventura a montagem da sua 'Casinha Relógio Cuco'! Boa sorte nessa empreitada.
Abração.
Happy birthday!
ResponderExcluirYour new project is original and amazing. I'm curious to see more...
I really like this clock! Having all of the features is great. I also like the size! :-)
ResponderExcluirYou sound a lot like me ;)
ResponderExcluirHi Lois, nice to meet you and welcome to my blog! :)
Excluir