
Well, there's no better therapy than minis, right? :) But I didn't feel ready to develop my own from scratch, so the best I could do now was to invest my time assembling a Chinese DIY kit I got from ebay a while a go. This one (image taken from internet):

Este tipo de kit tem vantagens e desvantagens:
+ são muito baratinhos!
+ são muito fofos!
+ vêm com tudo que tem dentro e a estrutura. Você só precisa das ferramentas (que provavelmente já tem...)
- não é na escala 1:12. Acho que estão na escala 1:18. Então se vc já tem peças que queria incluir, podem não encaixar legal
- mesmo com o manual em "inglês" (as aspas é porque o inglês é meio duvidoso, rsrs) é muito difícil montar alguns itens. São pequenos, não têm encaixe preciso. Se eu não tivesse vários "truques na manga" pelos meus anos de estrada nas miniaturas, teria ficado MUITO frustrada em vários momentos... Então se você é iniciante, pense duas vezes antes de começar por um deles!
This kind of kit has some positive and negative aspects:
+ they are very inexpensive!
+ they are really cute!
+ they come with everything you see inside plus the structure. All you need are the tools to make them (you probably already have them anyway)
- they are not in 1:12 scale. I think they are in 1:18, hence a little smaller. If you want to add some extra minis you might already have, they might not blend in well.
- even having the "English" version of the manual (the quotation marks are because the English is kinda weird, lol) it is really hard to assemble some items. They are small, no slots to fit. As the wood is painted, glue won't hold them together that well. If I didn't have my own set of "tricks", collected over the years of miniature making, I would have gotten VERY frustrated at several moments... So, if you are a beginner, think twice before starting your adventures in the mini world with one of those kits!
O negócio é que eu achei que, apesar de muito fofo, tinha coisas demais dentro dele. Gosto de ambientes minimalistas, com pouca coisa dentro. Assim dá para ver bem cada miniatura dentro. Então queria ter duas estruturas iguais, e dividir o conteúdo entre elas. Como não sei onde comprar só a estrutura, não teve outro jeito: tive que duplicar cada peça da estrutura para fazer uma igual... Não fiz para vender e nem vou passar aqui as medidas e as etapas de montagem para que não me acusem de pirataria. Não foi essa a intenção! Só queria dividir o conteúdo em dois ambientes!
The thing is that I thought, despite the original kit being really cute, that there were way too many things inside it. I like more minimalist/clean settings. This way we can appreciate better all the minis inside. So I wanted to have two structures instead of one, and divide the contents between them. As I have no idea where I could get a duplicate of the structure only, I had to make a similar one myself... I didn't make it to sell, and I won't share the details here so as not to infringe copyrights. That was not my intention! I just wanted to divide the contents into two identical structures!
Mesmo assim, nas próximas postagens (vai levar alguns dias, obrigada pela paciência! :) ) eu vou compartilhar como fiz duas coisas na minha estrutura:
1) a parte elétrica, que muitos brasileiros têm dificuldade de fazer e vou mostrar os materiais que usei - nacionais - e onde encontrar cada um
2) as janelas. Eu não segui a sequência de montagem sugerida. Fiquei doidinha tentando. Então desisti e fiz do meu jeito mesmo! E esta técnica que usei pode ser usada para montar qualquer janela que você quiser, então posso mostrar sem problema.
Nevertheless, in the next posts (it might take a few days, thanks for your patience! :) ) I will share how I made two things in my version of the strucutre:
1) the lightening. Many Brazilians have difficulty with this, not only on how to do it but also on what to use and where to buy. And I'll show how I did and where I got the items. I did not follow the original kit instructions about this, so it's my "how-to"
2) the windows. Again, I did not follow the original kit instructions. I tried, but it almost drove me crazy! So I gave up and did it my way. And this technique I used can be used to create any window for any structure, so I will share with you.
Bem, o primeiro passo foi descobrir quais eram as peças que faziam parte da estrutura:
Well, the first step was to figure out which pieces were part of the structure:

E duplicar! Usei foamboard (da spumapaper, muito boa a qualidade!) e balsa da Nauticurso:
Then I duplicated them! I used foamboard and balsa wood.

E aqui estão as duas estruturas, já montadas:
And here are both structures, already finished:

Com a luz funcionando:
Lights on:

Pelo lado de trás, com "jardinagem":
The back side, with "landscaping":


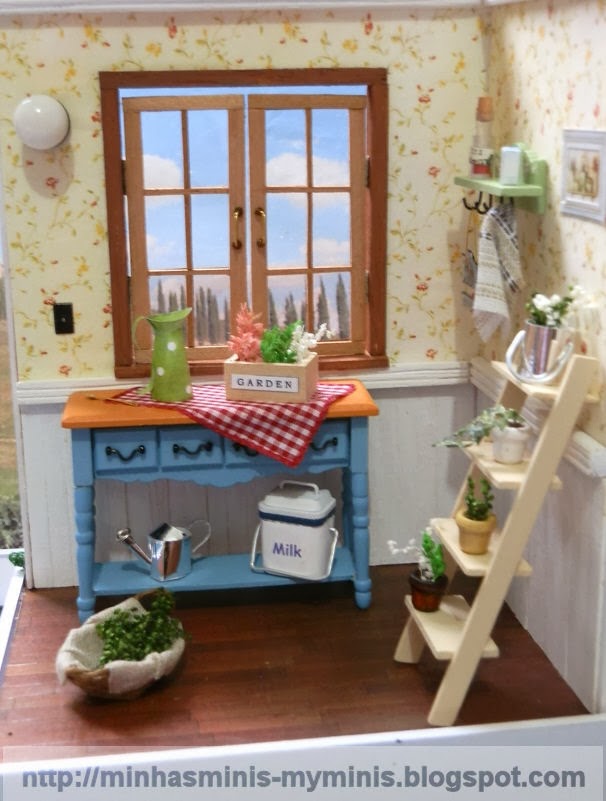
E, depois de muitos dias lutando com o manual e as pecinhas, as duas estruturas estão completas. Em uma coloquei a mesa, a cadeira e a "estante", montando um cantinho para o chá das 5. Na outra, coloquei o bufet, e a prateleira de plantas, além da pequena prateleira verde. Ficou um cantinho de cuidar das plantas:
And, after several days struggling with the manual and the fiddly parts, both sets are completed. In one of them I placed the table, the chair and the wall cupboard, making a cozy corner for the afternoon tea. In the other one I placed the side table, the little shelf and the plants shelf, turning it into a gardening corner:


Então, gostou? :)
How do you like it? :)
Que preciosidad una verdadera maravilla, me encanta.
ResponderExcluirUn abrazo.
Yolanda
¡Gracias, Yolanda! :)
ExcluirI like these wonderful corners. Very deteiled.
ResponderExcluirGreetings, Faby
Thank you Faby! :)
Excluiroh soo nice!! was it hard? I got one from a friend cheap but it was a flower shop and it had missing printies , it has a music box and very cute but I need to get more and flowers in it. may I ask what you paid? Did you get it right from China?
ResponderExcluirHi Chris,
ExcluirTo be completely honest, some parts of those kits are not too easy. But you are an experienced miniaturist, so you can pull it off. If you get stuck with any particular aspect of it, email me and I'll do my best to help you sharing some tips, ok?
This kit came with way more "plant" material than I needed. I could place more pots, but what I don't have are the pots, lol!
In the post I placed a link for an ebay search that will list similar items. If you search there for "Diy dollhouse kit" you'll find many different ones. They are all so cute, it's hard to pick one! Prices range from 9.90 to 35, so choose carefully. Some include shipping some charge high for shipping, so take that into consideration as well.
And yes, I did get it right. I also bought another one I'm making for a friend (a pet shop) and this one I got from AliExpress. I'll place a link with a search there too. I got this pet shop that arrived safe and sound. But I also ordered a music box lavender flower shop. This one didn't arrive, because there was a typo on the zip code. MY postal service messed up big time, because I kept asking them for info, they never replied and later on I found out that they returned the parcel to the sender. I was so angry and frustrated with them (PO, not the seller)! The good thing is that I got my money back from Ali Express.
On ebay you can buy using Paypal, but on Ali they only take credit card. It's safe, but I like Paypal better...
Here's the link (copy & paste on browser, the link won't be active here):
http://www.aliexpress.com/w/wholesale-diy-dollhouse.html?SearchText=diy%2Bdollhouse&CatId=200002626&pvId=10-350383&initiative_id=AS_20131108095703&isrefine=y
Very cute! That was a brilliant idea to divide the kit into two. They both turned out beautifully.
ExcluirXOXO,
John
Thank you John! :)
ExcluirGrazie, Susanna! :)
ResponderExcluirGreat idea dividing the kit. The result is lovely. Thanks for the links.
ResponderExcluirHugs, Drora
Thank you Drora! I'm glad I could help. :)
Excluiramei, bjs
ResponderExcluirObrigada Alicinha!
ExcluirFicou ótimo, Evelyne! Bom trabalho!
ResponderExcluirObrigada Eliana!
Excluirthanks sooo much for these super detailed infos!!! :) i had also admired the original chinise kit...it does look so cute! I fully agree with your idea of dividing the scene..yours are just perfect!!! You did a wonderful job! O, i can imagine you "fighting" with the instructions!!! :) Many greetings Anne
ResponderExcluirThank you Ana!
ExcluirCheck out this line of instruction in the first pages as an example:
"A18-3 and A18-5 cut out in the A4 pros and cons"... (!)
or this one:
"The bulb is connected through B37 and B35 with B36, B35, B34 adhesive, again, progressively material" ...(?!...)
LOL!!!