segunda-feira, 29 de abril de 2013

Portas!... - Doors!...

Por acaso já mencionei que quando eu comecei esta loja, em 2008, eu tinha muito pouca experiência em fazer miniaturas? Do zero, quero dizer, não de kits... Eu até tinha feito pesquisa visual da época, mas ainda não tinha incorporado a escala em mim. Então, tudo com que me preocupei na época foi em não ter uma estrutura grande demais que eu não teria onde colocar.
Have I mentioned before that when I started this store, in 2008, I had very little experience in miniature making? From scratch, I mean... I did do some research, but I still had not incorporated the scale in me. So, all I cared about back then was that I didn't want to end up with a structure too big

Puxa vida, como eu estava errada, e sob tantos aspectos!!! :) Agora eu teria optado por uma estrutura de dois andares, como já disse antes. Mas também notei algo errado com as portas...
Oh, how wrong I was, in so many levels!!! :) Now I would have opted for a two story structure, I've already said that, I know. But now I also knoticed something wrong with the doors... 

É assim que as portas de lojas da época eram. Duas vezes mais altas que uma pessoa normal, como pode ver pelas fotos...
This is what doors from back then should look like. Twice as tall as the average person, as you can see from the pictures...

Na verdade o Angelo (professor de maquetes e miniaturas), que estava me orientando e ajudando na época, bem que queria fazer as portas consideravelmente mais altas, mas eu não quis. Eu achei que ficariam grandes demais. Mesmo assim, pensava em fazer como as da foto, com uma pequena 'janela' semicircular no alto. Nanina! Agora que já estou bem mais familiarizada com a escala, só de olhar já sabia que havia algo estranho para estes planos... Então, peguei "emprestado" uma porta pronta que tinha comprado e... encaixou na altura da abertura das portas! Daí que, se eu insistisse em fazer a tal "janelinha semicircular" no alto, conforme planejado, uma "pessoa" normal, em miniatura, não passaria pela porta de jeito nenhum! Ou eu teria que mudar o projeto todo para 1:24 ou mudar as portas. Escolhi a segunda opção...
Well, Angelo, who was helping me back then, did want to make the doors much higher (taller?), but I didn't agree. I thought they'd be too big. But yet, I wanted to make them like the ones I saw in the pictures, with a little semi-circular window on the top, like a Palladian door. Nope! Now that I have a better feel on scale, I sensed something was off... So, I "borrowed" a ready-made door from HBS I have and... it fit! So, if I insisted on making it as planned, it would end up being too small for a 'regular' person to go trough. I'd either have to switch the whole project to half scale or change the door plans. I chose the second option... 


Bem, então vamos lá!
So, off we go!

O primeiro passo foi medir as aberturas para as portas na estrutura. A partir disso, desenhei os moldes em papel. Usei um cortador/compasso para manter o topo circular. Depois usei os moldes para cortar as portas 3 vezes em papelão paraná, 6 vezes em papel duplex (o mesmo das caixas de cereal matinal) e 6 vezes em papel canson (alta gramatura, vendido em blocos nas melhores papelarias - é branco e tem uma textura interessante).
First step was to measure the openings in the structure. From that, I drew patterns on paper. I used a special  cutter/dividers to keep the top circular. Then I used the patterns to cut the doors 3 times on hard cardboard (same as the one used to make shoe boxes), 6 times on a thinner cardboard (the same as the one used to make cereal boxes) and 6 times on canson paper (used by art students - it's thicker than regular paper and it has an interesting texture too).


Daí cortei os panéis internos da porta, na camada intermediária - que corresponde ao papel duplex. Mantenha um bom controle de qual painel pertence a qual 'porta', ou terá problemas depois para encaixar! E ficará feio, pois diferenças pequenas na hora de cortar vão fazer uma grande diferença no final.
Then I cut out the inner panels of the intermediate layer (the one that would correspond to the "cereal box" cardboard). Make sure you don't mix up the panels, as very slight differences might make a huge difference in the end. 


Lixei as bordas de cada painelzinho para arredondar as arestas. Então usei a mesma 'porta' de onde os paineizinhos foram recortados como guia para colá-los no papelão paraná. Isto ajuda a posicionar cada um corretamente!
I sanded the removed panels, to make the edges more 'round'. Then I used the very same cardboard parts from where the panels were removed as a guide to glue the panels on the hard-cardboard doors. This helped  me keep them in the right position, all the time. 


Removi o trecho que faltava e colei cada painel de cada lado de uma das portas em papelão paraná.
I removed the remaining central parts, sanded the edges again and glued the outside part on each side of the forming doors. 

Repeti o processo usando os moldes de novo, desta vez no papel canson.
I repeated the process using the patterns on the 'canson' paper too. 

E aqui estão as portas, com todos os painéis cortados e colados no lugar!
And here you have the doors, all cut and glued in place!

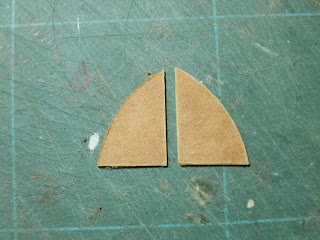
E aqui, já pintadas - parecem mais com portas, não é? :) E só então é que eu cortei ao meio, fazendo as duas metades de cada porta.
Now painted too - it does start to look more like doors, right? :) And only then I cut them in the middle, making two half doors.

Hora de instalar as dobradiças. Importadas, aqui no Brasil não achei pequeninas assim. Recortei uma reentrância para encaixar a dobradiça para que ficasse nivelada com a lateral da porta. Colei com super-bonder. E depois usei alicates para inserir cada minúsculo preguinho (são 3 para cada lado da dobradiça!), passando um pouquinho de super-bonder na ponta para segurar melhor. Se não fizer isso, sai fácil!!
Time to apply the hinges. I cut a little bit to fit them into the sides of the doors. Then used super-glue to hold the hinge in place. And used pliers to insert the tiny little nails in the right places. I put a drop of super-glue on a piece of paper and smear the nail in them, before I insert them, just to help them hold better and longer. Those things are fragile!!!


Agora é a vez do batente. Medi o comprimento total da abertura e cortei longas tiras em papel duplex. 6 mm para o batente e 2 mm para a parte mais 'alta' que segura a porta. O importante é que a 'fatia' onde será instalada a dobradiça deve ter a mesma 'largura' (profundidade?) da porta, ou ela não fechará bem!
Time to make the door jamb and stop. I measured the length of each opening and cut long strips from the "cereal box" cardboard. About 1/4" for the door jamb and 3/32" for the stop. What is important is that the space where you'll place the hinge is the same width (depth?) of the door, or they won't close well!!

Colei e pintei as tiras...
Glued and painted the strips...

E puxei entre os dedos para dar um formato curvo no meio, que ficaria na parte superior da porta.
And pulled them between my fingers to 'coax' them into a curve on where they'd be on the top of the opening (middle of the strips).

Formam-se alguns 'calombinhos' no processo de curvar papel, sempre. A melhor forma de se livrar deles é pressionar para dentro. Usei a parte de trás da base de uma lixa de unha de metal. É feita para empurrar cutícula, mas a parte de trás é curva e firme o bastante para isso, perfeita!
Little 'bumps' always form when you curve paper. The best way to get rid of them was to press them back into place. I used the back of a metal nail file. Usually it's meant to push back cuticles on our nails, but the back is round, and it's perfect for that!

Entalhe as reentrâncias para as dobradiças nos batentes também e instale-as do mesmo modo como nas portas. Esta parte é a que menos gosto de fazer! Parece fácil olhando as fotos, mas é um processo lento e 'doloroso'. Virava a estrutura toda de um lado para o outro, usei objetos para manter a porta no lugar ao instalar as dobradiças, etc. E esses malditos preguinhos minúsculos insistiam em voar para longe, alguns nunca mais foram vistos... Palavrões foram ditos... Se alguém souber um jeito mais fácil de instalar essas mini dobradiças, pode compartilhar! :)
Cut a little bit where you'll place the hinges and place them as you did on the sides of the doors. This was my least favorite part so far! I know it seems easy-peasy from the pictures, but it's a slow and painful process. I turned the structure on the sides, used objects to hold each side of the doors in place while positioning and 'nailing' the hinges, etc. Those damn tiny nails flew away, some got lost and were never seen again... Names were called... If anyone knows of a better, faster and easier way to install hinges in miniature, please, do share! :)

Bem, depois de uma longa batalha com minúsculos preguinhos e dobradiças teimosas, partes da pintura que havia aplicado com spray nas dobradiças douradas (preto parece mais com ferro que dourado brilhante) saíram, é claro! Não podia aplicar spray de novo pois ia fazer muita bagunça. Para minha sorte, achei um esmalte de unha não só preto, mas também fosco! Eba! Usei um micro-pincel - do tipo usado pelos dentistas - para não ter que sacrificar um pincel ultra-fino nessa operação - e retoquei aqui e ali. Parece bom... :)
Well, after the long battle, some of the paint I had sprayed on the golden hinges to turn them black (like wrought iron) was, of course, gone!. I could not spray them again without risking making a big mess. Lucky me, I found a nail polish that is not only black, but matte! Yay! I used a micro brush - the kind dentists use all the time - so I wouldn't have to sacrifice a good 00 paintbrush on this - and re-touched here and there. Looks good enough... :)


Eu já tinha algumas fechaduras que havia comprado da Cia das Artes anos atrás (modelo MEF-10678), especialmente para este projeto, e colei no lugar somente depois que as portas já estavam instaladas, para mantê-las alinhadas - por algum motivo as portas parecem sempre se 'mover' um pouco durante o processo de instalação, não importa o cuidado que eu tenha... :(
I had some locks I had bought from Cia das Artes years ago (model MEF-10678), especially for this project, and glued them in position only after the doors were installed, to keep them well aligned - somehow the doors always seem to 'move' a little during the install process... :(

E assim ficaram as portas, finalmente instaladas: fechadas e abertas.
And these are the doors, finally installed: closed, and open.


Obrigada! Thank you!
.

segunda-feira, 22 de abril de 2013

Enquanto isso... Macramê! - Meanwhile... Macrame!

Tenho estado ocupada com a criação e divulgação do novíssimo DHB Club. É um clube de acesso restrito a membros, bilíngue, no estilo Facebook, sem aqueles anúcios chatos. E é grátis! Confira aqui. Então, como estava sem tempo para dedicar a atenção necessária à próxima etapa da minha loja do século 19, fui tentando dar uma organizada no meu 'bagunceliê'. E, nisso, encontrei um kit antigo que consegui já há algum tempo, para fazer um porta-vaso de planta em macramê.
I've been busy setting and divulging DHB Club. It's a member-only-access international bilingual social network website, kind of like Facebook, but without the annoying ads. It's also free! Check it out here. So, while I didn't have time to finish the next step on my 19th century store, I did try to organize my workspace a bit. And while doing it, I came across a DIY kit I got from a store in Canada - it's closing down as their owners are retiring - for a plant hanger in macrame. 
acho que esse kit era da década de 70 ou 80!
I think this kit was from the 70's or 80's!
Não, eu nunca tinha feito nada em macramê antes! :) Mas tinha lembranças gostosas de infância desses suportes de vasos, quando eles eram um pouco mais comuns de ver e também um tanto "chiques". Então, decidi tentar. Bem... leva um tempão para fazer um! :) Nozinho por nozinho, um suporte para plantas pode muito bem levar 2 dias ou mais para ser finalizado... Mas algo estava errado com o meu. Não parecia muito com os que eu lembrava, dê uma olhada:
Nope, I have never tried macrame before! :) But I have some nice memories of those from my childhood, when they were more common and also very fancy. So, I decided to give it a try. Well... it takes time! :) Knot by knot, one plant hanger might take as much as 2 days to be finished... But something was very wrong with mine. It didn't look quite as the ones I remembered, check it out:

Eu até achava que tinha acertado na maioria das 'alças' do suporte, mas ainda assim parecia estranho. Então pesquisei no Youtube por vídeos que ensinassem a fazer macramê na escala normal. Até então eu só tinha a folhinha com o tutorial escrito e algumas imagens para seguir, então podia bem estar fazendo tudo errado.
I even think I got each most of the 'legs' of the hanger right, but it seemed so off. So I went ahead and searched on Youtube for some video tutorials on life size macrame. I only had a written tutorial with some drawings to follow, so I might be doing something wrong. 

De fato, achei dois vídeos excelentes, que recomendo totalmente. Esta senhora, thecraftingcorner, tem vários vídeos curtos onde ensina muito bem como fazer os nós básicos. E este outro vídeo, da macrame school, é um vídeo maravilhoso sobre um suporte para plantas muito lindo.
I did find two excellent videos, which I totally recommend. This lady, thecraftingcorner, has several short videos where she explains really well how to make the basic knots. And this other video, by macrame school, is a wonderful video of a beautiful plant hanger. 

Alerta: se você quiser assistir este último vídeo para aprender a fazer macramê, desligue o som. Ela realmente escolheu uma música linda, mas é tão suave, e assistir ela trabalhar, nó por nó, também é tão relaxante, que se você deixar o som ligado, pode sem querer descobrir a cura para sua insônia, hahaha!
Word of caution: if you watch this last video to learn how to make macrame, turn the sound off. She chose a beautiful soundtrack, but it's so relaxing, and watch her go, knot by knot, is also so soothing, that if you leave the sound on, you might find the cure for your insomnia, lol! 

De qualquer forma, notei que uma característica em comum é que o fio, ou melhor, o cordão usado era sempre um tanto grosso, variando entre 5 mm e 10 mm. E o fio de costura fornecido no kit era fino demais!!! Ele equivaleria a um fio de uns 2 mm no máximo, na escala normal. Por isso ficou tão estranho!...
Anyhow, I noticed that a common feature was that the thread or cord used was kind of thick, varying from 3/16" to 5/16". And the sewing thread provided in the kit was way too thin!!! It would translate into something smaller than a 1/16" in life size. That's why it was so off!...

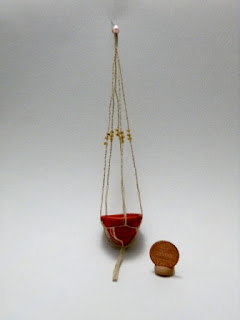
Bem, com isso resolvi tentar de novo. Usei um fio um pouco grosso demais desta vez, que equivaleria a uma corda na escala normal. Mas eu já vi suportes de plantas em fotos na internet com uns 2 metros de altura e com mais de 50 cm de largura, feitos de corda, então não está tão fora de escala assim. E, o melhor, desta vez o trabalho aparece, eba! :)
Well, I gave it another try. This time I used a much thicker thread, kind of like a rope in miniature. It is a little bit too large, but I've seen plant hangers as tall as 8 feet and 15" wide, made of actual rope. So, it's ok. And the knot work does show this time, yay! :) 
Até que não ficou nada mal, não é? :)
Not too bad, right? :)
Na próxima vez que fizer um, vou usar fio de crochê, aposto que ficaria lindo! :)
Next time I'll use some crochet threads, I bet they'll look great! :)

.
Obrigada! Thank you!
.

domingo, 14 de abril de 2013

Escada em espiral - Spiral iron stairs

Bem, depois de um longo "silêncio" no blog, mas bastante atividade fora dele (repaginando o site DollhouseBrazil, criando o MinisVitrine - já colocou seu blog ou site lá? - criando websites para outros miniaturistas, trabalhando offline...), finalmente consigo um tempinho para colocar o andamento da loja do século XIX em dia!!!
Well, after a long period of "silence" here on the blog, but very active outside it (I revamped the Dollhousebrazil website, I created MinisVitrine: the free-to-post white pages/yellow pages for the miniature community- have you placed your website/blog/club/store, etc there yet? - created websites for other miniaturists and also real life work...), I finally managed some time to update my work on the 19th century store!

Eu queria muito colocar uma escada em espiral, daquelas de ferro batido. Morro de aflição em usar uma na vida real - não sou muito chegada em escadas, trauma de infância, rsrs.... mas acho lindésimas. E são um elemento arquitetônico muito típico da época. 
I really wanted to place a spiral staircase, that Victorian kind made of wrought iron. In real life I'm kinda terrified of those - I'm not a huge fan of stairs, any kind of stairs, since I was a child and fell off one, :) but I do think they are drop-dead gorgeous (pun intended, lol!). And also they are a very typical architectonic feature of that time.


Como eu não sabia se minha tentativa ia dar certo, nem me dei ao trabalho de registrar as etapas cuidadosamente. Aqui vocês terão uma idéia do que fiz em linhas gerais. Mas depois que terminei descobri outros tutoriais na internet, com resultados bem semelhantes ao que consegui, uma inclusive usa praticamente os mesmos materiais que eu usei! Os dois tutoriais são em espanhol e repletos de fotos: El mundo de las manualidades e Pequeñeces.
As I wasn't sure if my attempt to create the spiral staircase would be successful, I didn't register each step of the way very carefully. Here you'll have an idea of what I did. But after I was finished, I discovered other tutorials to make stairs very similar to the one I made, one of them even uses the same materials I used! Both are in Spanish (use google translator if you need assistance), but they are very clear and have plenty of pictures:
El mundo de las manualidades and Pequeñeces.


O material que usei:

  • um tubo de borracha de aprox 3mm de diâmetro (comprei em uma loja especializada em borrachas, mas lojas de material elétrico ou de construção têm produtos semelhantes)
  • um tubo de borracha mais grosso, com cerca de 1 cm de diâmetro para o poste central
  • uma vareta redonda com o mesmo diâmetro do orifício central do tubo de borracha acima. Cerca de uns 4mm. Pode usar palito de churrasco
  • várias varetas mais finas para usar no corrimão. Pode usar hastes de cotonete, palitos de pirulito, etc.
  • um leque xing-ling de "madeira", comprado em loja de 1,99 [sugiro usar um de plástico, em vez deste de "madeira" que usei]
  • biscuit (opcional)
  • super-bonder
  • tinta spray preta
List of materials:
  • a plastic/rubber tube about 3/16" in diameter (I got it from a specialized store, but you can find similar ones at any hardware store, I believe)
  • a thicker plastic/rubber tube, about 3/8" in diameter, used as central axis
  • a wood dowel with the same diameter as the hole inside the thicker tube (about 3/16" in my case)
  • several wood dowels for the rails (about 1/8" or less)
  • a cheap "made in China" "wooden" (?) hand fan. [I suggest using the plastic one instead]
  • cold porcelain or polymer clay (optional)
  • super glue
  • black spray paint
Cortei pedaços do tubo mais grosso, em intervalos de ~1,5 cm: dê o espaçamento que desejar para a altura dos degraus.
I cut the thicker tube at regular intervals. Cut them the same the distance you want to have between each step and the next. In my case, ~9/16".


Corte cada haste do leque no comprimento dos degraus. Algo entre 6 e 7 cm. Fiz um furo em um dos cantos do lado mais largo para passar o palito mais fino. Esta parte é mais difícil. Por isso é que aconselho usar um leque de plástico. É o mesmo preço e deve ser mais fácil de trabalhar... Este é difícil de cortar e furar onde a gente quer, e quebra MUITO fácil onde a gente não quer... Dá para ver as manchas de super-bonder onde tive que consertar. Joguei vários fora!!!
Cut each "blade" of the fan in the length you want for the step. Something between 2 1/4" and 2 5/8". I drilled one corner of the larger part of each blade to let the thinner dowel go through. Working with the blades is a very tricky thing... It's hard to cut or drill them where you want to, but it breaks REALLY easily where you don't want it to... You can see the stains caused by super glue where I had to fix some of those "accidents". I had to throw many of them away because of that!!


Corte os palitos somando o espaço entre os degraus mais a altura que deseja que o corrimão tenha. Meça a altura de um corrimão real e divida por 12 para ter uma idéia aproximada. Os meus palitos têm cerca de 10 cm de comprimento. Usei uma haste que fiz de biscuit, somente no primeiro, para dar um efeito diferente. Pode usar todos de madeira se preferir.
To cut the dowels for the rails, consider the height you want them to have and add the distance between each step. You can measure a real-life-size stair rails (and then divide by 12) to have a better idea of what is a good size. In my case, they are about 4 inches. The first one was made of cold porcelain, just to add a different charm to it.


Segure a vareta mais grossa em algum lugar que fique firme. Coloque o primeiro "espaçador" que cortou do tubo de borracha mais grosso. Cole um "degrau" que fez com o leque. Insira outro espaçador, e, em seguida, cole o próximo degrau, um pouco mais para trás. Insira um palito no furo para colocar no lugar certo. Se quiser, já pode colar o palito no degrau de baixo para que já fique no lugar. Use super-bonder. Prossiga até chegar no último degrau. Faça furos a intervalos regulares na parte de baixo da tira do corrimão e cole por cima dos palitos, encaixando-os. Pinte com spray preto e pronto!
Place the thicker dowel somewhere it'll be held firmly. Place the first "spacer" you cut from the rubber/plastic tube. Glue one "step" you made from the fan blades. Insert another spacer and another step. Turn it a little on the central axis. If you insert the thinner dowel on that hole on the corner you had already drilled, and glue it to the corner of the first step, you can have a better control of that positioning. Use super-glue. Go on until you reach the last step. Make some holes on one side of the other rubber/plastic tube and glue on top of the rails/dowels. Paint with black spray paint and you're ready to go!


Eu já tinha feito um furo no piso no lugar em que vou encaixar a escada, então será só encaixar/colar lá. Outros tutoriais ensinam a fazer uma base, o que acho uma opção bem inteligente. 
As I had previously drilled a hole on the floor to place the stairs, all I'll have to do is glue it there when the time comes. The other tutorials I mentioned teach to make a base, which I think is a very clever option.

.
Obrigada! Thank you!
.

Related

Related Posts Plugin Blogger...