segunda-feira, 22 de abril de 2013

Enquanto isso... Macramê! - Meanwhile... Macrame!

Tenho estado ocupada com a criação e divulgação do novíssimo DHB Club. É um clube de acesso restrito a membros, bilíngue, no estilo Facebook, sem aqueles anúcios chatos. E é grátis! Confira aqui. Então, como estava sem tempo para dedicar a atenção necessária à próxima etapa da minha loja do século 19, fui tentando dar uma organizada no meu 'bagunceliê'. E, nisso, encontrei um kit antigo que consegui já há algum tempo, para fazer um porta-vaso de planta em macramê.
I've been busy setting and divulging DHB Club. It's a member-only-access international bilingual social network website, kind of like Facebook, but without the annoying ads. It's also free! Check it out here. So, while I didn't have time to finish the next step on my 19th century store, I did try to organize my workspace a bit. And while doing it, I came across a DIY kit I got from a store in Canada - it's closing down as their owners are retiring - for a plant hanger in macrame. 
acho que esse kit era da década de 70 ou 80!
I think this kit was from the 70's or 80's!
Não, eu nunca tinha feito nada em macramê antes! :) Mas tinha lembranças gostosas de infância desses suportes de vasos, quando eles eram um pouco mais comuns de ver e também um tanto "chiques". Então, decidi tentar. Bem... leva um tempão para fazer um! :) Nozinho por nozinho, um suporte para plantas pode muito bem levar 2 dias ou mais para ser finalizado... Mas algo estava errado com o meu. Não parecia muito com os que eu lembrava, dê uma olhada:
Nope, I have never tried macrame before! :) But I have some nice memories of those from my childhood, when they were more common and also very fancy. So, I decided to give it a try. Well... it takes time! :) Knot by knot, one plant hanger might take as much as 2 days to be finished... But something was very wrong with mine. It didn't look quite as the ones I remembered, check it out:

Eu até achava que tinha acertado na maioria das 'alças' do suporte, mas ainda assim parecia estranho. Então pesquisei no Youtube por vídeos que ensinassem a fazer macramê na escala normal. Até então eu só tinha a folhinha com o tutorial escrito e algumas imagens para seguir, então podia bem estar fazendo tudo errado.
I even think I got each most of the 'legs' of the hanger right, but it seemed so off. So I went ahead and searched on Youtube for some video tutorials on life size macrame. I only had a written tutorial with some drawings to follow, so I might be doing something wrong. 

De fato, achei dois vídeos excelentes, que recomendo totalmente. Esta senhora, thecraftingcorner, tem vários vídeos curtos onde ensina muito bem como fazer os nós básicos. E este outro vídeo, da macrame school, é um vídeo maravilhoso sobre um suporte para plantas muito lindo.
I did find two excellent videos, which I totally recommend. This lady, thecraftingcorner, has several short videos where she explains really well how to make the basic knots. And this other video, by macrame school, is a wonderful video of a beautiful plant hanger. 

Alerta: se você quiser assistir este último vídeo para aprender a fazer macramê, desligue o som. Ela realmente escolheu uma música linda, mas é tão suave, e assistir ela trabalhar, nó por nó, também é tão relaxante, que se você deixar o som ligado, pode sem querer descobrir a cura para sua insônia, hahaha!
Word of caution: if you watch this last video to learn how to make macrame, turn the sound off. She chose a beautiful soundtrack, but it's so relaxing, and watch her go, knot by knot, is also so soothing, that if you leave the sound on, you might find the cure for your insomnia, lol! 

De qualquer forma, notei que uma característica em comum é que o fio, ou melhor, o cordão usado era sempre um tanto grosso, variando entre 5 mm e 10 mm. E o fio de costura fornecido no kit era fino demais!!! Ele equivaleria a um fio de uns 2 mm no máximo, na escala normal. Por isso ficou tão estranho!...
Anyhow, I noticed that a common feature was that the thread or cord used was kind of thick, varying from 3/16" to 5/16". And the sewing thread provided in the kit was way too thin!!! It would translate into something smaller than a 1/16" in life size. That's why it was so off!...

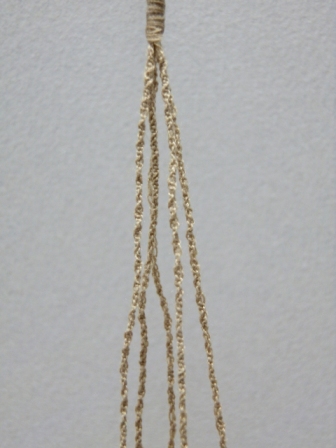
Bem, com isso resolvi tentar de novo. Usei um fio um pouco grosso demais desta vez, que equivaleria a uma corda na escala normal. Mas eu já vi suportes de plantas em fotos na internet com uns 2 metros de altura e com mais de 50 cm de largura, feitos de corda, então não está tão fora de escala assim. E, o melhor, desta vez o trabalho aparece, eba! :)
Well, I gave it another try. This time I used a much thicker thread, kind of like a rope in miniature. It is a little bit too large, but I've seen plant hangers as tall as 8 feet and 15" wide, made of actual rope. So, it's ok. And the knot work does show this time, yay! :) 
Até que não ficou nada mal, não é? :)
Not too bad, right? :)
Na próxima vez que fizer um, vou usar fio de crochê, aposto que ficaria lindo! :)
Next time I'll use some crochet threads, I bet they'll look great! :)

.
Obrigada! Thank you!
.

domingo, 14 de abril de 2013

Escada em espiral - Spiral iron stairs

Bem, depois de um longo "silêncio" no blog, mas bastante atividade fora dele (repaginando o site DollhouseBrazil, criando o MinisVitrine - já colocou seu blog ou site lá? - criando websites para outros miniaturistas, trabalhando offline...), finalmente consigo um tempinho para colocar o andamento da loja do século XIX em dia!!!
Well, after a long period of "silence" here on the blog, but very active outside it (I revamped the Dollhousebrazil website, I created MinisVitrine: the free-to-post white pages/yellow pages for the miniature community- have you placed your website/blog/club/store, etc there yet? - created websites for other miniaturists and also real life work...), I finally managed some time to update my work on the 19th century store!

Eu queria muito colocar uma escada em espiral, daquelas de ferro batido. Morro de aflição em usar uma na vida real - não sou muito chegada em escadas, trauma de infância, rsrs.... mas acho lindésimas. E são um elemento arquitetônico muito típico da época. 
I really wanted to place a spiral staircase, that Victorian kind made of wrought iron. In real life I'm kinda terrified of those - I'm not a huge fan of stairs, any kind of stairs, since I was a child and fell off one, :) but I do think they are drop-dead gorgeous (pun intended, lol!). And also they are a very typical architectonic feature of that time.


Como eu não sabia se minha tentativa ia dar certo, nem me dei ao trabalho de registrar as etapas cuidadosamente. Aqui vocês terão uma idéia do que fiz em linhas gerais. Mas depois que terminei descobri outros tutoriais na internet, com resultados bem semelhantes ao que consegui, uma inclusive usa praticamente os mesmos materiais que eu usei! Os dois tutoriais são em espanhol e repletos de fotos: El mundo de las manualidades e Pequeñeces.
As I wasn't sure if my attempt to create the spiral staircase would be successful, I didn't register each step of the way very carefully. Here you'll have an idea of what I did. But after I was finished, I discovered other tutorials to make stairs very similar to the one I made, one of them even uses the same materials I used! Both are in Spanish (use google translator if you need assistance), but they are very clear and have plenty of pictures:
El mundo de las manualidades and Pequeñeces.


O material que usei:

  • um tubo de borracha de aprox 3mm de diâmetro (comprei em uma loja especializada em borrachas, mas lojas de material elétrico ou de construção têm produtos semelhantes)
  • um tubo de borracha mais grosso, com cerca de 1 cm de diâmetro para o poste central
  • uma vareta redonda com o mesmo diâmetro do orifício central do tubo de borracha acima. Cerca de uns 4mm. Pode usar palito de churrasco
  • várias varetas mais finas para usar no corrimão. Pode usar hastes de cotonete, palitos de pirulito, etc.
  • um leque xing-ling de "madeira", comprado em loja de 1,99 [sugiro usar um de plástico, em vez deste de "madeira" que usei]
  • biscuit (opcional)
  • super-bonder
  • tinta spray preta
List of materials:
  • a plastic/rubber tube about 3/16" in diameter (I got it from a specialized store, but you can find similar ones at any hardware store, I believe)
  • a thicker plastic/rubber tube, about 3/8" in diameter, used as central axis
  • a wood dowel with the same diameter as the hole inside the thicker tube (about 3/16" in my case)
  • several wood dowels for the rails (about 1/8" or less)
  • a cheap "made in China" "wooden" (?) hand fan. [I suggest using the plastic one instead]
  • cold porcelain or polymer clay (optional)
  • super glue
  • black spray paint
Cortei pedaços do tubo mais grosso, em intervalos de ~1,5 cm: dê o espaçamento que desejar para a altura dos degraus.
I cut the thicker tube at regular intervals. Cut them the same the distance you want to have between each step and the next. In my case, ~9/16".


Corte cada haste do leque no comprimento dos degraus. Algo entre 6 e 7 cm. Fiz um furo em um dos cantos do lado mais largo para passar o palito mais fino. Esta parte é mais difícil. Por isso é que aconselho usar um leque de plástico. É o mesmo preço e deve ser mais fácil de trabalhar... Este é difícil de cortar e furar onde a gente quer, e quebra MUITO fácil onde a gente não quer... Dá para ver as manchas de super-bonder onde tive que consertar. Joguei vários fora!!!
Cut each "blade" of the fan in the length you want for the step. Something between 2 1/4" and 2 5/8". I drilled one corner of the larger part of each blade to let the thinner dowel go through. Working with the blades is a very tricky thing... It's hard to cut or drill them where you want to, but it breaks REALLY easily where you don't want it to... You can see the stains caused by super glue where I had to fix some of those "accidents". I had to throw many of them away because of that!!


Corte os palitos somando o espaço entre os degraus mais a altura que deseja que o corrimão tenha. Meça a altura de um corrimão real e divida por 12 para ter uma idéia aproximada. Os meus palitos têm cerca de 10 cm de comprimento. Usei uma haste que fiz de biscuit, somente no primeiro, para dar um efeito diferente. Pode usar todos de madeira se preferir.
To cut the dowels for the rails, consider the height you want them to have and add the distance between each step. You can measure a real-life-size stair rails (and then divide by 12) to have a better idea of what is a good size. In my case, they are about 4 inches. The first one was made of cold porcelain, just to add a different charm to it.


Segure a vareta mais grossa em algum lugar que fique firme. Coloque o primeiro "espaçador" que cortou do tubo de borracha mais grosso. Cole um "degrau" que fez com o leque. Insira outro espaçador, e, em seguida, cole o próximo degrau, um pouco mais para trás. Insira um palito no furo para colocar no lugar certo. Se quiser, já pode colar o palito no degrau de baixo para que já fique no lugar. Use super-bonder. Prossiga até chegar no último degrau. Faça furos a intervalos regulares na parte de baixo da tira do corrimão e cole por cima dos palitos, encaixando-os. Pinte com spray preto e pronto!
Place the thicker dowel somewhere it'll be held firmly. Place the first "spacer" you cut from the rubber/plastic tube. Glue one "step" you made from the fan blades. Insert another spacer and another step. Turn it a little on the central axis. If you insert the thinner dowel on that hole on the corner you had already drilled, and glue it to the corner of the first step, you can have a better control of that positioning. Use super-glue. Go on until you reach the last step. Make some holes on one side of the other rubber/plastic tube and glue on top of the rails/dowels. Paint with black spray paint and you're ready to go!


Eu já tinha feito um furo no piso no lugar em que vou encaixar a escada, então será só encaixar/colar lá. Outros tutoriais ensinam a fazer uma base, o que acho uma opção bem inteligente. 
As I had previously drilled a hole on the floor to place the stairs, all I'll have to do is glue it there when the time comes. The other tutorials I mentioned teach to make a base, which I think is a very clever option.

.
Obrigada! Thank you!
.

sexta-feira, 1 de março de 2013

Threshold - Soleira

Finalmente consigo mostrar algum progresso na minha loja do século 19! Bem, andei meio quietinha no blog, mas muita coisa tem rolado nos bastidores... :)
Uma delas não foi tão boa assim. Depois de anos invicta, a dengue finalmente me pegou! Fiquei uma semana grogue, de molho e sofrendo com a maldita!! Por que ainda não desenvolveram uma vacina contra esse virus? Ai, ai... mas já estou bem melhor, obrigada!
I can finally show some progress in my 19th century store! Well, I've been quite quiet lately, but there were so many things happening in the backstage... :)
One of them wasn't nice at all. After years untouched, an endemic virus here has finally reached me. I was down for a full week thanks to 'dengue'. Why haven't they developed a vaccine against this virus is beyond me. I'm fully recovered now, thanks!


Ok, então vamos voltar ao trabalho! :)
Se você se lembra, na última postagem eu tinha trabalhado na fachada da loja, colocando os realces de 'cimento' nas portas e detalhes nas laterais. Bem, agora foi a vez de dar acabamento na parte interna das soleiras: Preenchi com massa de preenchimento que comprei em loja de material de construção e pintei com a mesma tinta de antes.
Ok, let's get back to work then! :)
If you remember, on my last post I had worked on the store facade, 'installing' the cement ornaments around the doorways and on the sides of the building. Well, now it was time to give a better finish to the inside of the door openings (threshold): I filled with a product I bought at a kind of home depot store here, used for filling holes in brick walls. It's good because it won't shrink when dry. Then I painted with the same paint as I used before. 


Depois, foi a vez de  e fazer um acabamento de 'mármore' na soleira, antes do piso de madeira. Para isso usei biscuit. Uma bola de biscuit branco, uma de natural e um tantinho de preto. Se você for fazer também, sugiro usar cinza em vez de preto, mais adiante entenderá porque...
Then, it was time to make a 'marble' finish on the threshold floor, before the wood flooring. This time I used cold porcelain. One 'ball' of white, one of natural, and a little bit of black. If you are also trying to do this, I strongly suggest using grey instead of black. You'll understand why later...


Fiz umas 'cobrinhas' com a massa preta, distribuí ao redor de um rolo que fiz com a branca, e também de um rolo semelhante com a natural. Envolvi tudo com mais um tanto de massa e fui girando e dobrando para conseguir o efeito marmorizado. Tome cuidado para não misturar demais senão fica sem graça!
I made some little 'snakes' with the black one, and spread them around the roll I made with the white and with the natural ones. Then I wrapped the whole set with some more white dough and twisted and turned the whole thing until I got a marbled effect. Be careful not to mix too much, as it'll all blend in and it'll be quite dull!


Abri a massa com rolo e cortei no tamanho das soleiras.
I opened the dough with a roll and cut some strips to fill the thresholds perfectly.


Passei bastante cola nas soleiras - inclusive nas laterais! - lembre-se que o biscuit encolhe depois de seco, e se não tiver cola para segurar no lugar certo, vai ficar muito feio!
I spread plenty of glue to the threshold where the strips would go, specially to the sides! - remember that cold porcelain shrinks when dry, and if you don't apply enough glue, it'll be very ugly!


E agora dá para ver porque o cinza teria sido melhor que o preto. Quando seca o biscuit escurece mais. E o preto faz um contraste muito forte, não fica um mármore muito realista.... A solução foi passar uma mistura bem aguada de tinta branca por cima. Na foto não mostra bem, mas ao vivo ficou até legal! Depois de seco, passei uma demão de verniz fosco à base de água para proteger. 
And now you'll see why grey would have been better than black. After dry, cold porcelain gets darker. And black will make too strong a contrast, not too realistic for marble... The solution was to apply a coat of a white wash on top of them. The picture doesn't show well, but it does look good in real life! After well dry, I applied a coat of matte water based varnish to protect the whole thing.


Obrigada! Thank you!
.

quarta-feira, 12 de dezembro de 2012

Casa Toscana II - Tuscany House II

ATUALIZAÇÃO (post original):

Consegui finalmente fazer as luzes funcionarem, e acrescentei uma grade na lateral.


UPDATE (original post):

I finally managed to make the LED lights work, and I also added a railing on the side of the porch.

A grade eu achei no ebay. Era um pouco maior que o espaço disponível, então tive que adaptar. E também não é tão delicada quanto o portão de chipboard, mas acho que combinou bem... :)
I saw this "Victorian railing" on eBay and just couldn't resist... It was a little larger than the space available, so I had to cut/adjust it. And it's not as delicate as the chipboard gate that came with the kit, but I think it fits nicely... :)

Com a grade instalada, não dava para deixar os outros vasos grandes, não ia dar 'passagem' para os 'habitantes' em miniatura, rsrs... Então troquei os vasos de lavanda por uns menores, e clareei mais a folhagem para ficar mais realista...
With the new railing, the larger lavender pots wouldn't fit well, they would take up space and block the 'way' for the miniature 'inhabitants', :) So I downsized the pots and painted the leaves a lighter shade, to make them more similar to real ones...

Finalmente, as luzes! O kit original veio só com o LED para colocar no poste de luz externo. Eu queria um na porta também. Usei o LED original, em um tom mais quente, do lado da porta. E usei um dessas luzes de natal que não funcionava mais, e que tem um tom mais azulado, no poste do passeio. Deu muito trabalho! Queria ligar os dois no mesmo conjunto de bateria. Testava antes de soldar e funcionava bem, quando soldava, só o da porta acendia. Achei que o do poste tinha queimado... Desmontei tudo, troquei, soldei de novo e... mesma coisa! Aí, finalmente desconfiei: as pilhas só conseguiam fornecer energia para um led por vez, e o da porta levava vantagem por algum motivo... 
And finally, the lights! The original kit came with only one LED/batteries/switch kit to be used for the street lamp post. I wanted the light next to the door to work too. So I used the original LED, which had a warmer color, next to the door. And then I used a LED from a Christmas kit that was defective for the lamp post. This one has a 'cold' (bluish) shade. It was  actually a big puzzle (for me) to make them work! I wanted to connect both LEDs simultaneously, but after everything was soldered together, the 'street' led refused to work! I thought it died on me, so I disassembled everything, changed the LED, tested, re-tested, soldered again and...  same problem! Then it dawned on me: the batteries 'pack' (three small coin batteries) was enough to power only one of them, not both! 

Então desmontei uma lanterninha xing-ling, que eu já tinha, para usar o conjunto de bateria deles (+ suporte), soldei cada led em um conjunto de bateria independente, mas os dois no mesmo micro interruptor. Milagrosamente, coube tudo na base do poste (nem me pergunte como!!!)
So I used another 'battery pack' from a cheap 'made in China' finger light I had, connected each LED to its own 'battery pack', but both were connected to the same switch and, miraculously all that fit inside the 'street lamp post' base (don't ask me how...) 


Nas fotos não dá para ver bem, as luzes são mesmo fraquinhas, mas até que ficou legal, não? :)
The lights are not too strong, so you can't see them too well in the pictures, but they turned out ok, don't you think? :)

Obrigada! Thank you!
.

sábado, 8 de dezembro de 2012

Ganhei presentes! - I got gifts!

No mês passado recebi um presente MUITO especial!!! Sheila Cristina, uma miniaturista do Pará para quem eu tinha feito um jogo de sofá de presente, que sempre acompanha as novidades do DHB e aqui, e ainda por cima é especialista em novinhos de topo de bolo bem realistas, quis fazer uma miniatura minha. Bem, eu não facilitei o trabalho dela, pois detesto tirar fotos minhas, hehe... Só mandei uma foto, já antiga... Mas queria muito ter miniaturas de meus 'filhos', o Garotão, um cão de 18 anos que adotei da rua aos 6 anos e Bianca, minha gata também adotada, que virou estrelinha em novembro do ano passado, aos 17 1/2 de idade, uma senhora!
Last month I got a VERY special gift!!! Sheila Cristina, a miniaturist from Belém, Para (North of Brazil), a faithful follower of DHB and my personal blog (this very one...), happens to be a specialist in creating miniature sculptures of bride & grooms for top-of-the-cake. I made her a sofa set in 1:24 and, in return, she decided to make a mini version of me... :) I didn't make her work easy at all, as I absolutely hate to be in pictures, so I didn't have any good ones to send her so she could base her work on. Only a very old one... But I was very fond of the idea of having miniatures of my 'furry children', Garotão (Big Boy), a 18-years-old dog I adopted when he was 6 (he had been abandoned on the streets by his previous owner's family, after he died) and Bianca, a cat I also adopted but that has already crossed the Rainbow Bridge in November 2011, at the age of 17 1/2. 

E quando o presente chegou, fiquei absolutamente maravilhada! Até minha mãe viu a semelhança. E ainda ganhei uma mesa com mini-dollhouses em andamento, que lindo!!! Bem, um presente desses merecia um cenário próprio, claro... Eu não tinha nada que coubesse, pois estão na escala 1:6 (mais adequada a noivos de topo de bolo, a especialidade da Sheila).
When that special gift arrived, I was in awe! Even my mother could see the resemblance. And I also got a mini-desk with mini-dollhouses in progress, so beautiful!!! Well, such a great gift deserves nothing less than a setting of its own, of course... I didn't have any roombox that would fit them, as they are in 1:6 or playscale (which fits better for her work)

A mini-eu com a 'Bianca' no colo...
Mini-me with 'Bianca' in her arms...
Achei um nicho vazado na em uma loja de artigos de artesanato na cidade:
I found a 'hollow niche' a crafts store in the city:


O que comprei é  30x30x15 cm
The one I bought was 12x12x6 in


Estou em um período de contenção de despesas, então procurei aproveitar o máximo o que eu já tinha...
  • Do lado de fora, fiz um trabalho que misturava pintura e tecido, arrematado com passamanaria. 
  • Por dentro, usei duas folhas de scrapbook na cor lavanda que já tinha comprado há algum tempo. 
  • O acabamento foi com fita de scrapbook que também já tinha
  • O rodapé também já tinha comprado, na miniatures.com quando comprei para a loja do século 19...
Ok, so I'm on a very tight budget right now, therefore, I tried to make the best of the stash I already had...
  • Outside I decorated with paint and fabrics, finished with a trim.
  • Inside, I used two scrapbook (lavender) sheets I've had for a while
  • The finishing for the 'wallpapers' was made using a scrapbooking ribbon I've had for a while too
  • I also had the baseboard, I had bought at miniatures.com when I bought the one I used on my 19th century store (on hold for now...)


  • E para o piso?... Bem, para o piso resolvi fazer uma técnica que já tinha lido a respeito e eu já tinha até recomendado para fazerem: piso de taco usando palitos de picolé! São baratinhos, um saco com uns 50 custa só 99 centavos
  • What about the flooring?... Well, for the floor I decided to try a technique I read about a long time ago and I had even recommended it to other people: parquet flooring using popsicle sticks! They are very inexpensive, as one bag with about 50 of them costs less then 50 cents (of a dollar).
 Bem, posso garantir que NUNCA mais recomendo esta técnica!... hahaha... O efeito final é lindo, mas... 
  • os palitos têm espessura e largura variada, muito difícil de conseguir um acabamento perfeito (eu sou chata nisso...)
  • são mal lixados (nem sei se teria coragem de usar algum para seu propósito inicial, como picolé que se leva à boca!)
  • a madeira, apesar de quebrar fácil, é DURÍSSIMA, muito difícil de cortar contra o veio, para fazer os tacos. Como tinha que cortar muitos, só consegui cortando com a dremel.... Improvisei uma 'guia' de corte, mas não gostei nada....
  • o tamanho dos palitos é ideal para 1:6, como este cenário provou... Não serve para 1:12!!!!
  • deu MUITO trabalho para lixar depois de colados, para deixar todos no mesmo nível, levei 3 dias nisso, lixando manualmente. Acho que uma lixadeira orbital vai entrar na minha lista para o Papai Noel, hehe...
Well, I can assure you I'll NEVER again recommend this technique!... hahaha... The final effect is beautiful, but...
  • the sticks come in different thickness and width, a nightmare for achieving a perfect finishing and fitting (I'm pretty picky about this)
  • they are extremely rough. So bad I'm not sure I'd ever use them for their intended purpose (holding popsicles which are to be put in the mouth! Tell me about splinters!...)
  • the wood they're made of, though easily breakable, is really HARD to saw (perpendicular to the vein), which is necessary to obtain the pieces in the right size. I could only manage to do that using my dremel tool. As I had to cut many of them, I improvised a cutting jig, but I hated working with that wood...
  • Their size is ideal for 1:6, as this setting proves it... NOT good for 1:12!!!
  • it was A LOT of work to sand them after glued in place, in order to make them even (level 'down'). It took me 3 days of hard work and manual sanding. I think that an orbital sander will make it to the list I'm sending to Santa this year, lol...
Esse montinho não dá nem para o começo, hehe...
This pile won't fill half of the floor, lol...

Começando a fazer o piso....
Begining the parquet floor

Piso totalmente colado na base de papel-cartão.
Finished gluing the parquet floor on the card base.

Dá para ver como fica irregular na altura. E os espaços entre os 'tacos'! (preenchi com cola e pó de serragem)
You can see the different 'heights' of the wood pieces and the spaces between them (I filled those with a mix of glue and sawdust). 

Piso terminado, 'sintecado' e colado no lugar.
Finished floor: sanded, varnished and glued in place.
Outro detalhe interessante é que eu tinha uma lanterninha bem xing-ling, de led e com pilhas de bateria redonda. Desmontei ela toda, ampliei os fios (com solda) e usei um micro-interruptor que comprei em uma loja de materiais eletrônicos, a 90 centavos cada. Usei a dremel de novo para criar as ranhuras para que os fios não aparecessem sob o papel de parede. A luminária do teto é da própria lanterninha que comprei... O pacote dos correios no chão simboliza um igual onde veio meu presente e ainda serve para esconder as baterias!...
Another interesting detail is that I had one of those cheap LED flashlights 'Made in China', the kind that uses small round coin batteries. I took it all apart, extended the wiring (had to use soldering iron here) and a micro-switch I bought online from an electronics store for $0.50 each. I used my dremel again to create some grooving where I'd fit the (round) wires, so that they wouldn't show beneath the wallpaper. The light fixture on the ceiling is actually the top of the flashlight itself... The postal package on the floor symbolizes the one that brought me the actual gift AND also hides the batteries!... 

Entalhe para encaixar os fios...
Grooving to fit the wiring....
detalhe onde ficará o interruptor
close-up where the switch will be
  
o interruptor pronto
the finished light switch
cenário iluminado, no escuro
setting: lights on, while outside is dark

cenário iluminado, no claro
setting: lights on, daylight
E, mais uma grande surpresa, hoje recebo outro presente, da queridíssima Edi Oliveira, que faz essas ma-ra-vi-lho-sas orquídeas em biscuit. AMEI!!! Como ela adivinhou que lilás é minha cor favorita???? Acho que ela deve abrir uma loja online e vender suas criações únicas para o mundo, vocês não acham? :)
And as if that wasn't enough, to my greatest pleasure, another wonderful surprise: yesterday I got yet another gift, from my dear friend Edi Oliveira, a super-talented miniaturist who makes GORGEOUS orchids, out of cold porcelain. I LOVED it!!! How did she guess that my favorite color IS lavender???? (the actual color doesn't show well in the picture, though). I think she should open an online store and sell her OOAK creations to the world, don't you think? :)


Obrigada! Thank you!
.

Related

Related Posts Plugin Blogger...