segunda-feira, 5 de novembro de 2012

A construção - The Building (III)

Enfim... a fachada!!! :)
Finally, the facade!!! :)

Você lembra os elementos que eu queria usar na fachada? Não? Veja-os marcados na foto abaixo. Não estou reproduzindo uma loja específica, então busquei reproduzir os elementos que notei serem mais comuns na época.
Do you remember the elements I wanted to reproduce on the facade? No? Well, you can refresh you memory with the picture below. :) Keep in mind I'm not trying to reproduce in miniature one specific store. Instead, I'll try to reproduce some recurring elements of that time that I noticed when I was doing my research.


Bem, comecei por baixo... Notei que as lojas da época tinham uma espécie de 'faixa', com uns 80 cm de altura + ou -, texturizada e geralmente com terminação arredondada. Acho que para proteger a pintura de marcas feitas por pés, quando os homens apoiavam na parede? Bem, para isso, colei um pedaço de papelão paraná sobre o outro, para obter uma espessura de uns 3 mm. Cortei nas mesmas medidas das larguras entre as portas. 
Well, I started from the bottom. I noticed that stores back then had a kind of 'band', around 2 1/2 feet tall, with a texture and usually ending in a rounded finish. I think it was meant to protect the painting from the feet, as men used to rest their feet on the wall while leaning against it?... Anyway, I glued two layers of thick solid cardboard to get a thickness of about 1/8". Then I cut in widths that matched the ones between the doors.


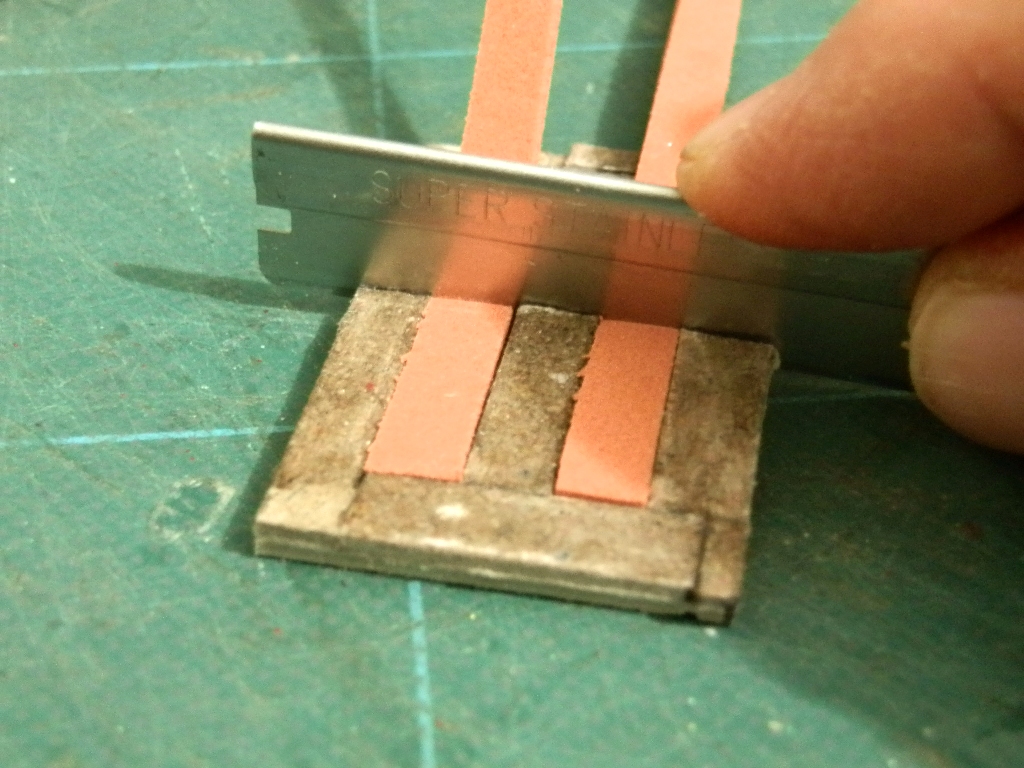
Eu já tinha comprado há algum tempo varetas em semi-círculo na loja do John Constable (Canadá). Cortei nas mesmas larguras e colei, mantendo bem preso até a cola secar. Colei cada conjunto no seu lugar, mantendo preso com prendedores, para não soltar nadinha.
I had bought some time ago some some half dowels from John Constable (Canada). I cut pieces with the same length as the width of the cardboard pieces. I glued them on top, securing with clamps. Then I glued each to the right place on the facade, again securing with clamps until glue was set.


Agora era a hora de aplicar textura... Protegi bem toda a área em volta com fita própria para pintura, da 3M. Usei textura criativa, da Acrilex. A que eu tinha era transparente, o que não importa muito pois pintarei depois. Mas esse material é ótimo para imitar granito, por exemplo, e vem em várias texturas! Depois que seca fica duro como pedra!!! Espalhei uma quantidade generosa, e dei batidinhas com pincel de pintar estêncil para dar a textura que eu queria. Tem que trabalhar pequenas áreas por vez, e rápido, pois seca logo!
Now it was time to apply the texture... I protected well all around with masking tape. I used a product called textura criativa, by Acrilex, a national brand. The one I had is transparent, but that's irrelevant as I was going to paint it later. This material is great to create granite too (in one of the other colors offered). It dries as hard as stone!!! I spread a thick layer, tapped with stencil brush to create the texture. I had to work small areas at a time, as this material dries very fast!...


Depois de seco, pintei. Mas ficou muito mais escuro do que eu queria, então depois pintei de novo, num tom mais claro.
After well dry, I painted them. But I thought it was way too dark. I painted it again with a lighter shade later.


Cortei os arcos em papelão paraná, usando os próprios arcos das portas (vãos) como referência. Coloquei o papelão por trás e tracei com um lápis. Como os arcos da fachada foram cortados manualmente, não dá para garantir que ficaram todos os arcos iguais, então tracei e marquei cada um individualmente. 
Next I cut the ornaments around the arches. I used the solid cardboard again. I used the arches themselves to trace the ones I'd cut on paper. The ones on the building had been cut manually, so I could not be sure they were exactly the same shape and size. So I traced and marked each one individually (to remember which was which later).


Cortei um pedacinho para fazer de detalhe. Cometi o erro de colar antes de colar o arco em si. Alguns ficaram descentralizados, o que me deu trabalho depois, pois tive que 'acertar' com pasta de modelar. Deixe para colar depois do arco já no lugar. Cortei também as tiras retas das laterais. 
I also cut some small pieces to make the top ornament. I made a mistake here: I glued them on the paper arches before gluing the arches on the wall. Oh-oh, they ended up being off center. I corrected that using modeling paste, but I strongly recommend you not to do the same... :) I also cut the straight strips to go on each side.


Já aproveitei e 'tirei o molde' para cortar o relevo que vai do lado de dentro, mas em um papel mais fino (1mm de espessura).
I also traced the details that will go inside, on a thinner paper (1/16").


Para as 'molduras' do alto da fachada, encomendei umas prontas na miniatures.com. Essas molduras geralmente eram instaladas aos pares, paralelas. Uma bem no alto e outra mais embaixo. E, não sei porque, a de baixo costumava ser maior.... Cortei uma tira de balsa e arredondei para acrescentar à moldura pronta. 
For the mouldings on top of the facade, I ordered some crown mouldings from miniatures.com. Those usually came in pairs back then, one on top and the other one a little bit lower. I don't know why the lower one was usually bigger... but I cut a strip of balsa wood, rounded one of the corners and glued it to one of the crown moldings to get that same effect.


Testei (quase) todos os elementos no seu devido lugar, antes de colar. Cortei também os retângulos que vão nas laterais. Fiz a conta do espaço disponível para saber quantos cortar e qual o tamanho. 
I dry fitted (almost) all elements before painting and gluing. It doesn't show on the picture, but I also cut some rectangles to go on each side. Some math was involved to figure the exact number of rectangles that would fit the available space and the space between them...


Pintei todos os elementos decorativos da fachada em um tom marfim e colei no lugar. Gosto de usar uma cola que comprei lá fora, a Ultimate Crafter's Choice. Parece com nossa cola branca, mas é muito mais espessa e forte. Seca rápido e depois não solta por nada!!! Muito boa para elementos da construção em si. 
I painted all elements before gluing, using the seashell white by Ceramcoat. To glue building elements, I like to use the Ultimate Crafter's Choice. Very strong and reliable!

Bem, a fachada ficou assim: 
Well, this is what it looked like in the end:


Ainda falta arrumar os arcos internos (note onde o mdf aparece), mas vou fazer isso quando trabalhar nas portas. E também colocar os números, a placa com o nome da loja, a propaganda na lateral e umas urnas no alto, mas vou deixar para fazer tudo isso por último, porque até lá ainda vou ficar virando a estrutura de um lado para o outro, e não quero estragar nem sujar esses detalhes, rsrs...
I still have to work on the inner part of the arches/doors (notice the spots where the mdf shows?), but I'll work on that part when I make the doors. I also still have to place the numbers, the store name, the ad on the side and some urns on top. But I'll do all that at the very end, as I still have a lot to do inside and I'll probably turn the whole building all around a lot, and I don't want to damage those elements...

sexta-feira, 2 de novembro de 2012

A construção - The Building (II)

A outra parede...
The other side wall now...

Para o outro lado da loja, eu queria um visual mais 'destruído'. Como se uma construção vizinha, que tivesse compartilhado a parede, tivesse sido demolida e ainda nada tivesse sido reconstruído no lugar. A virada do século foi um momento de muitas transformações na cidade, com muitas demolições e construções acontecendo o tempo todo. Como na foto abaixo...
For the other side of the building, I wanted a 'worn down' look. As if there had been a building there, which shared the wall, but that had been torn down and no other one has been built there, yet... The turn of the 19th to the 20th century was very feverish in terms of building, with many demolitions and new buildings happening all over the city (São Paulo is where my fictitious store is located). Just like in the picture below...


Esta técnica que usei poderia ser melhor realizada com DAS, um tipo de massa importada que tem a mesma aparência de tijolo. Mas como é difícil de encontrar, usei biscuit mesmo. Afinal, eu só queria alguns tijolos expostos. O restante seria coberto pelo 'reboco'. Poderia nem ter feito toda a parede de 'tijolos, só a parte aparente. Mas a impressão dos tijolos sob o reboco dá mais realismo, como aprendi com a Otterine/Brae.
I could have used DAS, a kind of paper clay, that already comes in a terracotta color. It makes wonderful bricks! But as it's hard to find here, I went with cold porcelain, much cheaper and easily found. After all, there would be only a few bricks exposed. The rest would be covered by the 'plaster'. Yes, I could have made just a few 'patches' here and there, but as I learned from Otterine/Brae, it looks more realistic if you do it all.

Primeiro passo: abrir a massa. Como eu não fazia questão de uniformidade, abri de qualquer jeito. Mas o certo é abrir entre guias de espessura, para ficar uniforme (se quiser um resultado mais caprichado...)
First step: open the 'dough'. As I didn't care for a uniform thickness, I opened without any guiding. But the correct way to do this to get an even result is by using "thickness rulers'...


o jeito 'certo' de abrir a massa...
the 'right' way of working the porcelain...
Passei cola na 'parede' e fui colando o biscuit. Passei a cola à medida em que abria, para não secar.
I spread glue on the 'wall' and placed the cold porcelain. I would spread glue as I had whole flat pieces to place, or it would dry too soon.


Agora foi a hora de marcar os tijolos. Usei um rolo marcador que se compra em lojas de artesanato. Mas o meu estava soltando - não verifiquei isso antes - e não daria tempo de colar e consertar, senão secaria o biscuit. Então tive dificuldade de controlar a pressão. Tudo bem no meu caso, pois a maior parte ficaria coberta. Verifique antes e faça testes!!! 
Now it was time to score the bricks. I used a scoring roll easily found here at crafts stores. But mine was kinda loose, and I neglected to check it before I started. Too late, I couldn't afford to glue and fix it now, so I went on anyway. It was really hard to control the pressure, and it will show later. No problem, only parts will be exposed, so I didn't worry. But remember: test all your tools before you start!!!


procure fazer as linhas coincidirem. 
Try to make the lines match.
biscuit natural parece branco quando ainda úmido.
natural cold porcelain looks white while still 'moist'.
mas ao secar fica quase transparente! Veja as marcas do rolo  causadas pela dificuldade em controlá-lo!
but it dries almost transparent! Now you can see the roll marks, caused by the wobbling!...
Era um dia bem quente e seco, e o biscuit estava secando rápido demais. Passei uma pincelada de água por cima para evitar isso. Quando fui passar o rolo, criou uma 'textura' extra, pois colava no marcador. Até que gostei, pois daria mais realismo ao aspecto "detonado" que eu queria... Aí foi só deixar secar.
That was a very hot and dry day, and so the cold porcelain tended to dry way too fast. To give me some more working time, I sprinkled some water on it. When I rolled the brick thing, it created an extra 'texture' I hadn't planned, as the water made the cold porcelain stick to the tool. I actually liked it, as it would make it even more like the adjacent wall had been 'torn down'. I let it dry overnight.

Depois de seco, foi a hora de pintar. Usei o mesmo preparado cor de 'cimento' qut tinha feito para o outro lado (guardei em um frasco bem fechado). Fiz uma tinta mais parecida com o tom base do EVA que usei do outro lado para pintar o tijolo. 
Once dry, it was time to paint the bricks. I used the same color I prepared for the 'mortar' on the other side wall (I had saved it). I also prepared some paint to 'match' the base EVA (foam sheet) color I used on the other side, to paint the 'bricks'.


Agora foi a vez de passar o 'reboco': usei gesso acrílico e misturei tinta até atingir o tom da de verde que usei na fachada. Espalhei uma camada bem grossa, com uma espátula, deixando 'brechas' onde queria que aparecesse o tijolo, como se um piso ou muro tivesse existido ali, ou simplesmente foi 'descascado' durante a demolição.
Next, time to 'plaster' the wall: I prepared a mix of 'acrylic plaster', used by painters, and mixed the same green paint I used on the facade. I spread a thick layer, with the help of a spatula, leaving the painted areas uncovered, so that the 'bricks' would show. I wanted it to look like some adjacent walls or ceilings had been there before or as if the plaster had been carelessly removed during the demolition.


Depois de seco, este acabamento rachou. Acho que foi a mistura de tintas, tinha algumas diferentes. Passei de novo, e alisei de novo. Aí foi a vez de dar um acabamento de "limo" formado pela umidade e chuva... Usei tanto uma tinta bem aguada marrom escura (quase preta) e, novamente, sombra para os olhos. 
I allowed a couple of hours to dry, but when I went there to check, I noticed it cracked all over. I guess the chemicals in the 'plaster' and the paint didn't agree well... I spread another layer, then smoothed it. After it dried, I sanded. Finally, I applied a very dark brown wash to simulate the 'damp patches' caused by rain, and also, again, some eye shadows.


E o resultado ficou assim:
And it looks like this:


detalhe / close-up

sábado, 27 de outubro de 2012

A construção - The Building (I)

Depois do agito que foi a visita da MJ e o suspense da sua viagem até a próxima anfitriã, finalmente posso voltar a postar sobre a loja. Se você curte construir seus próprios ambientes, poderá curtir estes posts. Senão, vai achar muito chato, rsrs... Vou procurar fornecer o máximo de informação possível, sem me extender demais. :)
After the adventures with MJ and the suspense of her trip to the next hostess, I can finally start posting about my 19th century store progress. If you enjoy building your own settings, you'll probably enjoy this series of posts. If not, I'm afraid you'll be bored to death... lol. I'll try to supply as much information as possible, without lingering too much. :)

Hoje vou falar sobre uma das laterais da estrutura. Como já havia dito antes, quero fazer com tijolos, e mais tarde colocarei um anúncio, como nessa foto aqui. Ok, nesta foto não tem tijolo aparente. Mas eu acho bonito e me faz lembrar de casas antigas, das construções do séc. 19 que vi na minha infância, na cidade do interior. As fachadas eram bem acabadas, mas as laterais, não muito, principalmente porque eram coladas umas nas outras. Como se raciocinassem "o vizinho que cuide da parede do lado dele..." E, enquanto o vizinho não vem, coloca-se anúncios! :)
Today I'm talking about the finishing I gave to one of the sides of the building. As I said before, I wanted it to be made of bricks. Later I'll place some ads on it, like on this picture below. Ok, in this picture the wall is not made of visible bricks. But I like that kind of finishing and it reminds me of some 19th century buildings I saw in the countryside town I lived in my childhood. The facades were well finished, but the sides, not so much. It was as if they thought "This side of the wall should concern my neighbor, as he's the one who'll use it!". The buildings usually shared the side walls... And while there is no building next door: let's make some money by placing some ads! :)


Para fazer os tijolos, resolvi usar um material sugerido por Regina Passy, e que funciona maravilhosamente bem: EVA! Comprei uma folha mais ou menos na cor de tijolo, fiz manchas aleatórias em vários tons de sombra. Isso mesmo, sombra! Sombra de maquiagem, para os olhos. Tinha várias aqui, já vencidas e que não uso mais, mas excelentes para este fim. Colei uma tira na guilhotina para manter a folha bem na distância certa para cortar mantendo as tiras iguais. Foi a melhor maneira que descobri para cortar tiras iguais. Com régua e estilete ou tesoura não consegui bem, mas assim mantive coerência.
To make the bricks, I decided to use a material suggested by Regina Passy, and it works beautifully: EVA! I found a sheet that had approximately a brick color, made some blobs of different shadows here and there. Yes, that's right: I used eye shadows! I had several different shades. No longer usable (expired) or used, but perfect for miniature shading... :) I glued a stop on the paper-cutter (or you could use a "duplicate-it"...) to make sure I would get the same width of strips every time  and cut a lot of them! It was the best way for me to get even strips. I had tried using scrapbook ruler and craft knife and also scissors, but I wasn't pleased with the result. This way, they all were almost exactly the same width.

Depois fiz um gabarito de papel paraná com um corte no lugar certo para manter os tijolos do mesmo comprimento (veja na foto). O segundo corte, que teoricamente me permitira cortar 4 tijolos por vez, logo se desfez por estar muito na beirada. Com a experiência, hoje faria um gabarito diferente, mas este funcionou! A mancha escura do papel paraná é que coloquei cola tipo 'superbonder' para tornar o papel mais duro e resistente para aguentar todos os cortes que fiz! Usei uma lâmina de um só gume para realizar os cortes.
Then I made a jig out of solid cardboard (the same kind they use to make shoe boxes), so as to make sure I'd cut all bricks the same length (see picture). The second slit, which was supposed to allow me to cut 4 bricks at a time, soon collapsed as it was too close to the edge. With the experience I had, now I'd probably make a different jig, but this one worked! The dark 'stain' on the cardboard is because I used super-glue to harden it and make it more resistant to last longer. I used a one-side shaving blade with the jig.


Mais de 1.200 'tijolos'. Deu trabalho e levou tempo!... :)
Over 1,200 'bricks'. That's a lot of work and time in this tray... :)
Aí comecei a colar as fileiras, usando a cola Aileen's tacky glue. Ela é boa porque segura no lugar mais rápido do que cola branca comum. Mas se quiser, pode usar cola de EVA mesmo. A distância entre os tijolos entre si em cada fileira fui determinando meio 'no olho'. Para a primeira fileira, usei um cartão triplex (veio dentro de uma embalagem qualquer que guardei). Na segunda, procurei colocar o espaço entre os tijolos da fileira no meio de cada tijolo da fileira de baixo. Daí por diante, foi no 'olhometro' mesmo, tentando mantê-los alinhados. Só usava o cartão para manter a mesma distância entre as fileiras, como na foto...
Nest I started gluing the bricks in place. I used Aileen's tacky glue. The ultimate Crafter's choice is also another good option. I eyeballed the distance between the bricks within a row. For the first row, I used a thin cardboard I had saved, which came with some packaging (cosmetics, perfume, candies, I don't remember...) to space the bricks evenly. For the second row, I just tried to keep the spaces in the middle area of each brick from the first row. For all the other ones, I just eyeballed them, trying to keep them all aligned. I only used the cardboard to keep an even space between the rows, as you can see in the picture...


O progresso foi MUITO lento, pois só conseguia fazer duas fileiras por vez. Mais do que isso, desalinhava tudo! Tinha que esperar a cola secar bem, pelo menos 15 minutos. Aí eu ia fazer outra coisa e acabava voltando só uma hora depois... rsrs...
The progress was VERY slow, it took me several days to finish this wall. I could only make two rows at a time. If I tried more, all the bricks would slide and mess up the alignment. So, I had to wait at least 15 minutes for the glue to dry and hold them in place. So, I'd go do something else, and ended up coming back only one hour (or more) later... :)


Hoje eu teria pintado a base na cor que gostaria que fosse o 'cimento', pois queria deixar os tijolos mais 'em relevo'. Mas não pensei nisso, e a parede estava verde... Então, tinha que colocar o 'cimento' entre os tijolos. Lá fui eu fazer o 'cimento': um pouco de gesso acrílico, para dar 'consistência', tintas na cor branca, ocre, caramelo e preto. 
With the experience I have now, I'd probably have painted the wall with the color I wanted the mortar to be, as, at first, I was planning to leave the 'bricks' just like that, as if they were 'outstanding', lol. But as I didn't think of it before I started, the wall was green... So, I had to place some 'mortar' between the 'bricks'. I made some 'cement': some acrylic plaster (for thickness), and paint in the following colors: white, ocre, caramel and black. 


Tentei primeiro aplicar com uma seringa e uma ponta que ganhei de um dentista. Mas é muito difícil manter um fluxo constante, ficou feio. Tentei espalhar com um alfinete fino, mas não resolveu, continuou desigual e feio. 
At first, I tried to insert the 'mortar' with a syringe and a tip I got from a dentist. But it's hard to keep a constant flow of the 'mortar' and it didn't look good. I tried to spread using a pin, but that didn't work either, it continued to look uneven and ugly.


Não teve jeito, tive que usar rejunte! O problema é que para usar rejunte, tem que impermeabilizar bem o EVA, senão ele, sendo poroso, absorve boa parte do rejunte e fica todo esbranquiçado. E eu queria evitar isso, queria manter a textura natural dele. Mas não teve jeito: já tinha passado uma camada de verniz incolor spray para que a 'sombra' não saísse. Passei duas camadas de verniz fosco com um rolo de espuma. Depois de bem seco, espalhei o rejunte com uma espátula. Retirei o excesso com um pano úmido, sem esfregar demais para não retirar entre os 'tijolos', e passando várias vezes o pano úmido e limpo até retirar todo o excesso. 
As I couldn't think of any other option, I had to go for grout. The problem is that in order to be able to use it with EVA, the 'bricks' had to be waterproofed. It's a porous material and it absorbs part of the grout, becoming 'whitish' (and ugly!). I have been trying to avoid varnishing it. I did spray some varnish on it, but the artistic kind to prevent the powder 'eye shadow' I used to make the different shades from getting off the EVA. Well, no other option left, I applied two coats of matte varnish with a foam paint roller. After dry, I spread the grout with a spatula and removed the excess, gently (so as not to remove from the spaces between the bricks too), using a moist rag. I repeated several times, cleaning the rag in between, until all excess was removed. 


 Mais uma camada de verniz, para proteger o rejunte desta vez, e pronto! Na foto sem flash o verniz não aparece, mas na com o flash sim. Que pena... Ficou bonito, acho eu, mas não consegui deixar a textura original do EVA. Teria que fazer de outro jeito para conseguir deixar sem passar o verniz (com o rodinho, o spray tem que passar para não sair o pó da sombra, e ele não aparece).
After the grout had dried, I applied yet another coat of matte varnish, to protect the grout itself, and voilá! In the picture take without the flash, the varnish won't show, but it becomes clear in the picture taken with the flash. Too bad... It still looks good, I suppose, but I wasn't able to leave the original texture of the EVA, as I had intended. I would have to come up with another technique where I wouldn't have to varnish it... 

sem flash - no flash.


com flash - with flash


até que ficou legal, não? It looks good, doesn't it?

Related

Related Posts Plugin Blogger...